How to install WindrosePlus
CreeperPanel
Creating a new WindrosePlus Instance
To create a fresh WindrosePlus instance, log in to the CreeperPanel. Then:
- Select
Add More +from the CreeperPanel's sidebar. - Select
Install something new...in the pop-up window. - Click
Next.

- Enter
Windrosein the search box. The results will autopopulate as you type. - Select
Windrosefrom the list of available titles. - Click
Install.

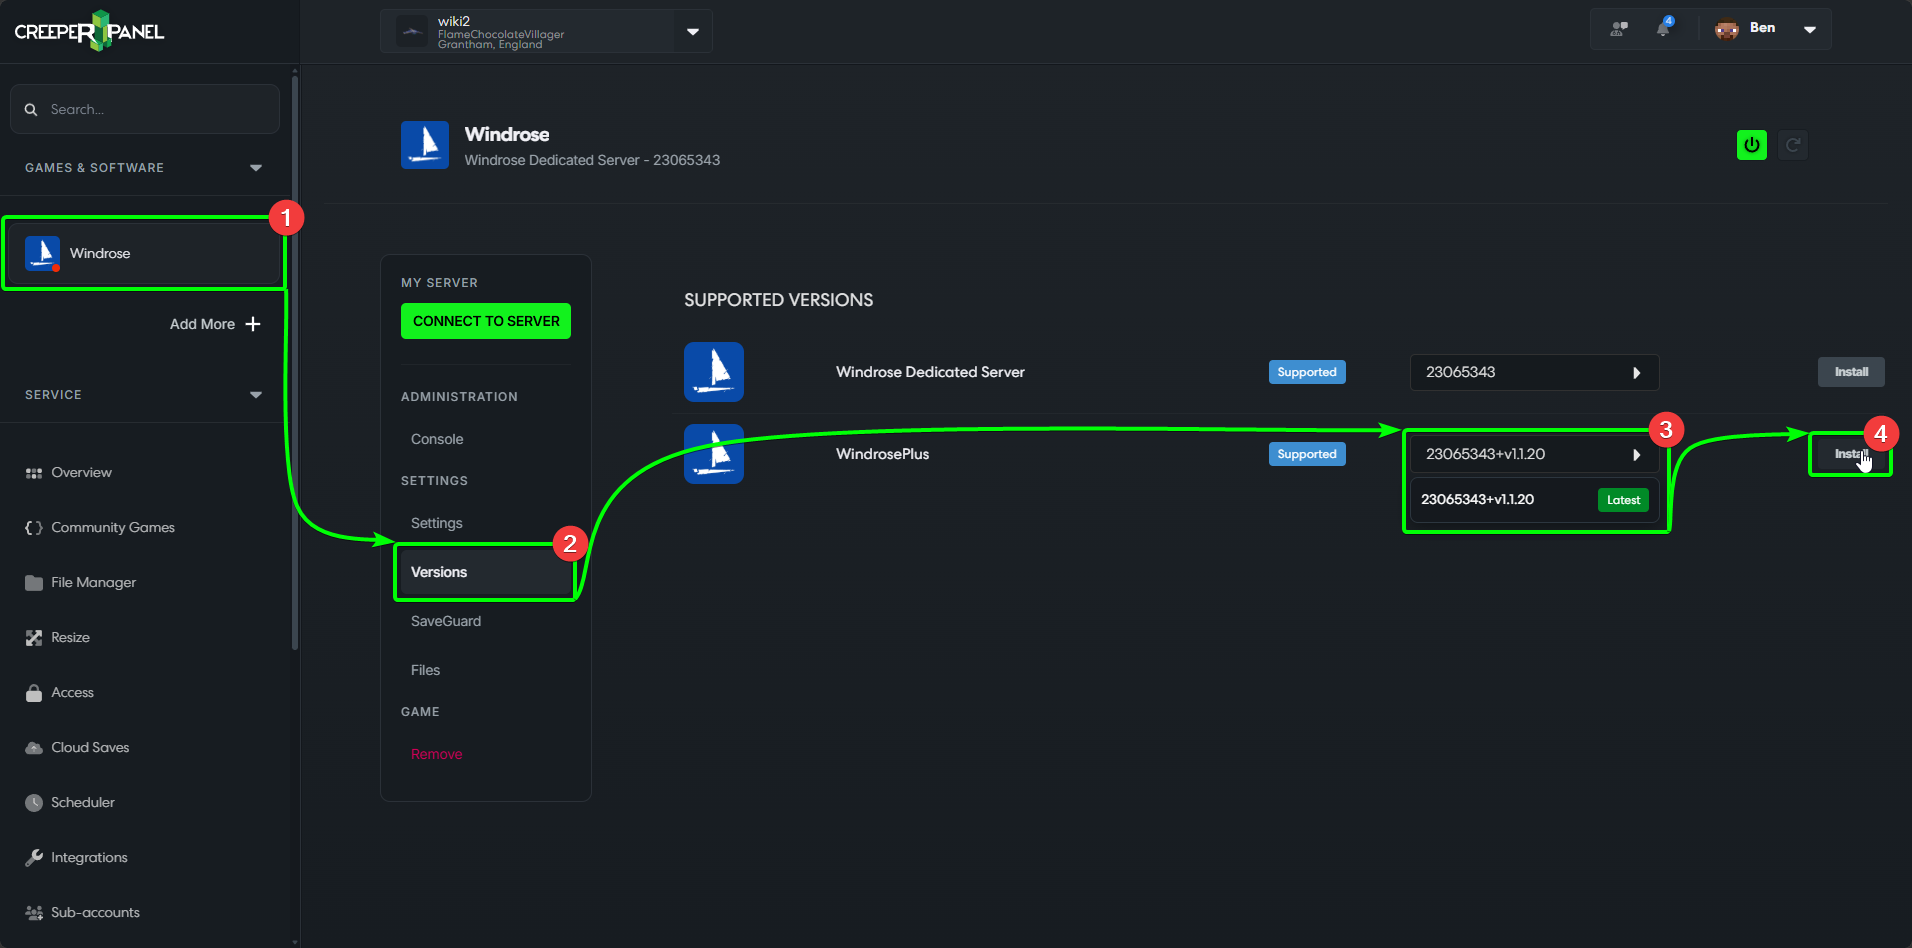
- On the
Supported Versionspage, select the dropdown list adjacent toWindrosePlus. Pick the version you wish to install. - Click
Install.
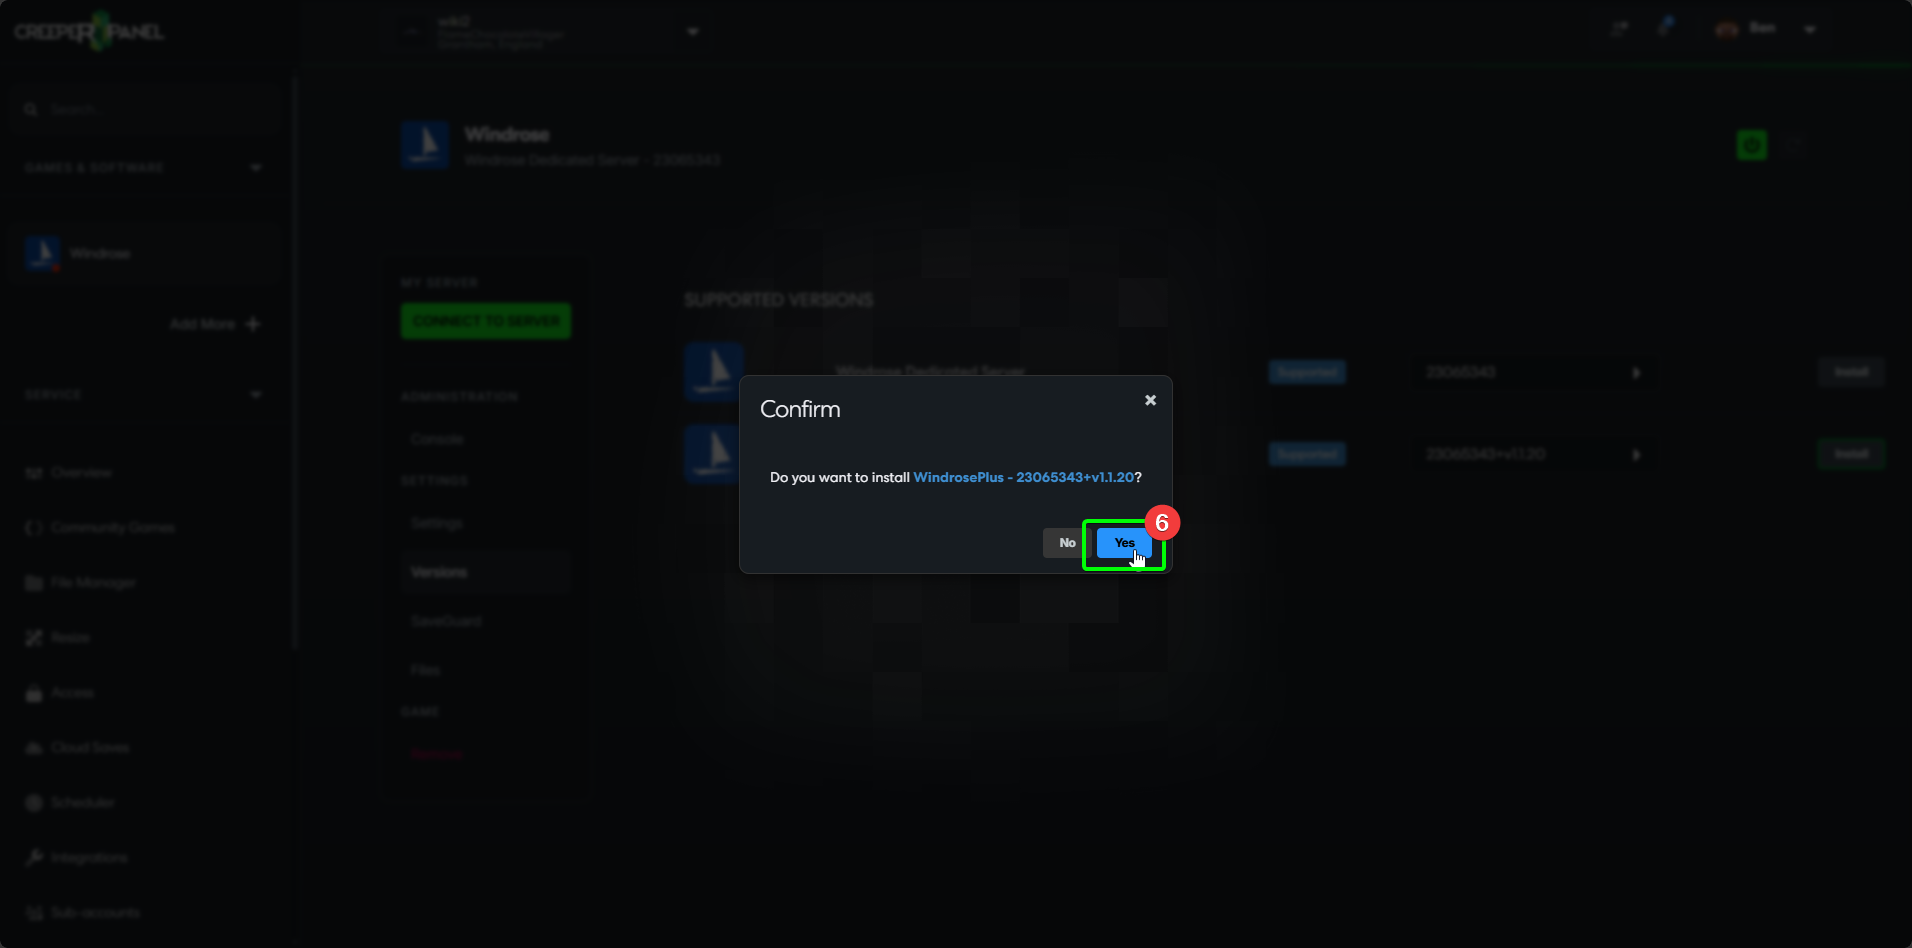
- In the popup, select
Yes.

That's it! The Panel will inform you of the progress, and will display the main page when the installation is complete. You can explore the CreeperPanel whilst you wait for the installation to complete.
Adding Windrose Plus to an Existing Instance
If you already have a Windrose installation, you can add WindrosePlus in an instant with the CreeperPanel. To get started, log in to the Panel. Next:
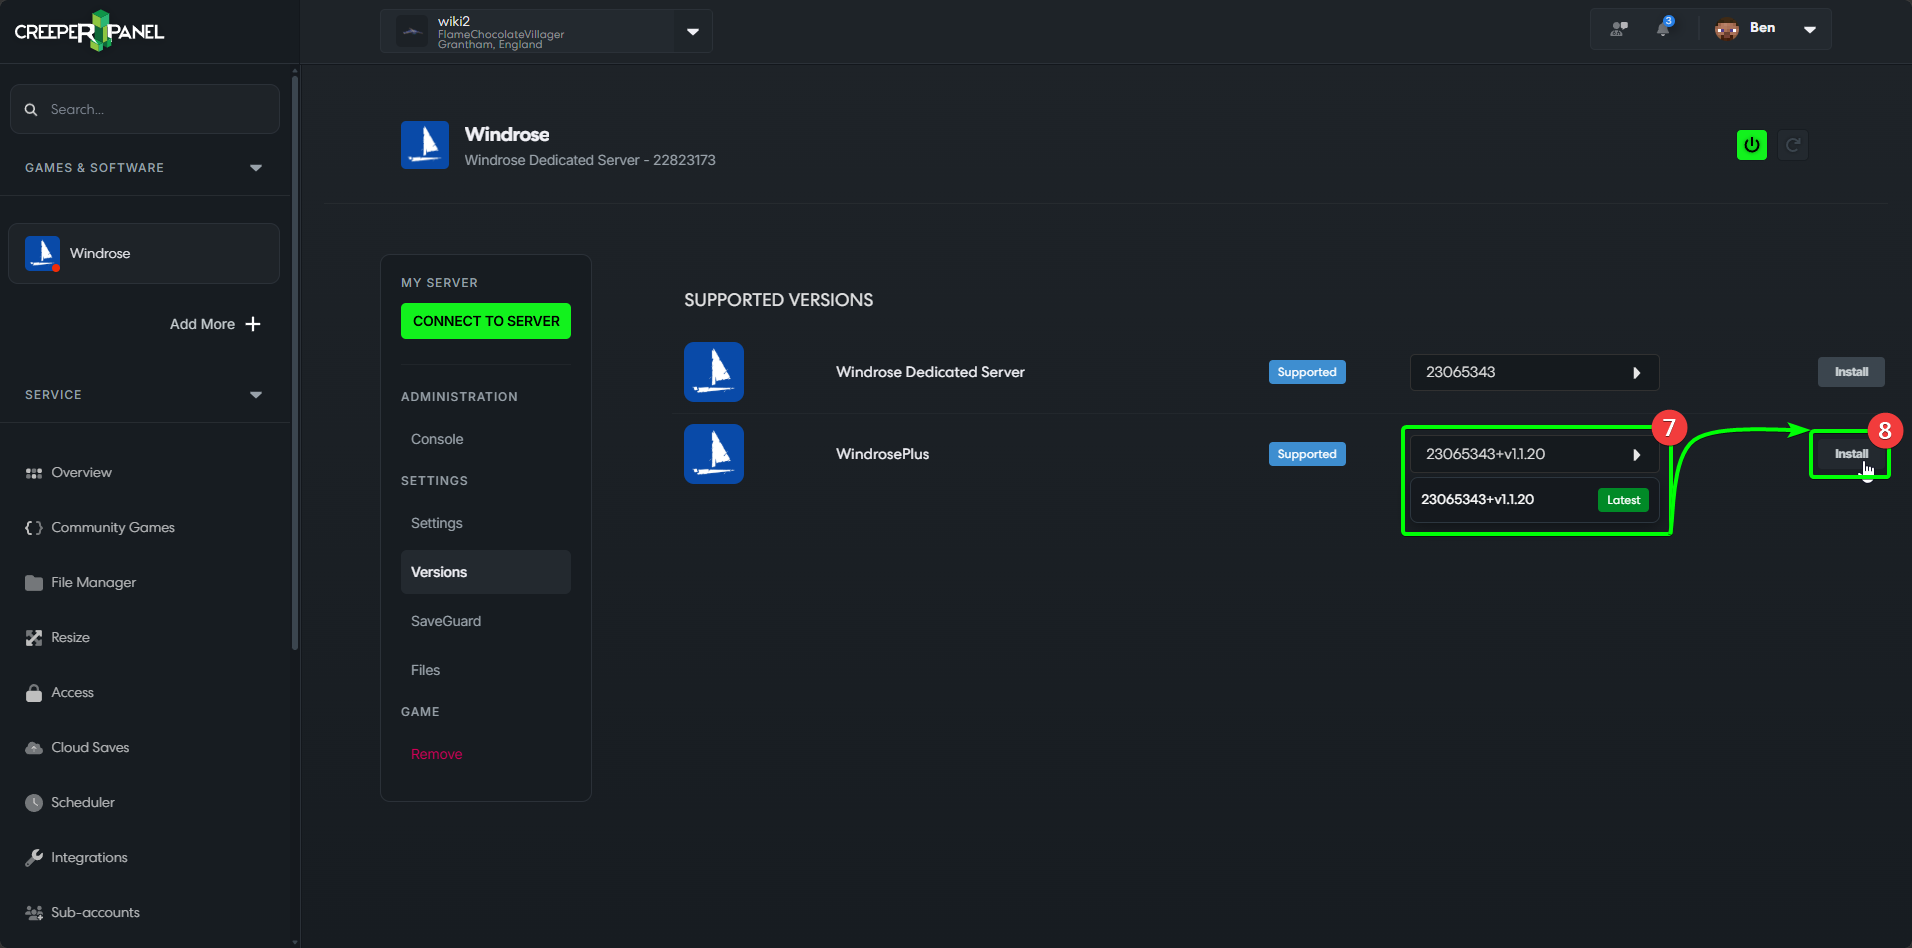
- Select your
Windroseinstance from theGames & Softwaretab. - Select
Versions, found underSettingsin the instance's submenu. - On the
Supported Versionspage, select the dropdown list adjacent toWindrosePlus. Pick the version you wish to install. - Click
Install.
- In the popup, select
Yes.
That's it! The Panel will inform you of the progress, and will display the main page when the installation is complete. You can explore the CreeperPanel whilst you wait for the installation to complete.
Manual
Make sure you have an unmodded version of the Dedicated server files for Windrose installed
Windows
- Download a copy of WindrosePlus from their github https://github.com/humangenome/WindrosePlus/releases
- Extract the downloaded zip into your server directory. Make sure the directory you are extracting into contains the
WindroseServer.exe - Run the
install.ps1script, This download UE4SS and sets everything else up for you. That's it, WindrosePlus is now installed and ready to use
Linux
You will need to already have a working version of the game running under WINE for this to work
- Download a copy of WindrosePlus from their GitHub https://github.com/humangenome/WindrosePlus/releases
- Extract the downloaded zip into your server directory. Make sure the directory you are extracting into contains the
WindroseServer.exe - Unfortunately you can not run PowerShell scripts on linux so it will need to be converted to bash, Here is one I did earlier
Install Script
This version of the script was created for WindrosePlus version 1.1.20 and might be out of date
    UE4SS_ZIP_URL="https://github.com/UE4SS-RE/RE-UE4SS/releases/download/experimental-latest/UE4SS_v3.0.1-946-g265115c0.zip"

    # Setup Game Directory
    GAME_DIR="${1:-$(pwd)}"
    GAME_DIR=$(realpath "$GAME_DIR")

    R5_DIR="$GAME_DIR/R5"

    WIN64_DIR="$GAME_DIR/R5/Binaries/Win64"
    UE4SS_DIR="$WIN64_DIR/ue4ss"
    MODS_DIR="$UE4SS_DIR/Mods"

    PROXY_DLL="$WIN64_DIR/dwmapi.dll"
    UE4SS_DLL="$UE4SS_DIR/UE4SS.dll"

    if [ ! -f "$PROXY_DLL" ] || [ ! -f "$UE4SS_DLL" ]; then
    TEMP_DIR=$(mktemp -d)
    UE4SS_ZIP="$TEMP_DIR/ue4ss_download.zip"
    UE4SS_EXTRACT="$TEMP_DIR/ue4ss_extract"

    if ! curl -L "$UE4SS_ZIP_URL" -o "$UE4SS_ZIP"; then
    echo "    ERROR: Download failed."
    exit 1
    fi

    if ! file "$UE4SS_ZIP" | grep -q "Zip archive"; then
    exit 1
    fi

    mkdir -p "$UE4SS_EXTRACT"
    unzip -q "$UE4SS_ZIP" -d "$UE4SS_EXTRACT"

    EXTRACTED_PROXY="$UE4SS_EXTRACT/dwmapi.dll"

    if [ -f "$EXTRACTED_PROXY" ]; then
    cp "$EXTRACTED_PROXY" "$WIN64_DIR/"
    else
    exit 1
    fi
    EXTRACTED_UE4SS="$UE4SS_EXTRACT/ue4ss"
    if [ -d "$EXTRACTED_UE4SS" ]; then
    mkdir -p "$UE4SS_DIR"
    cp -r "$EXTRACTED_UE4SS"/* "$UE4SS_DIR/"
    fi
    mkdir -p "$MODS_DIR"
    rm -rf "$TEMP_DIR"
    fi
    SETTINGS_SOURCE="$GAME_DIR/UE4SS-settings.ini"
    if [ -f "$SETTINGS_SOURCE" ]; then
    cp "$SETTINGS_SOURCE" "$UE4SS_DIR/UE4SS-settings.ini"
    fi

    MOD_SOURCE="$GAME_DIR/WindrosePlus"
    MOD_DEST="$MODS_DIR/WindrosePlus"
    DATA_DIR="$GAME_DIR/windrose_plus_data"
    LOGS_DIR="$DATA_DIR/logs"

    mkdir -p "$MODS_DIR"
    mkdir -p "$DATA_DIR"
    mkdir -p "$LOGS_DIR"

    # Cleanup legacy files
    rm -rf "$MODS_DIR/IdleCpuLimiter"
    rm -f "$DATA_DIR/idle_cpu_limiter_disabled" "$DATA_DIR/idle_cpu_limiter_enabled" "$DATA_DIR/idle_cpu_limiter_cpu_rate.txt" "$DATA_DIR/idle_cpu_limiter_cpu_rate_override.txt" "$DATA_DIR/idle_cpu_limiter_status.txt"

    if [ -d "$MOD_SOURCE" ]; then
    if [ ! -d "$MOD_DEST" ]; then
    cp -r "$MOD_SOURCE" "$MOD_DEST"
    else
    rm -rf "$MOD_DEST/Scripts"
    cp -r "$MOD_SOURCE/Scripts" "$MOD_DEST/"
    cp -r "$MOD_SOURCE"/* "$MOD_DEST/" 2>/dev/null || true
    fi

    if [ -f "$GAME_DIR/cpp-mods/HeightmapExporter/HeightmapExporter.dll" ]; then
    CPP_DEST="$MODS_DIR/HeightmapExporter/dlls"
    mkdir -p "$CPP_DEST"
    cp "$GAME_DIR/cpp-mods/HeightmapExporter/HeightmapExporter.dll" "$CPP_DEST/main.dll"
    echo "1" > "$MODS_DIR/HeightmapExporter/enabled.txt"
    fi
    else
    exit 1
    fi

    MODS_TXT="$MODS_DIR/mods.txt"
    if [ -f "$MODS_TXT" ]; then
    sed -i '/IdleCpuLimiter/d' "$MODS_TXT"
    if ! grep -q "WindrosePlus" "$MODS_TXT"; then
    echo "WindrosePlus : 1" >> "$MODS_TXT"
    fi
    if [ -f "$MODS_DIR/HeightmapExporter/dlls/main.dll" ]; then
    if ! grep -q "HeightmapExporter" "$MODS_TXT"; then
    echo "HeightmapExporter : 1" >> "$MODS_TXT"
    fi
    fi
    else
    echo "WindrosePlus : 1" > "$MODS_TXT"
    fi

    WP_DIR="$GAME_DIR/windrose_plus"
    mkdir -p "$WP_DIR"

    for folder in "server" "tools" "docs"; do
    if [ -d "$GAME_DIR/$folder" ]; then
    rm -rf "$WP_DIR/$folder"
    cp -r "$GAME_DIR/$folder" "$WP_DIR/"
    fi
    done

    CONFIG_SRC="$GAME_DIR/config"
    CONFIG_DST="$WP_DIR/config"
    if [ -d "$CONFIG_SRC" ]; then
    mkdir -p "$CONFIG_DST"
    cp "$CONFIG_SRC"/*.default.ini "$CONFIG_DST/" 2>/dev/null || true
    fi
- Create a new file called
install.shand paste the above into the file - Make the file executable
chmod +x install.sh
- Run the script. This downloads UE4SS and sets everything else up for you.
./install.sh
That's it! WindrosePlus is now installed and ready to use.