Note - You can run multiple instances at the same time, provided you have enough RAM to run them and disk space to install them. Minecraft does not share ports, each additional instance will require a new 'server port' in the "Settings" menu and can be connected to via your HOSTNAMEorIP:customportnumberhere - Eg: myserver.playat.ch:29974
# Validating modpack install If you are having issues with your server such as it not starting or certain recipes not working, the modpack files may have become corrupted and/or some critical files may be missing, this guide will cover how to validate the modpack files. 1. Go to the console page of the server you are having issues with and if the server is currently running, click the stop button and wait for it to shut down. 2. In the top right of the console page, where the control buttons are, you will see an orange/yellow button with a wrench icon. [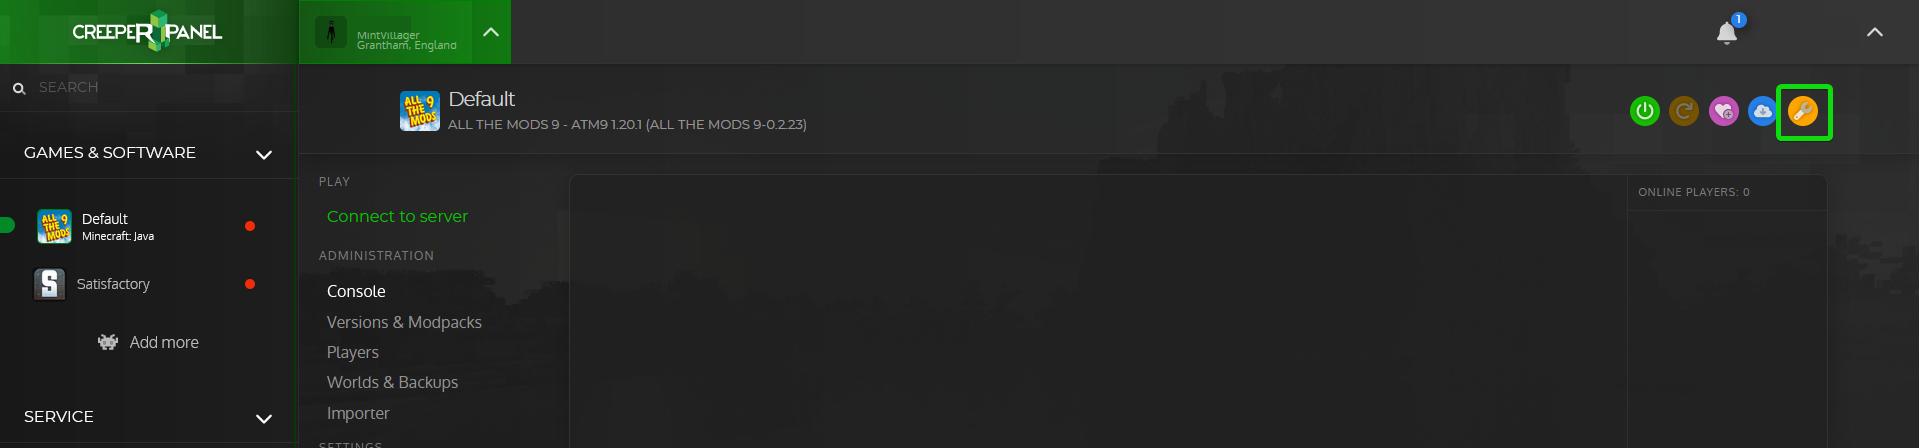](https://www.creeperhost.net/wiki/uploads/images/gallery/2023-12/cfEvPOciPNsYEcIi-firefox-2023-12-02-01-04-09.png) 3. If you click on this button it will start validating the files for the modpack that's installed, if it finds any corrupted configs, it will replace them with the default config for that modpack and rename the broken one to config\_name.format.bkp # Opping a Player There are multiple methods you can use to OP a player when using our panel, those methods have been listed below. You will first need to go to the Console page of your instance, if you are not sure how to get to your instance, take a look at the How do I find my Instance guide here: [https://www.creeperhost.net/wiki/books/minecraft-java-edition/page/finding-your-instances](https://www.creeperhost.net/wiki/books/minecraft-java-edition/page/finding-your-instances) ##### Method 1 - Using the Online Players list If the player is currently playing on the server they should appear in the online player list on the right of the console page. If you do not see the player in the online player list please go to method 2 [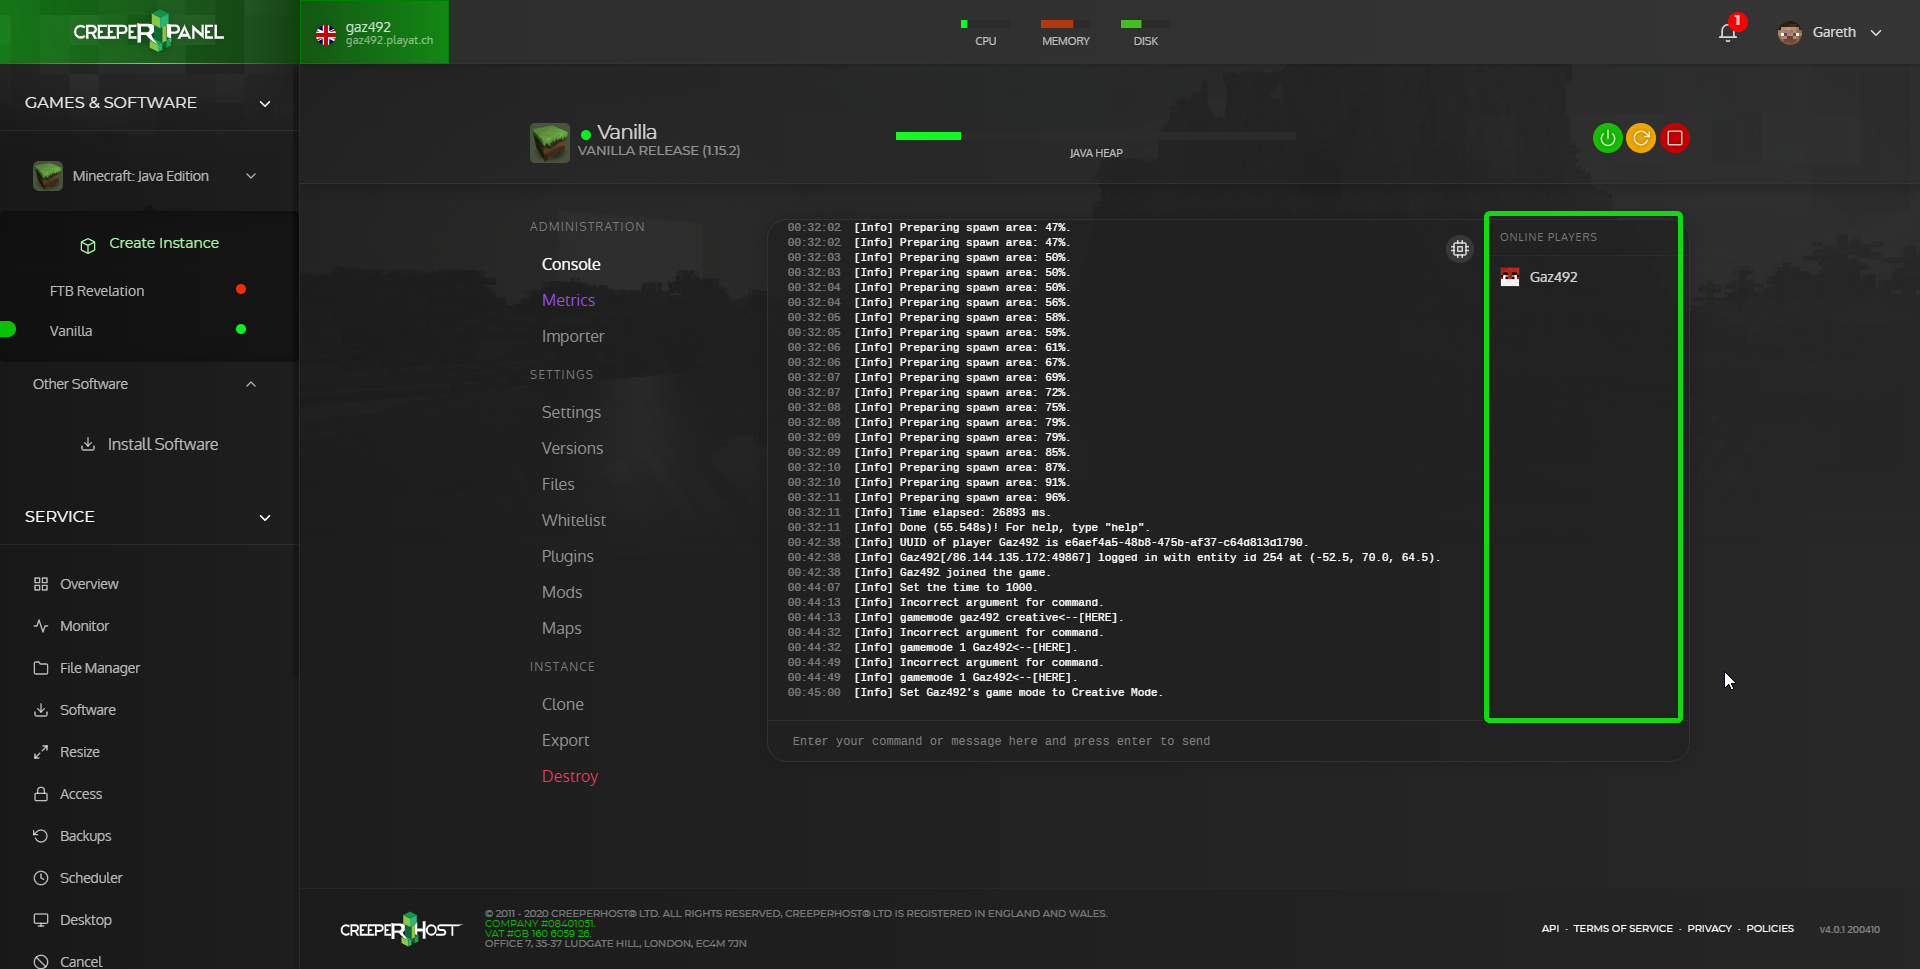](https://www.creeperhost.net/wiki/uploads/images/gallery/2020-04/EZ2Cfbisg6Ywy01Z-msedge_2020-04-16_00-47-17.png) If you see the player you want to OP right-click on them to bring up the player management menu and click on OP. You should now get a notification at the bottom of the screen saying that the player is now an OP. [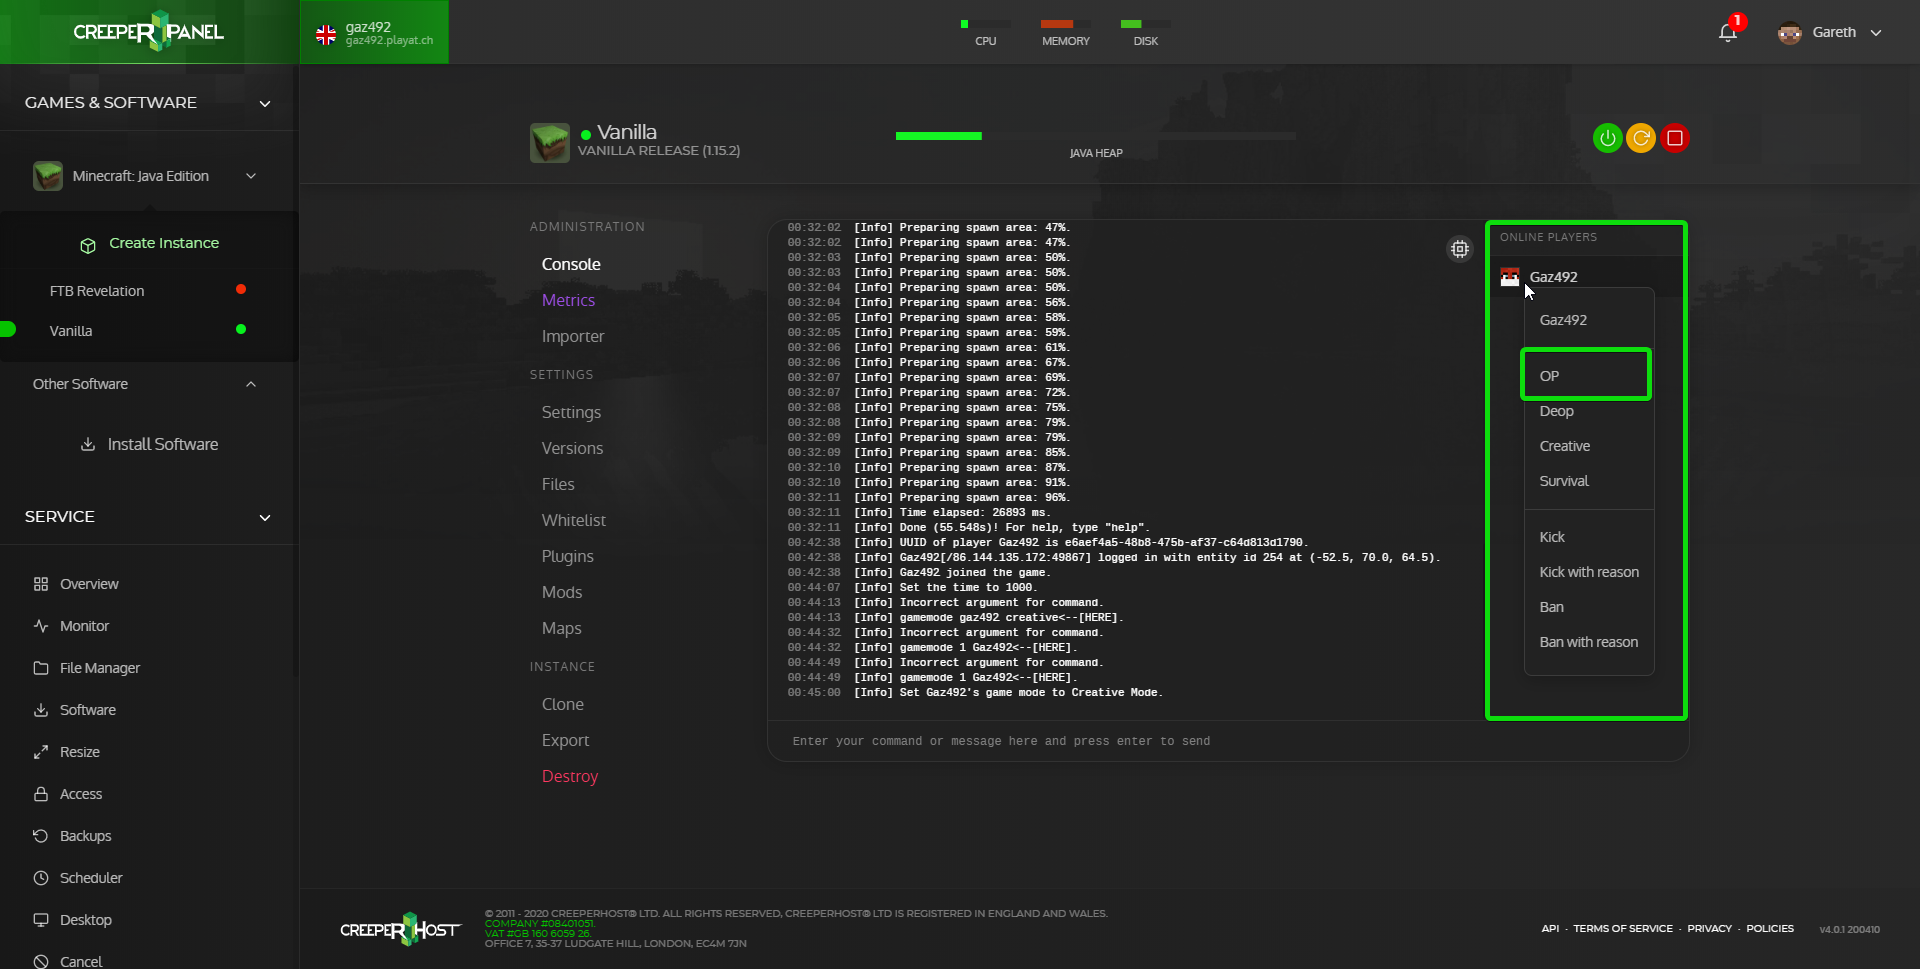](https://www.creeperhost.net/wiki/uploads/images/gallery/2020-04/7tlYIKWIcqqjOrUD-msedge_2020-04-16_00-49-06.png) ##### Method 2 - Using console commands Click in the textbox below the console output where it says `Enter your command or message here and press enter to send` and type `/op playerName` then press the enter key on your keyboard. You will then get a message in the console output saying `Made playerName a server operator` [](https://www.creeperhost.net/wiki/uploads/images/gallery/2020-04/XHw7gKBEobRsfVif-msedge_2020-04-16_00-55-17.png) ##### Method 3 - Using the player's menuYou will need to reboot your server after using this method
Once on the console page for your instance you will then have a Instance navigation menu to the left of the console window in here you will see a `Players` option, if you click this it will take you to a new page where you can add players to the whitelist or as operators (OPs). [](https://www.creeperhost.net/wiki/uploads/images/gallery/2020-06/QSZWE2DgY9aBtf3J-firefox_2020-06-15_20-17-08.png) Now that we are on the Players page click on the `Operators` tab. [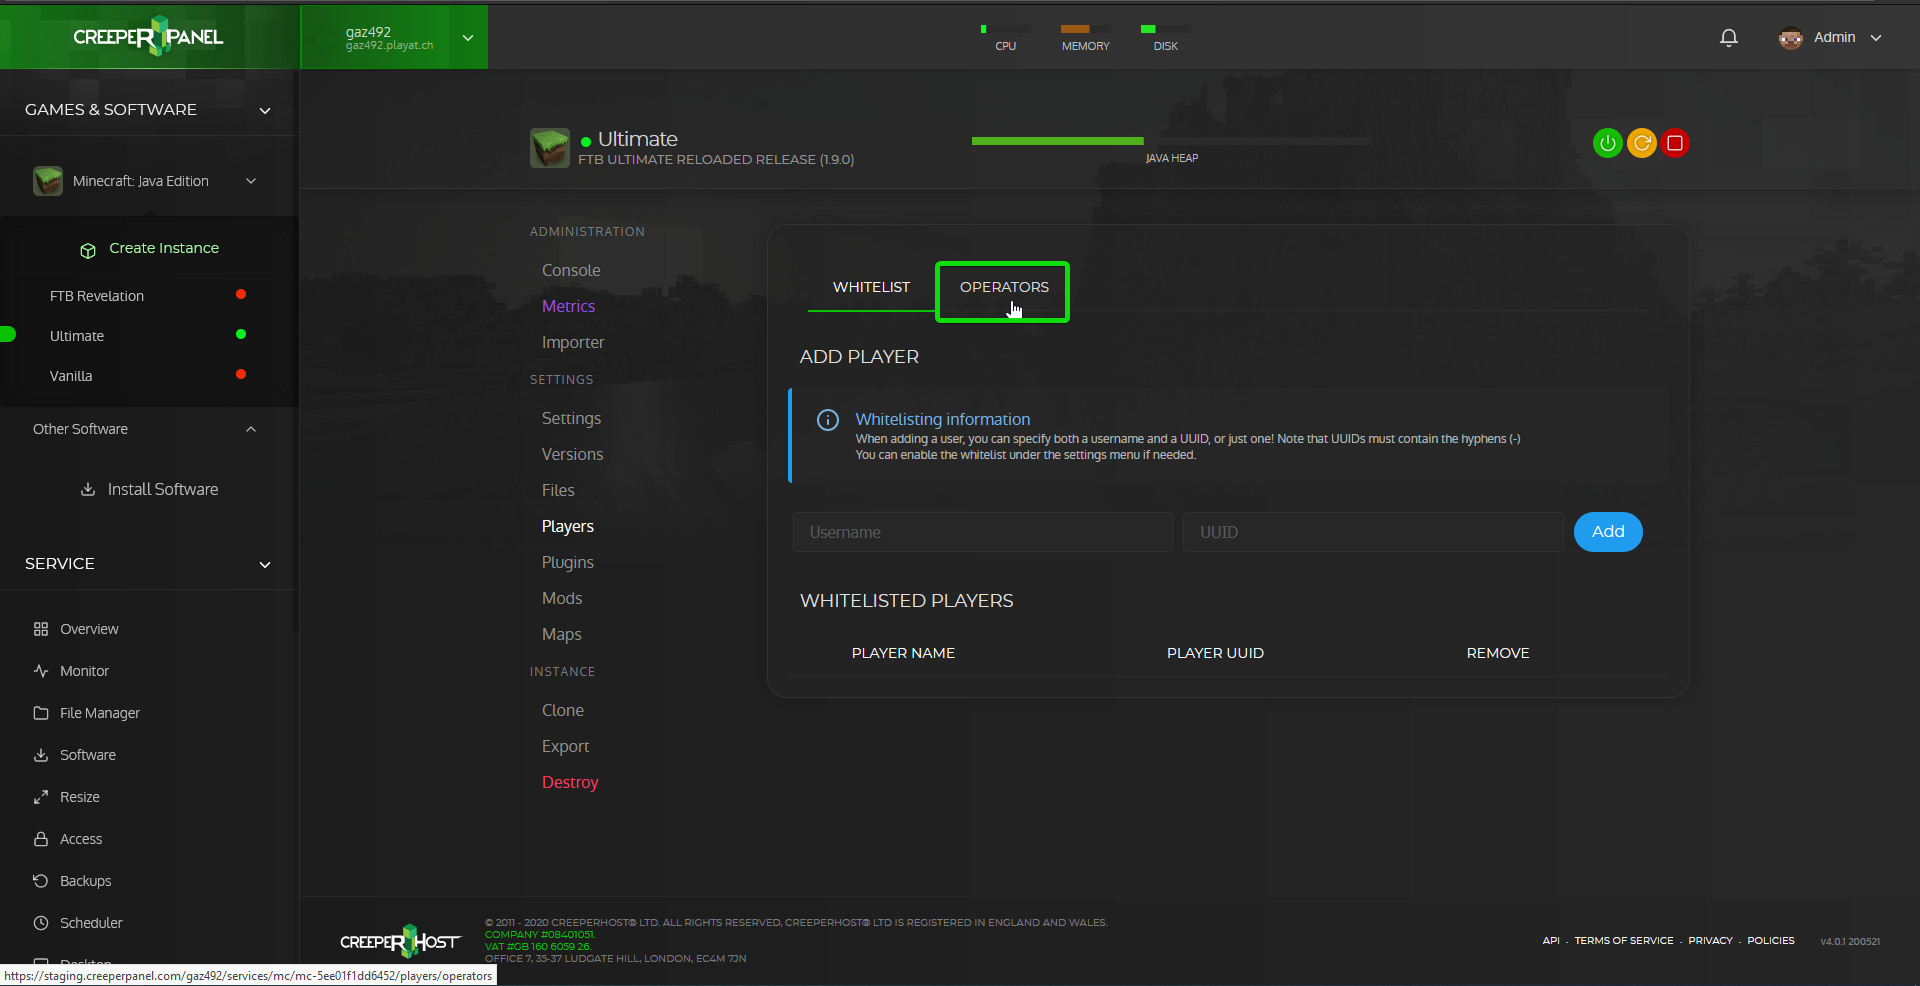](https://www.creeperhost.net/wiki/uploads/images/gallery/2020-06/23DiBTazcVBDP5FI-2020-06-15_20-19-14.png) From here we can now enter either the user name of the player we want to add as an OP or use the UUID, we can also select the OP level for the user. You can read more about OP levels here [https://www.creeperhost.net/wiki/books/minecraft-java-edition/page/operator-levels](https://www.creeperhost.net/wiki/books/minecraft-java-edition/page/operator-levels) Once you have entered the username or the UUID of the player and selected their OP level click the add button [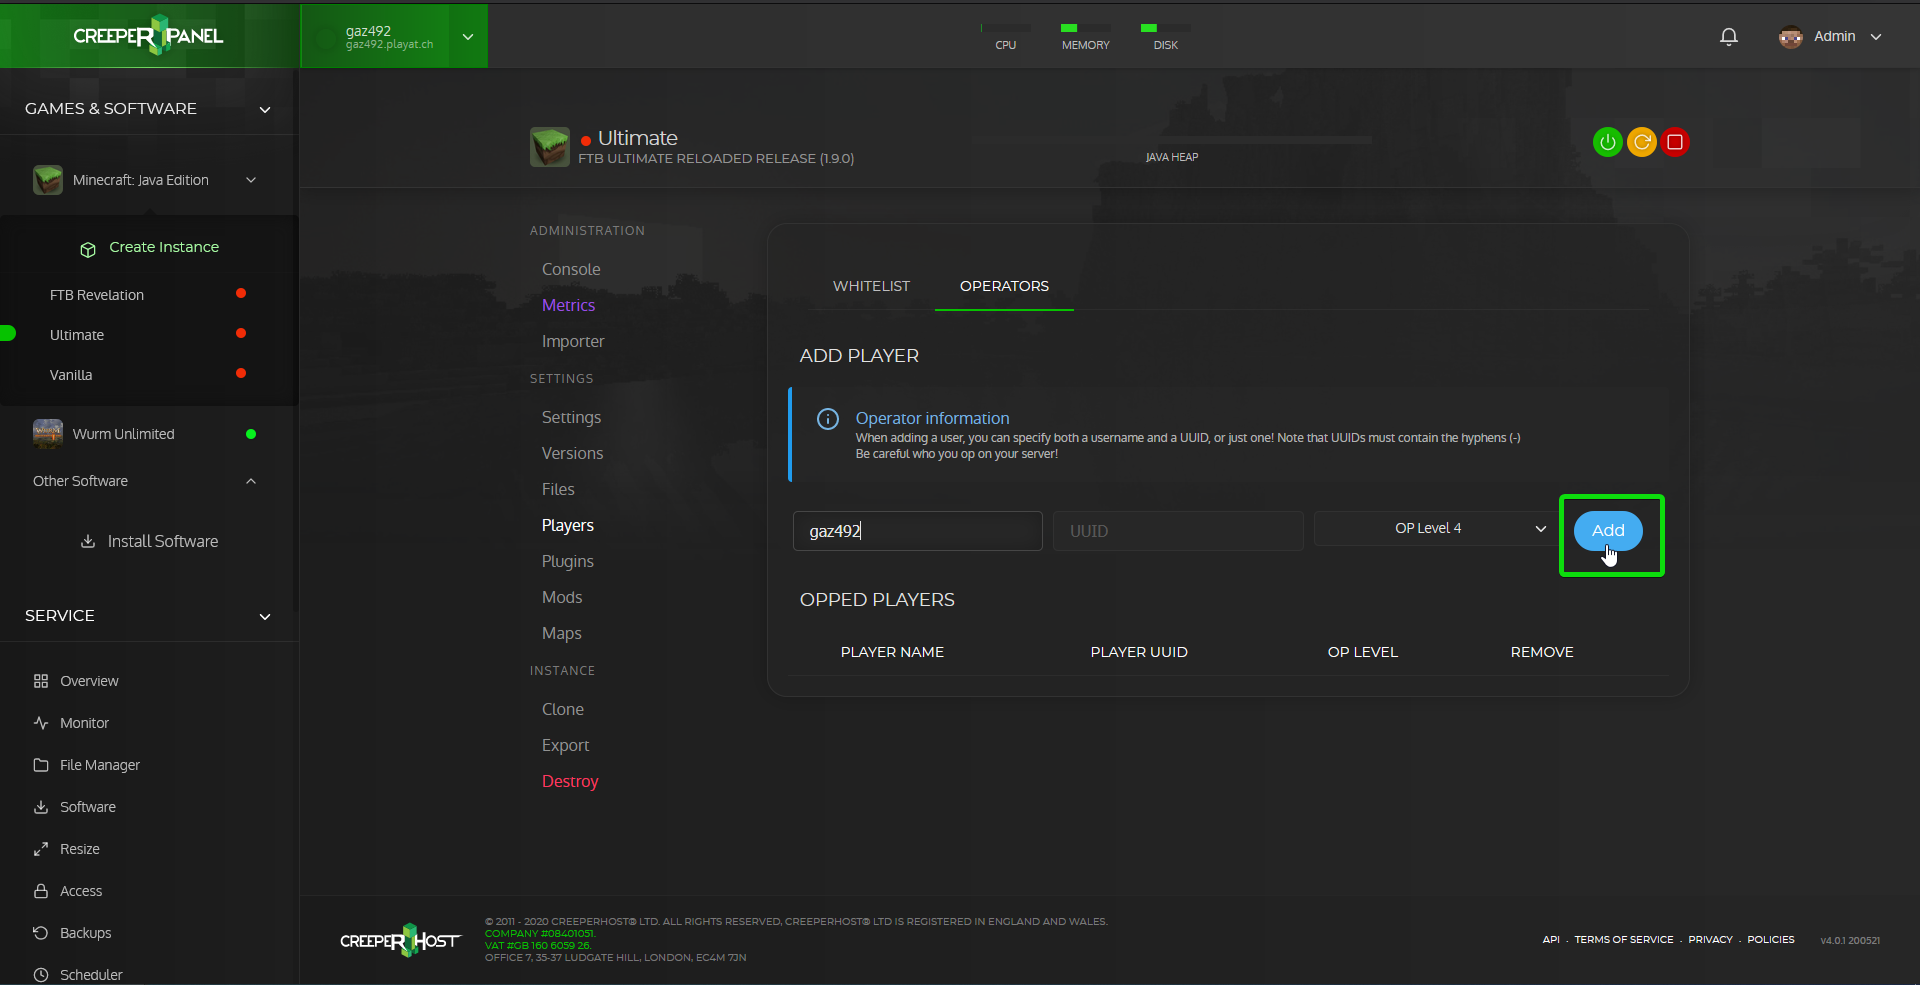](https://www.creeperhost.net/wiki/uploads/images/gallery/2020-06/0MuVbBayrddAE9W2-2020-06-15_20-56-36.png) The page will now refresh and add the player to the OPs list. You may need to tell the player that you OPped to reconnect to the server for the changes to take effect. [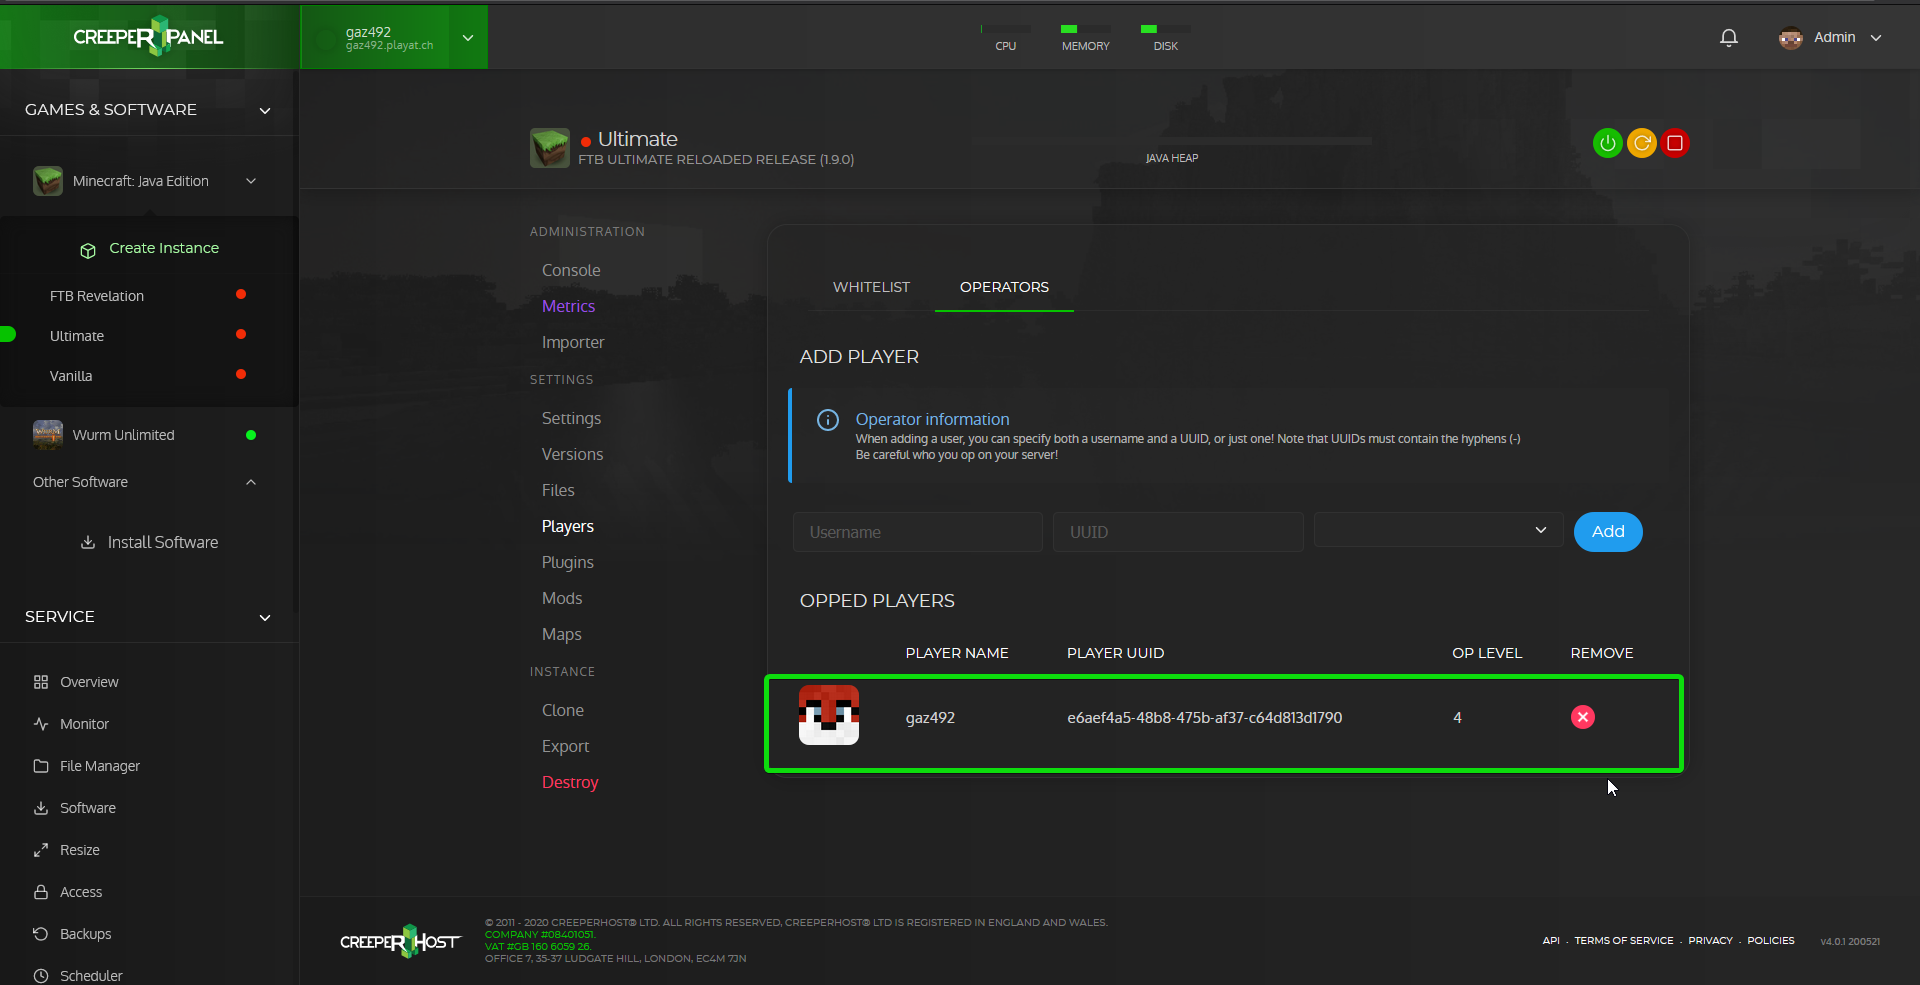](https://www.creeperhost.net/wiki/uploads/images/gallery/2020-06/IQEhwBWmhrQDLaWe-firefox_2020-06-15_20-59-41.png) # Sending Console Commands To send console commands fist click on your instance and make sure you are on the Console page. Once you are on the `Console` page you will see a large box in the centre of the screen that may have a lot of text in it. Below the large box there will be textbox with the words `Enter your command or message here and press enter to send`, if you click on this text box you will be able to type commands such as `/op playerName` and to send the command all you need to do is press then enter key on your keyboard. [](https://www.creeperhost.net/wiki/uploads/images/gallery/2020-04/XHw7gKBEobRsfVif-msedge_2020-04-16_00-55-17.png) # Starting/Restarting/Stopping your serverTo start/restart/stop your server first click on your minecraft server in the sidebar. This will take you to the Console page of the instance you selected. You can find a guide on finding your instance here [https://www.creeperhost.net/wiki/books/minecraft-java-edition/page/finding-your-instances](https://www.creeperhost.net/wiki/books/minecraft-java-edition/page/finding-your-instances)
In the top right of the Console page there are 3 buttons in green, orange and red. The green button will start the instance if it is stopped, the orange is to restart the instance, and the red will stop the instance. [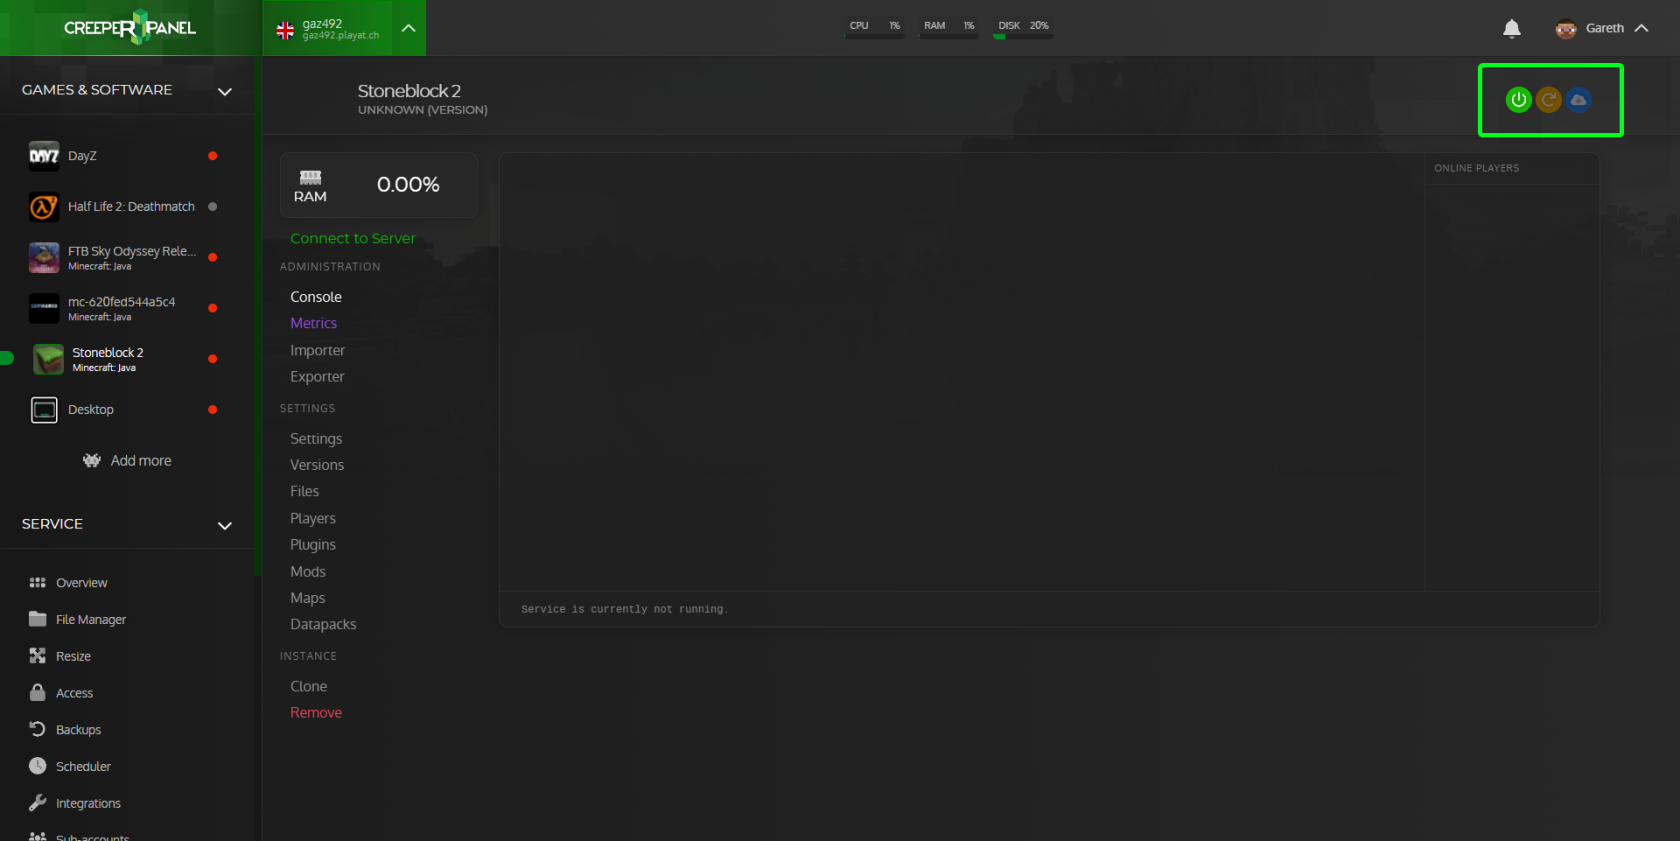](https://www.creeperhost.net/wiki/uploads/images/gallery/2022-04/31ZFhhVv8UCFPKdl-msedge-2022-04-27-18-28-52.png) If the instance is unable to start for some reason, you will get a notification at the bottom of the screen with a message saying it was unable to start the server. # Importing a modpack from CurseForge Before you follow this guide you will need to have already downloaded the modpack.zip of the modpack you want to import from CurseForge or if its a custom pack using the Twitch app you will need to export the modpack. Twitch has a guide on exporting modpacks here [https://support.curseforge.com/en/support/solutions/articles/9000197912-exporting-and-importing-modpacks](https://support.curseforge.com/en/support/solutions/articles/9000197912-exporting-and-importing-modpacks) Click on the instance you want to import the modpack to (**[https://www.creeperhost.net/wiki/books/minecraft-java-edition/page/finding-your-instances](https://www.creeperhost.net/wiki/books/minecraft-java-edition/page/finding-your-instances)**) then make sure that the server is stopped by pressing the red stop button in the top right. Next click on the `Importer` link in the instance navigation [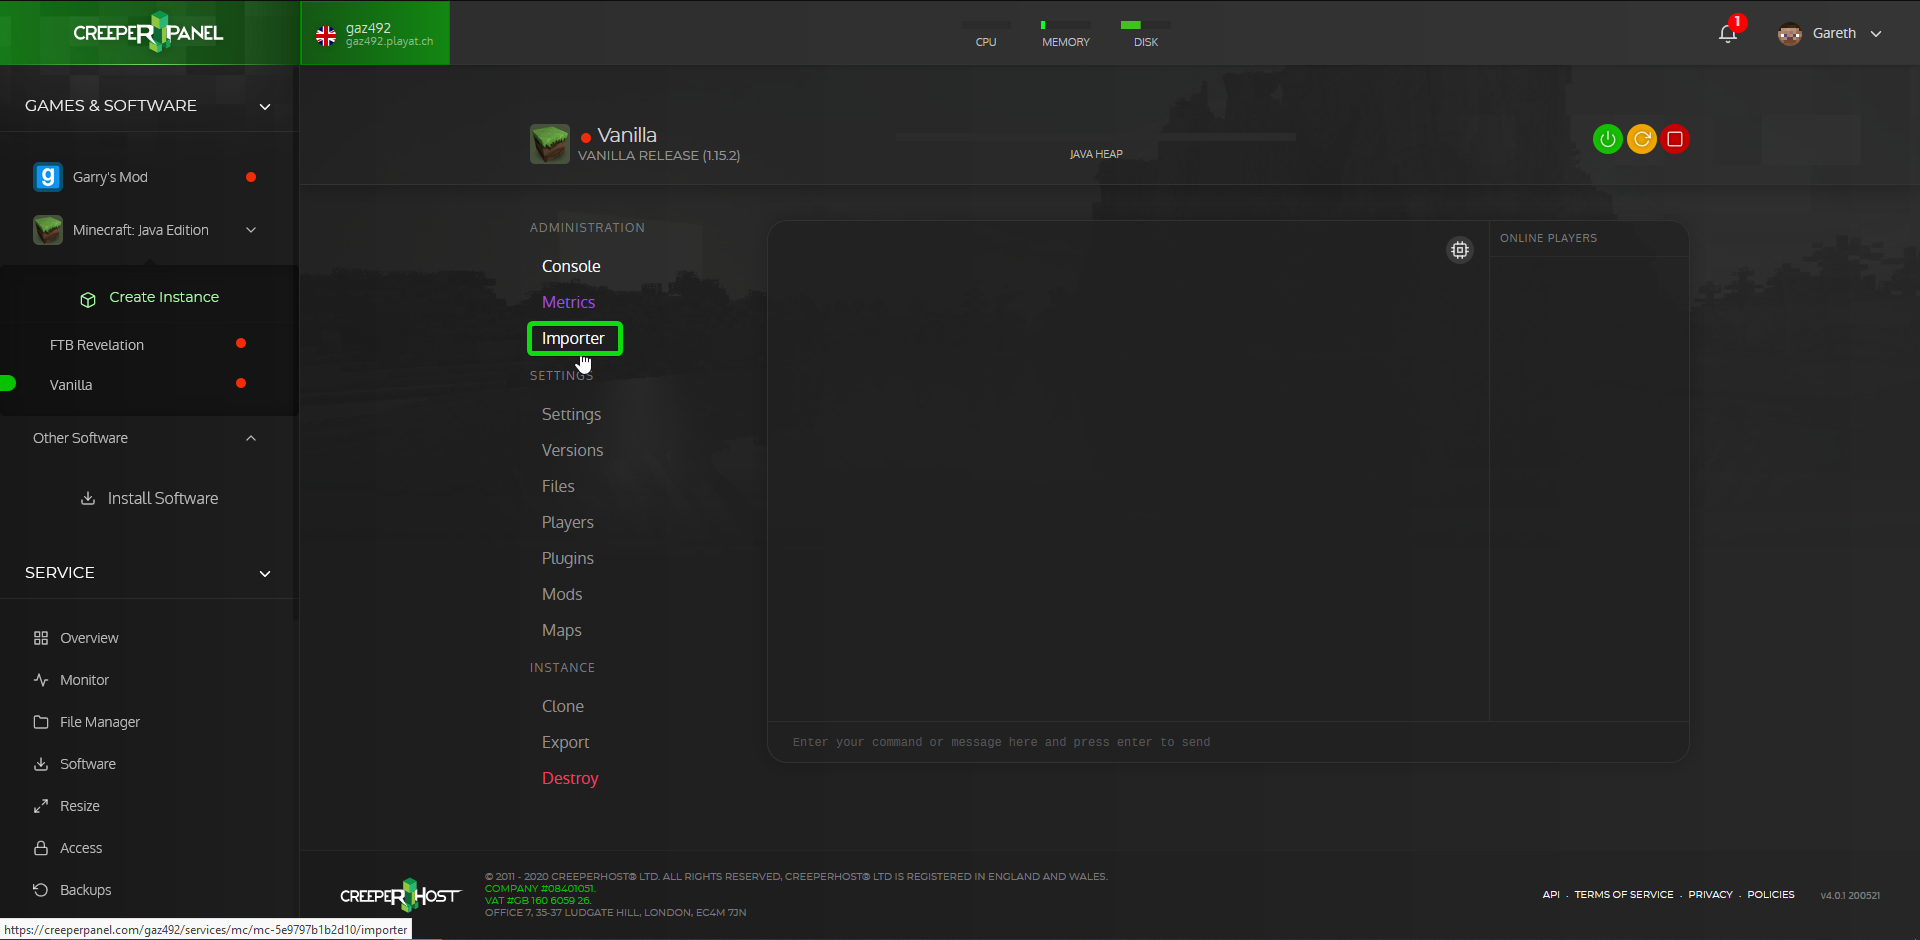](https://www.creeperhost.net/wiki/uploads/images/gallery/2020-05/tJf4M1MJGVTM6N2Q-2020-05-23_22-21-46.png) On the importer page click on `Click or drag your twitch export to upload`. This will open a window where you can browse to where your CurseForge modpack.zip is. [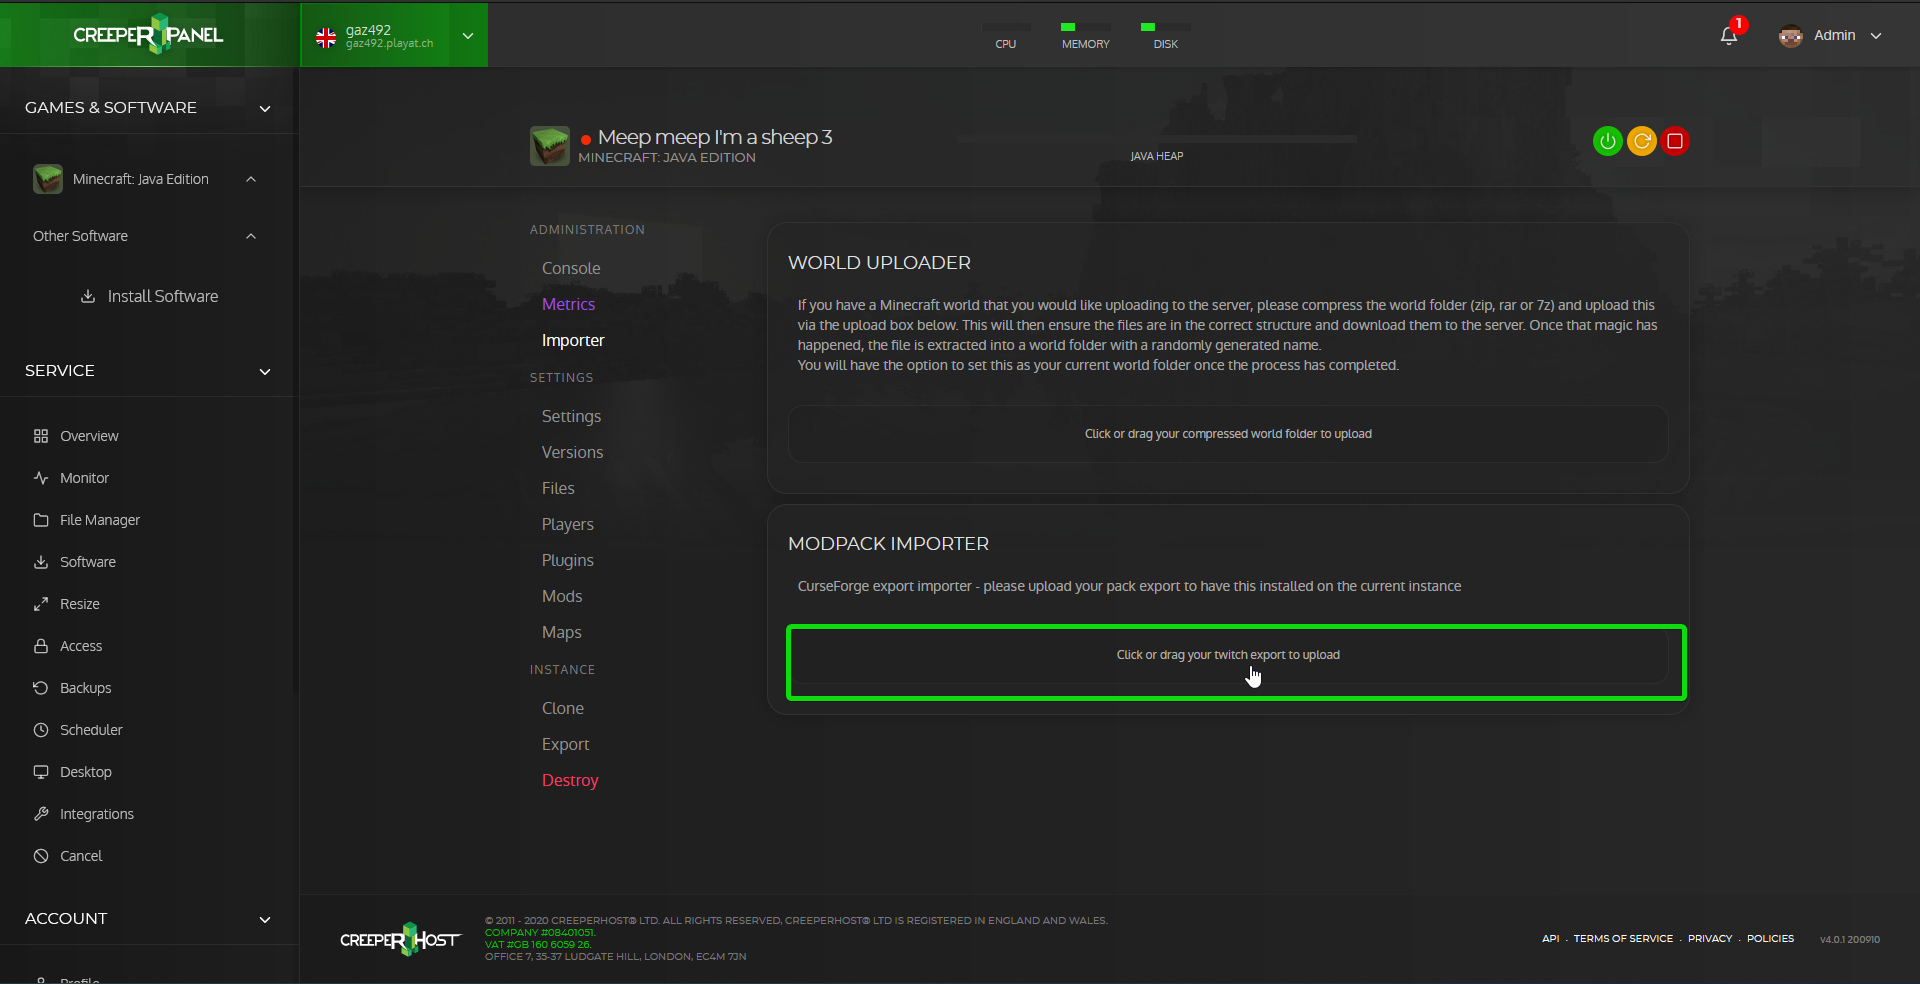](https://www.creeperhost.net/wiki/uploads/images/gallery/2020-09/chVkuy1tJH5UerFX-2020-09-15_22-30-34.png) Click on the modpack.zip then click on `Open` [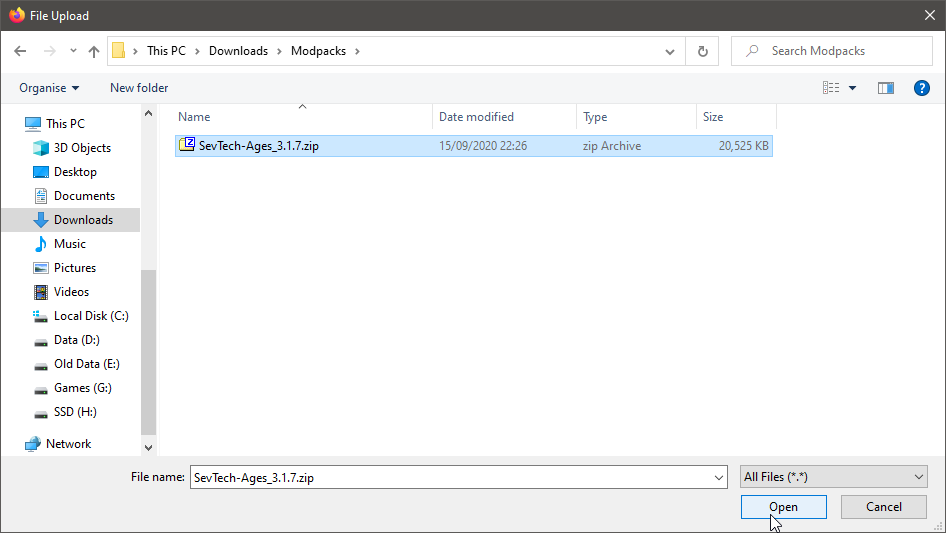](https://www.creeperhost.net/wiki/uploads/images/gallery/2020-09/KjiArdqYekfTR5Sh-firefox_2020-09-15_22-30-47.png) It will now upload the modpack, once the upload is done you will get a notification saying that its being installed and you should see a progress bar showing files being downloaded. [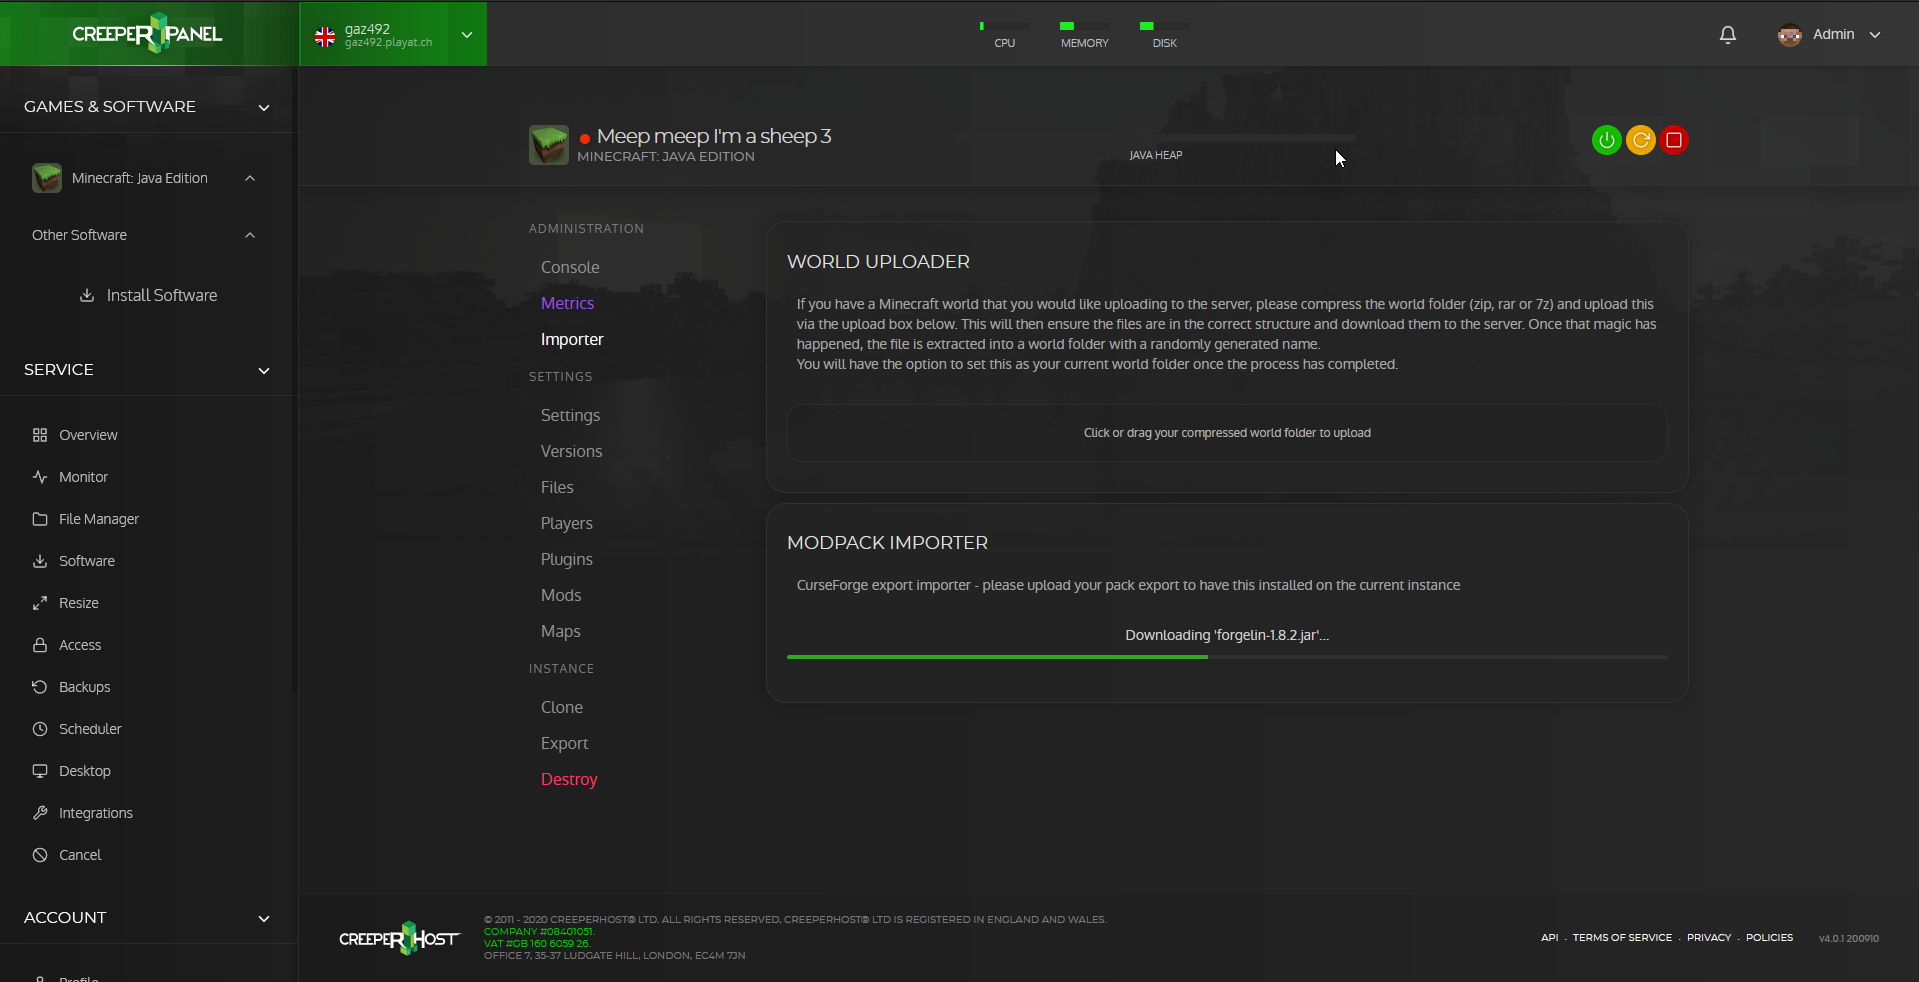](https://www.creeperhost.net/wiki/uploads/images/gallery/2020-09/aV9RxtVgvH0o5QOZ-firefox_2020-09-15_22-28-36.png) Once the pack has finished installing you will get another notification saying that your instance is ready to be used and you should be able to start the instance ([https://www.creeperhost.net/wiki/books/minecraft-java-edition/page/startingrestartingstopping-your-server](https://www.creeperhost.net/wiki/books/minecraft-java-edition/page/startingrestartingstopping-your-server)) # Changing Settings To change the settings of your server such as the display name of the instance or the MOTD of the server select the instance you want to make the changes on then click on the Settings link. [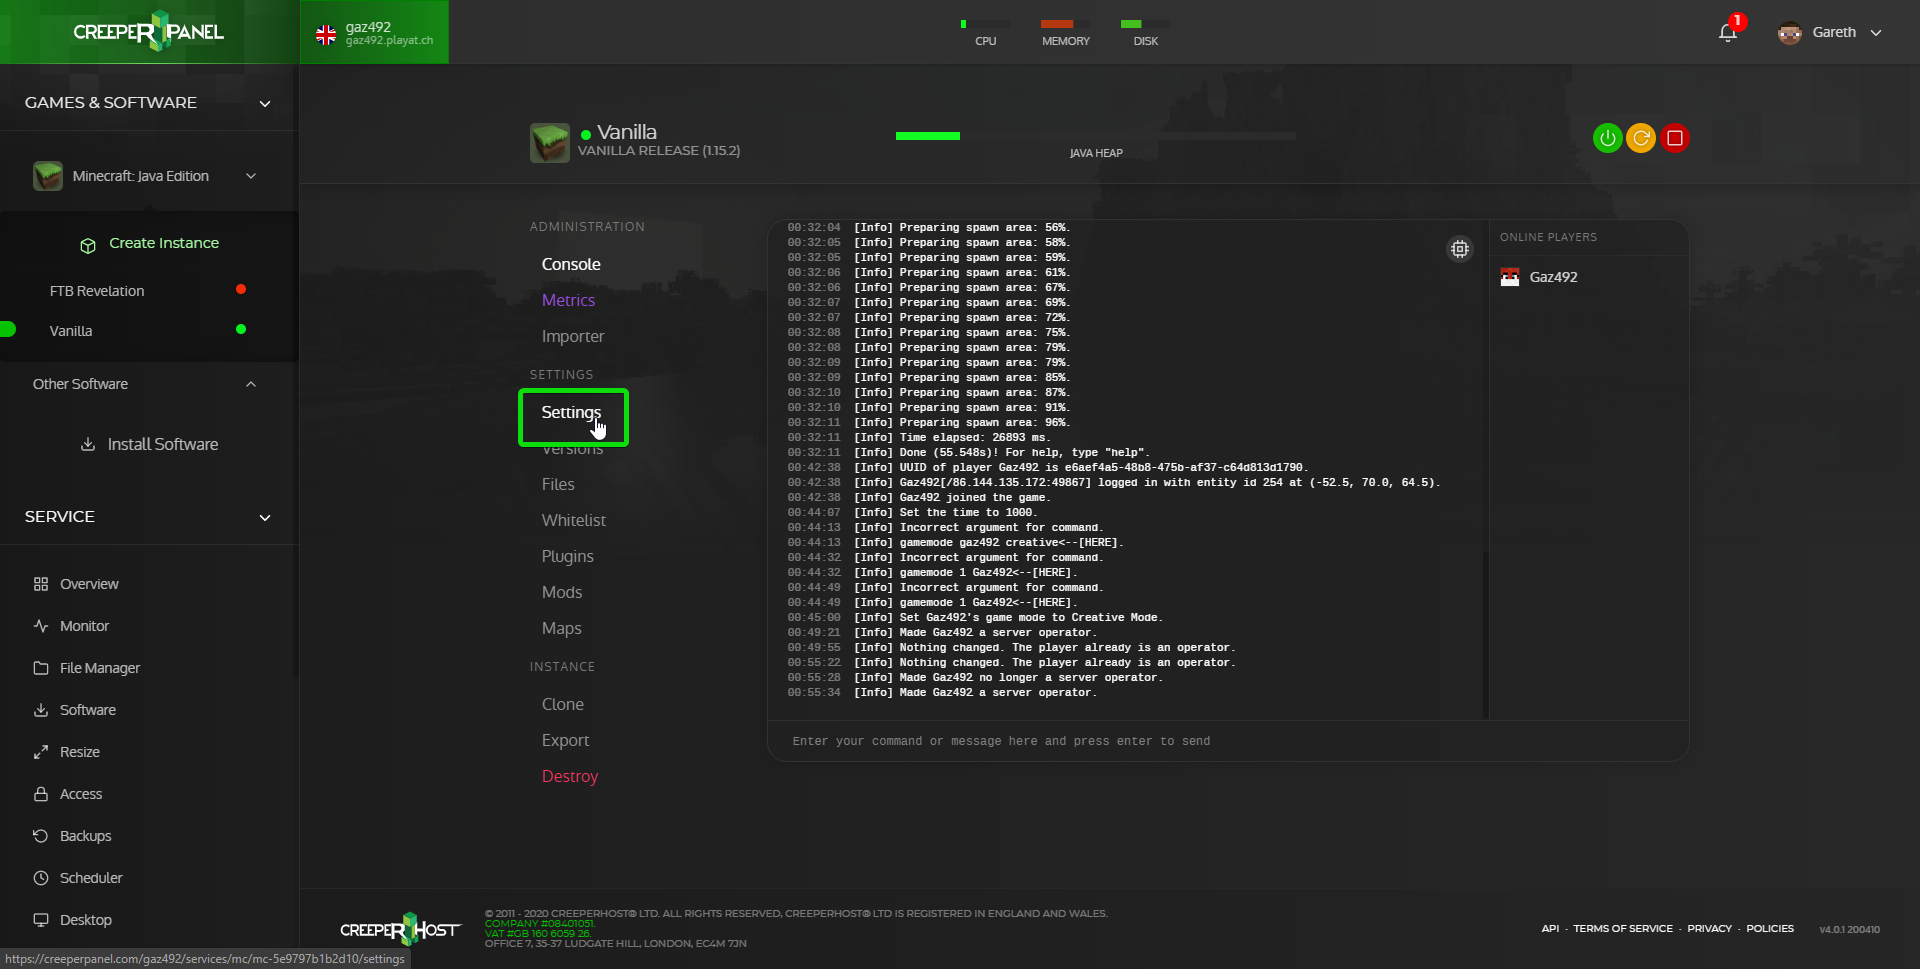](https://www.creeperhost.net/wiki/uploads/images/gallery/2020-04/dpZOjMe6DZfXRK2C-msedge_2020-04-16_00-58-47.png) This will now load the Settings page for the instance where you are able to make our changes. The settings page has also been split into categories to make it easier to find the settings you want to change. You can change the settings categories by clicking on either General (default), Admin, World, Network, System, Security or Advanced You can read about what the settings do here [https://www.creeperhost.net/wiki/books/minecraft-java-edition/page/settings](https://www.creeperhost.net/wiki/books/minecraft-java-edition/page/settings) [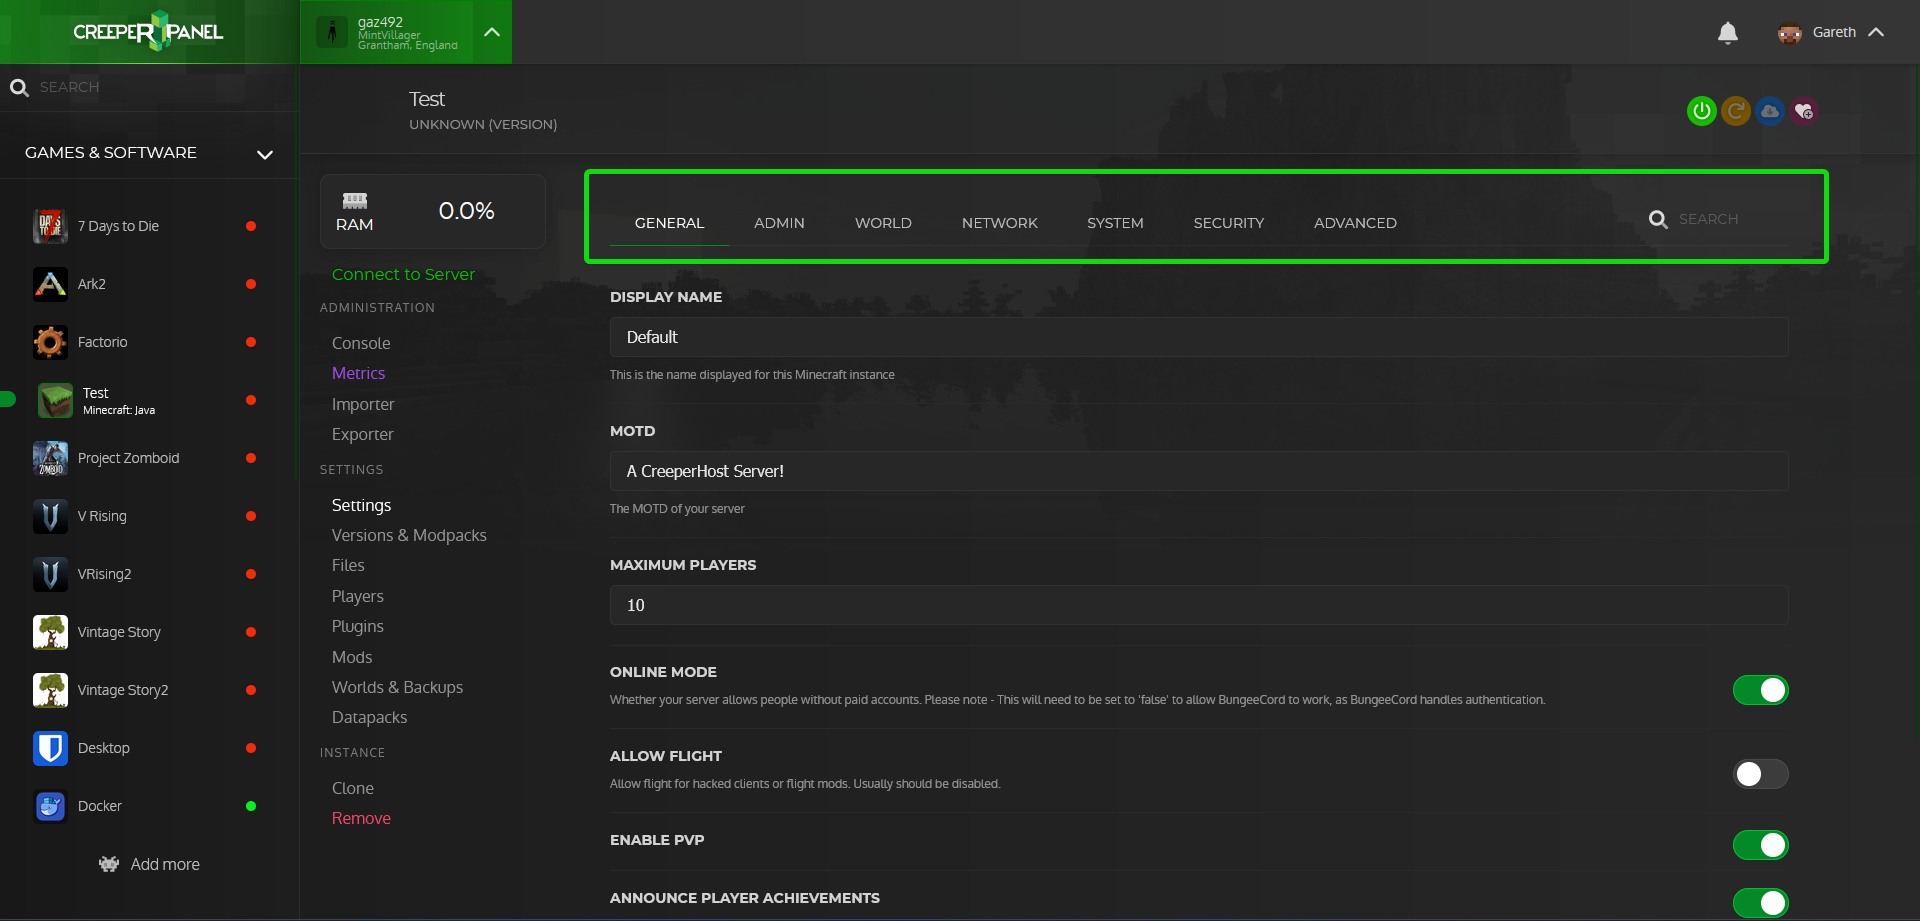](https://www.creeperhost.net/wiki/uploads/images/gallery/2023-09/Xxkr3lc5NUB15XyN-2023-09-26-01-17-11.png) After you have made the changes you want, remember to click the Save button located at the bottom of the page. You will also need to restart your server for the changes to take place [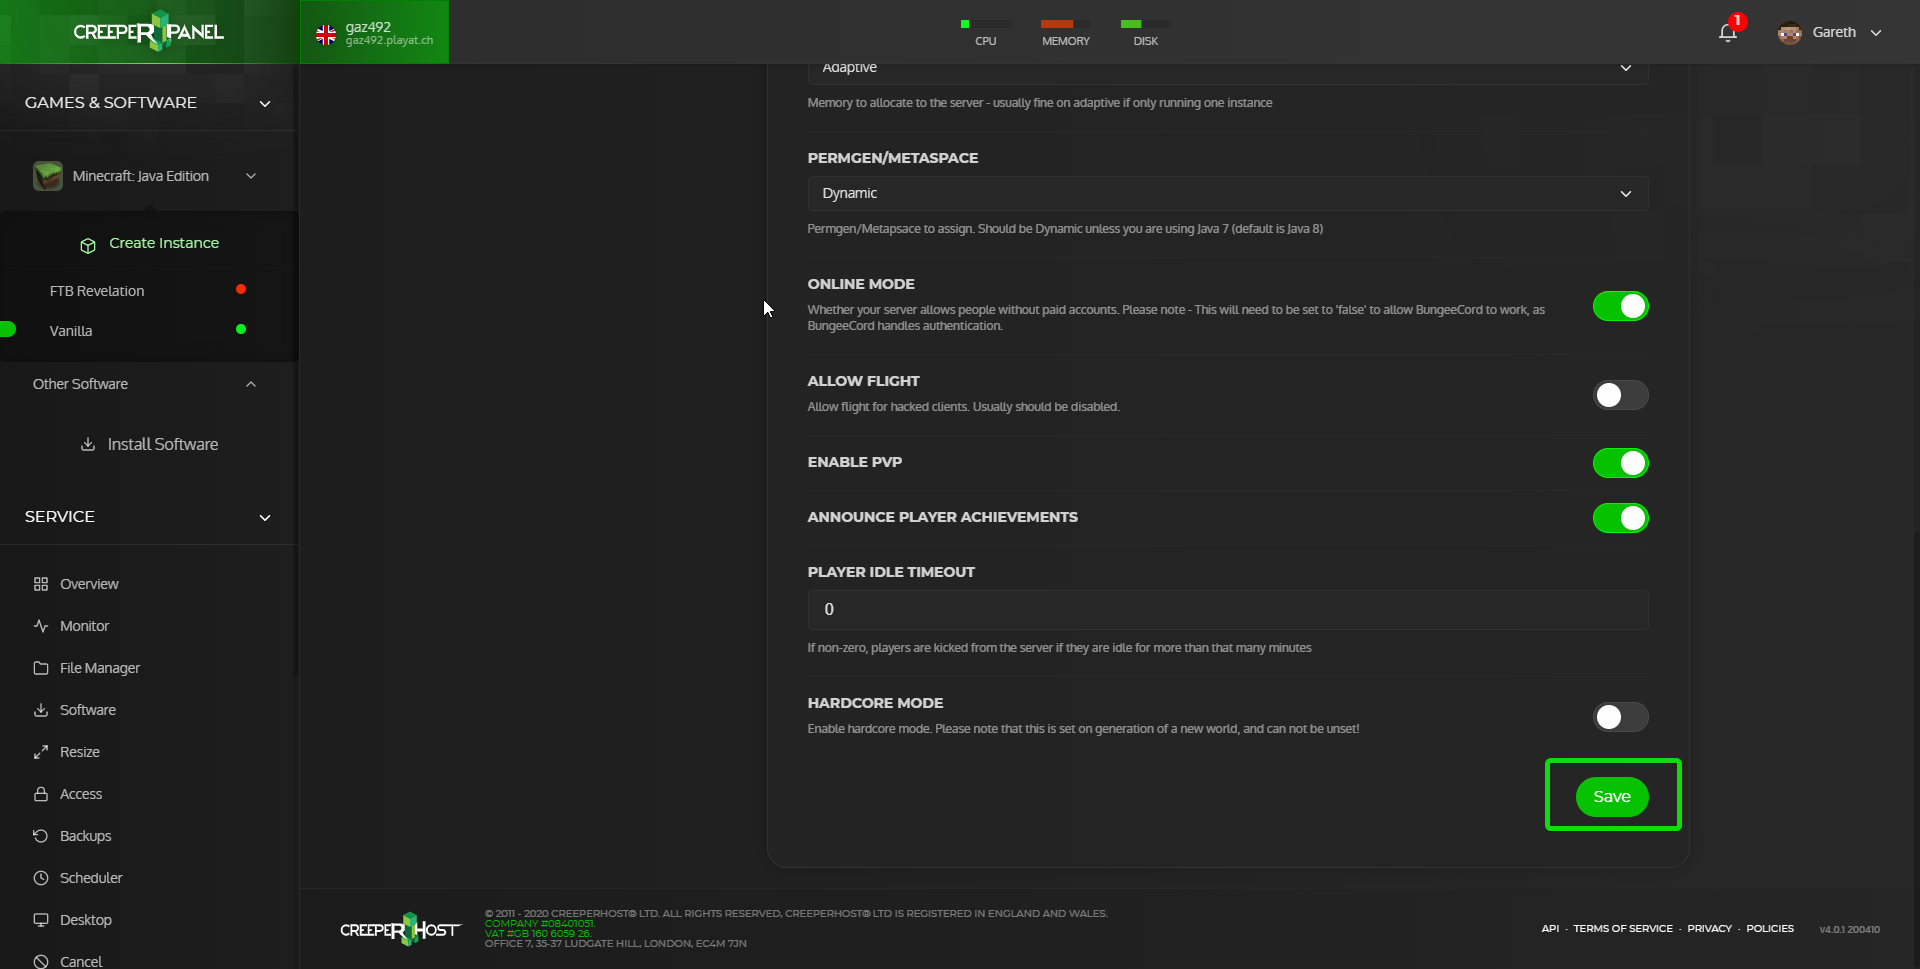](https://www.creeperhost.net/wiki/uploads/images/gallery/2020-04/X9krUxFL72576Gz0-msedge_2020-04-16_00-59-16.png) # Updating your server To find your instance please follow this guide: **[https://www.creeperhost.net/wiki/books/minecraft-java-edition/page/finding-your-instances](https://www.creeperhost.net/wiki/books/minecraft-java-edition/page/finding-your-instances)** ---First, you will need to make sure that the instance you are changing the version on has been stopped (you can find out how to stop your server [**https://www.creeperhost.net/wiki/books/minecraft-java-edition/page/startingrestartingstopping-your-server**](https://www.creeperhost.net/wiki/books/minecraft-java-edition/page/startingrestartingstopping-your-server))
After stopping your instance you can now click on Versions [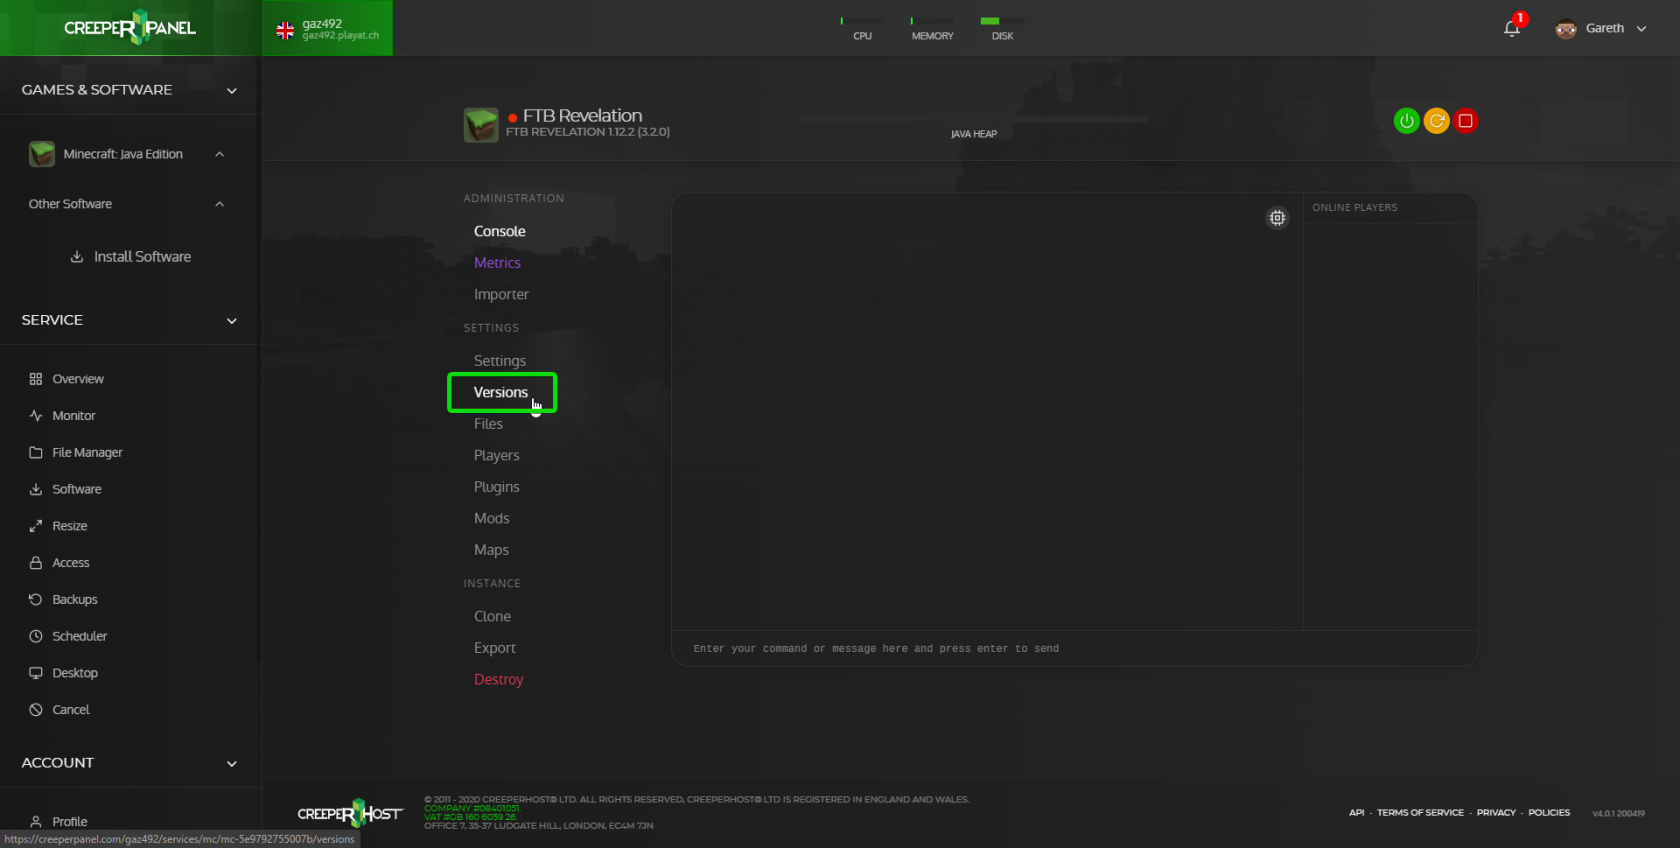](https://www.creeperhost.net/wiki/uploads/images/gallery/2020-04/35Seug0EtF3vCOif-msedge_2020-04-21_03-15-58.png) On the `Versions` page click in the `Search Versions` textbox at the top of the page and enter the name of the modpack you want to install or update. [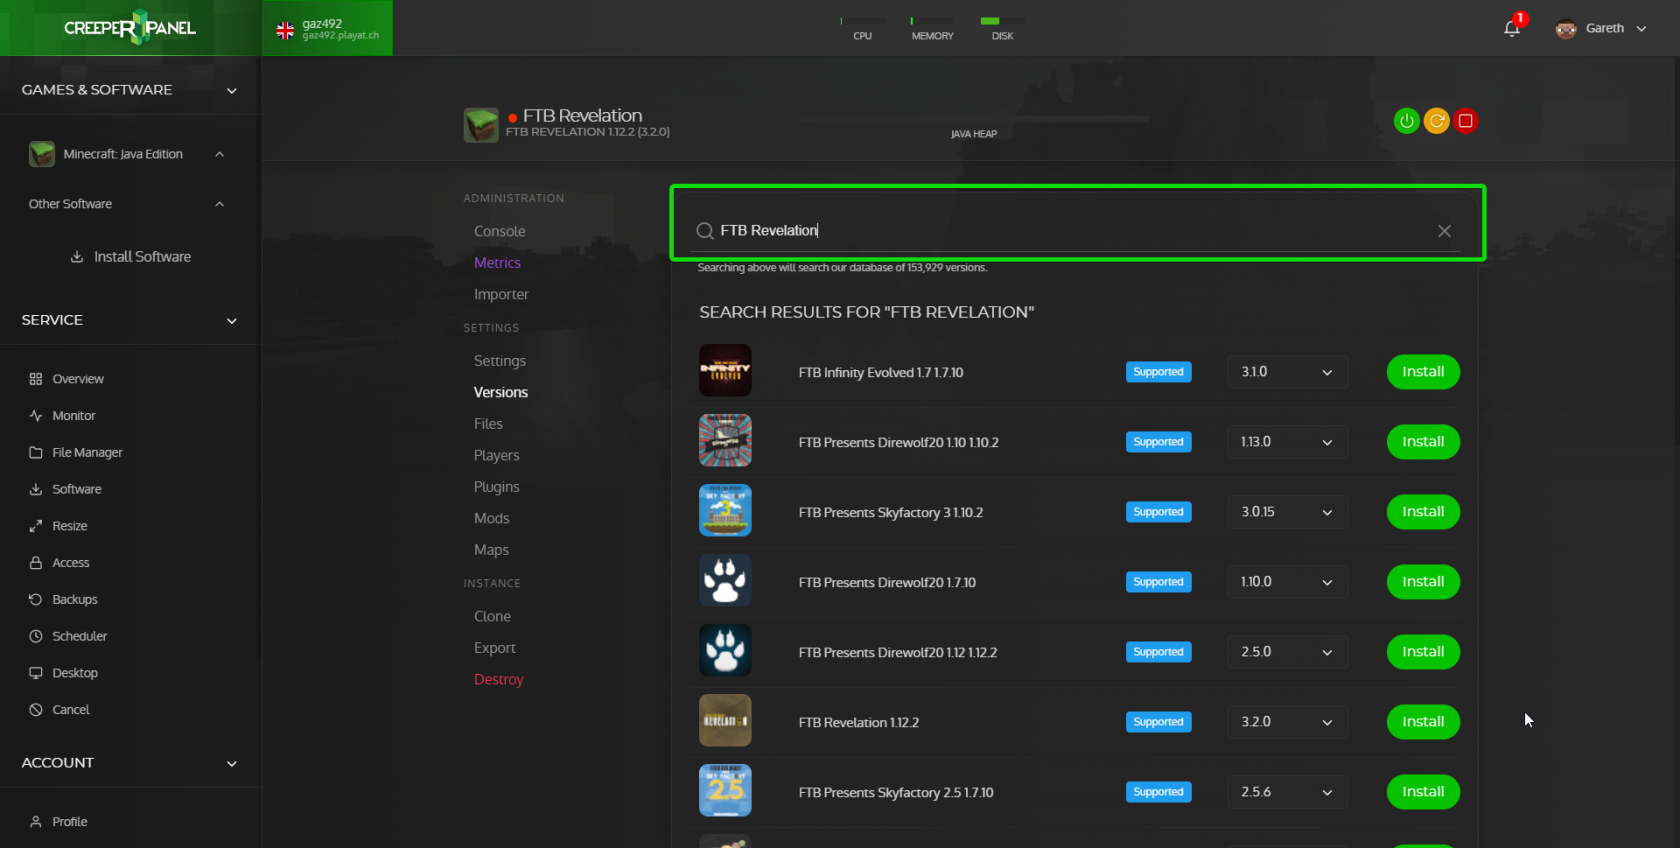](https://www.creeperhost.net/wiki/uploads/images/gallery/2020-04/6ITA7vZh9965uni9-msedge_2020-04-21_03-19-24.png) When you find the modpack you want to install or update make sure the version you want to install is selected in the dropdown then click the Install button and wait for a notification saying that the modpack has finished installing. [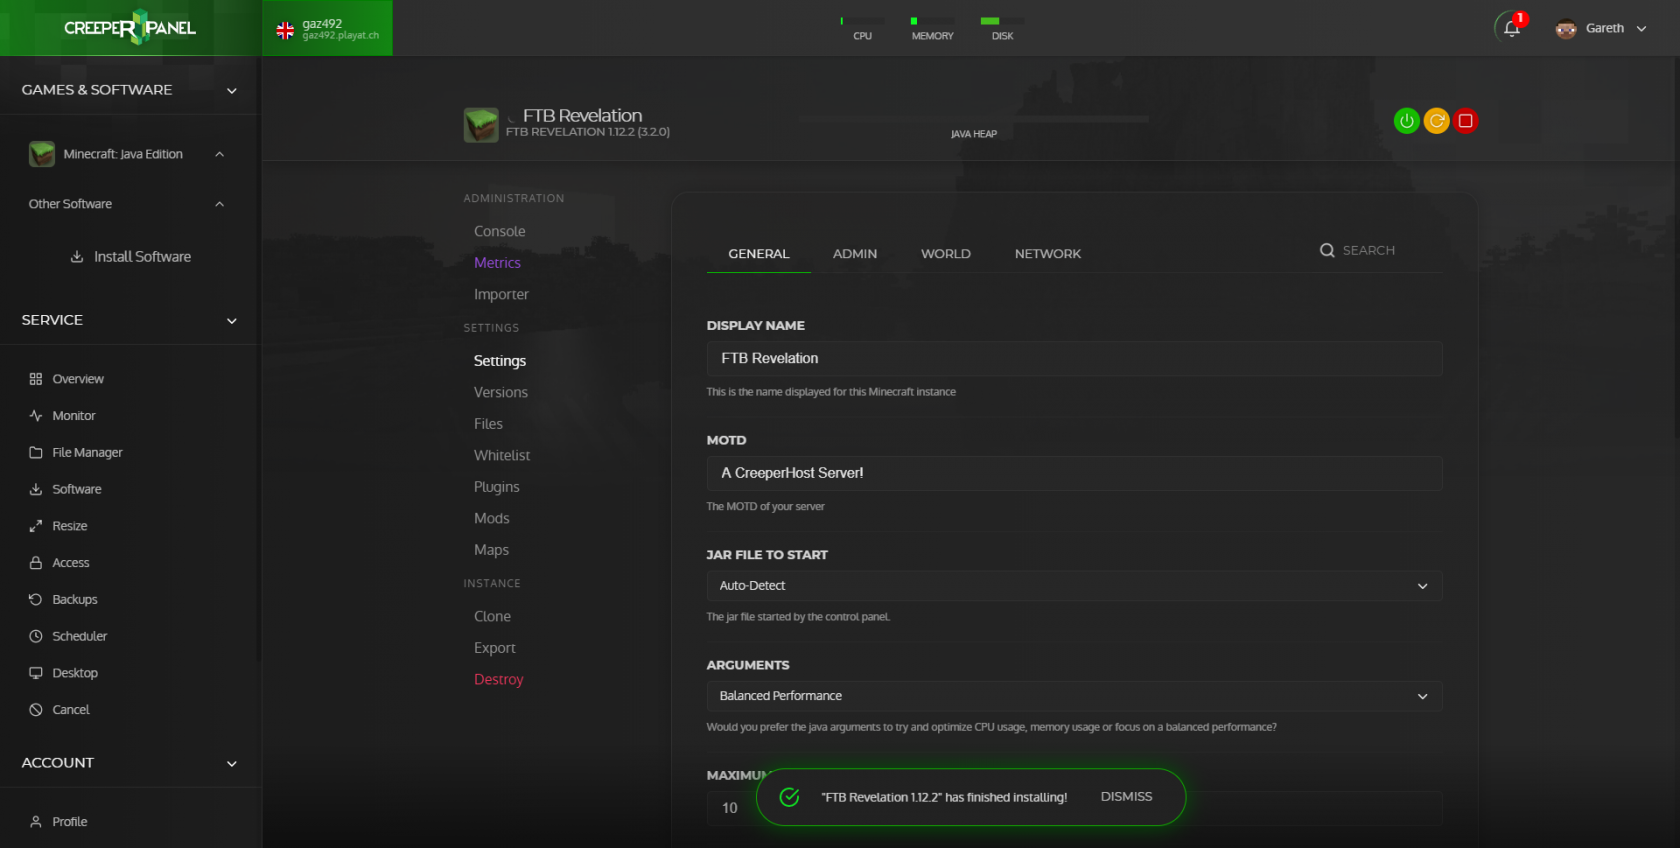](https://www.creeperhost.net/wiki/uploads/images/gallery/2020-04/yusnaPuaoQTG2BJw-msedge_2020-04-16_00-03-16.png) # Whitelist a player There are multiple methods you can use to whitelist a player when using our panel, those methods have been listed below. You will first need to go to the Console page of your instance, if you are not sure how to get to your instance, take a look at the How do I find my Instance guide here: [**https://www.creeperhost.net/wiki/books/minecraft-java-edition/page/finding-your-instances**](https://www.creeperhost.net/wiki/books/minecraft-java-edition/page/finding-your-instances) ##### Method 1 - Using console commands Click in the textbox below the console output where it says `Enter your command or message here and press enter to send` and type `/whitelist playerName` then press the enter key on your keyboard. You will then get a message in the console output saying that the player has been added to the whitelist [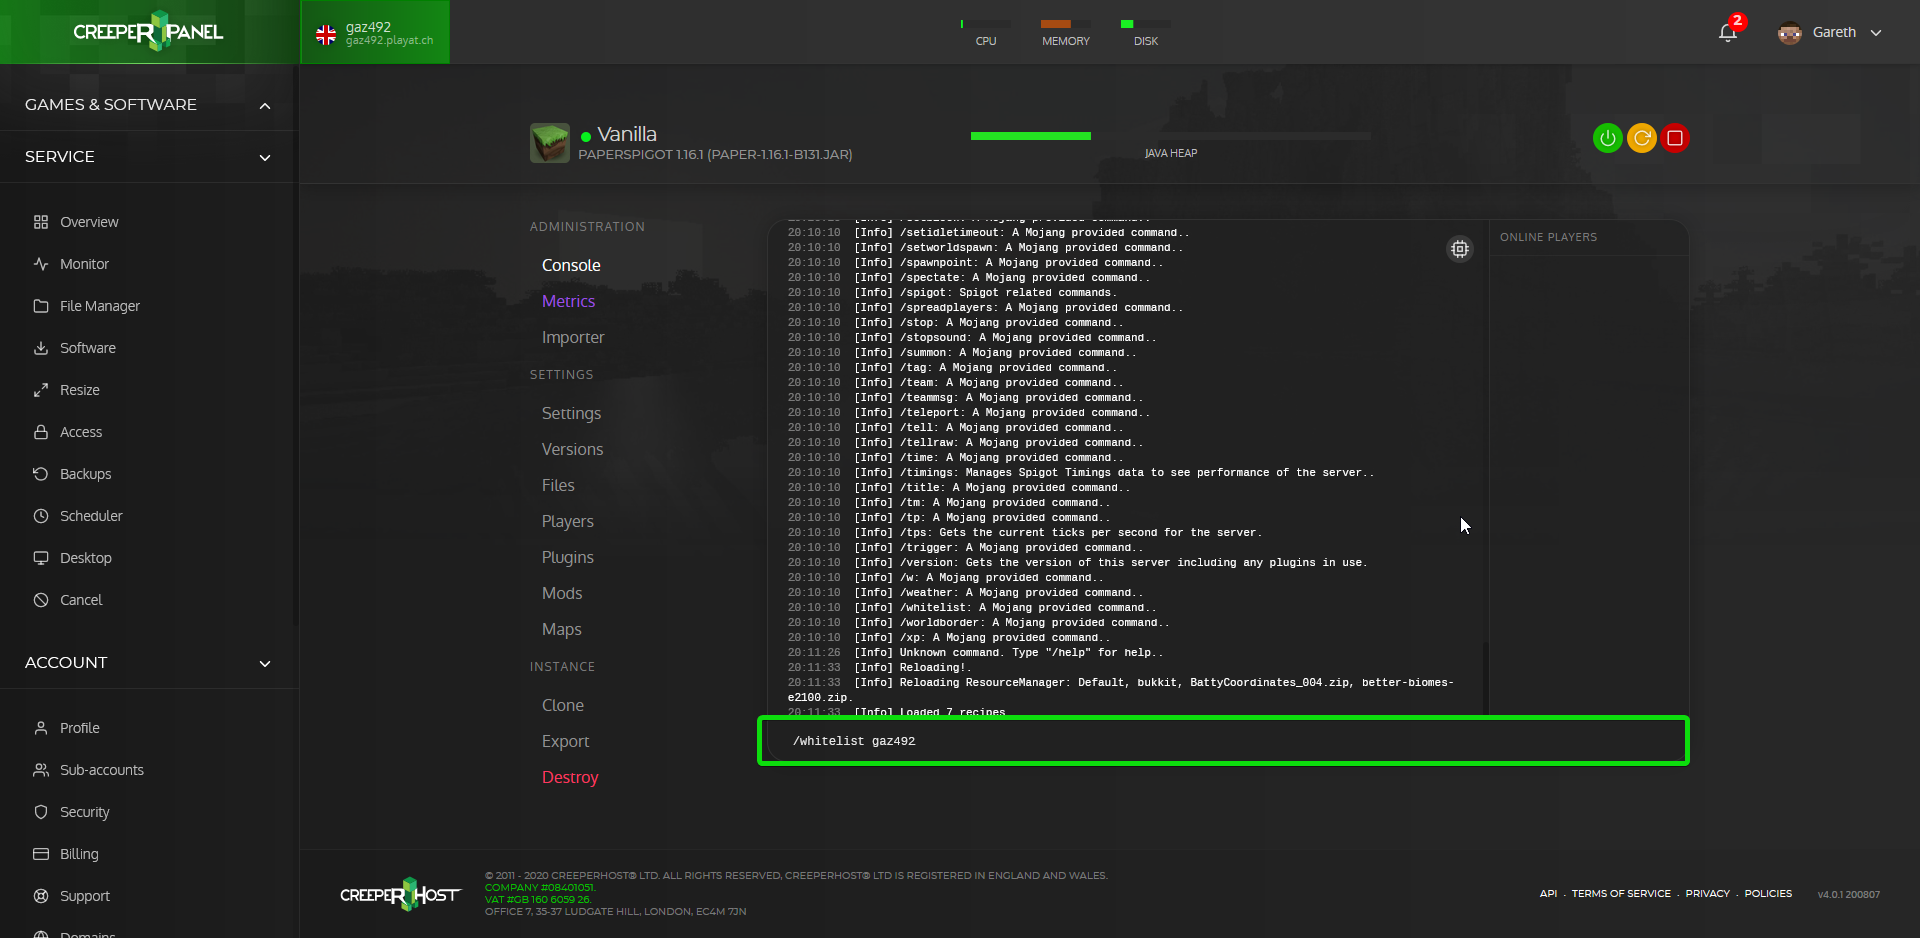](https://www.creeperhost.net/wiki/uploads/images/gallery/2020-08/QbUADd2UchKYRh9k-firefox_2020-08-26_17-11-14.png) ##### Method 2 - Using the player's menu Once on the console page for your instance you will then have an Instance navigation menu to the left of the console window in here you will see a `Players` option, if you click this it will take you to a new page where you can add players to the whitelist or as operators (OPs). [](https://www.creeperhost.net/wiki/uploads/images/gallery/2020-06/QSZWE2DgY9aBtf3J-firefox_2020-06-15_20-17-08.png) Now that we are on the Players page make sure that the Whitelist tab is active (there will be a green line under the active tab). [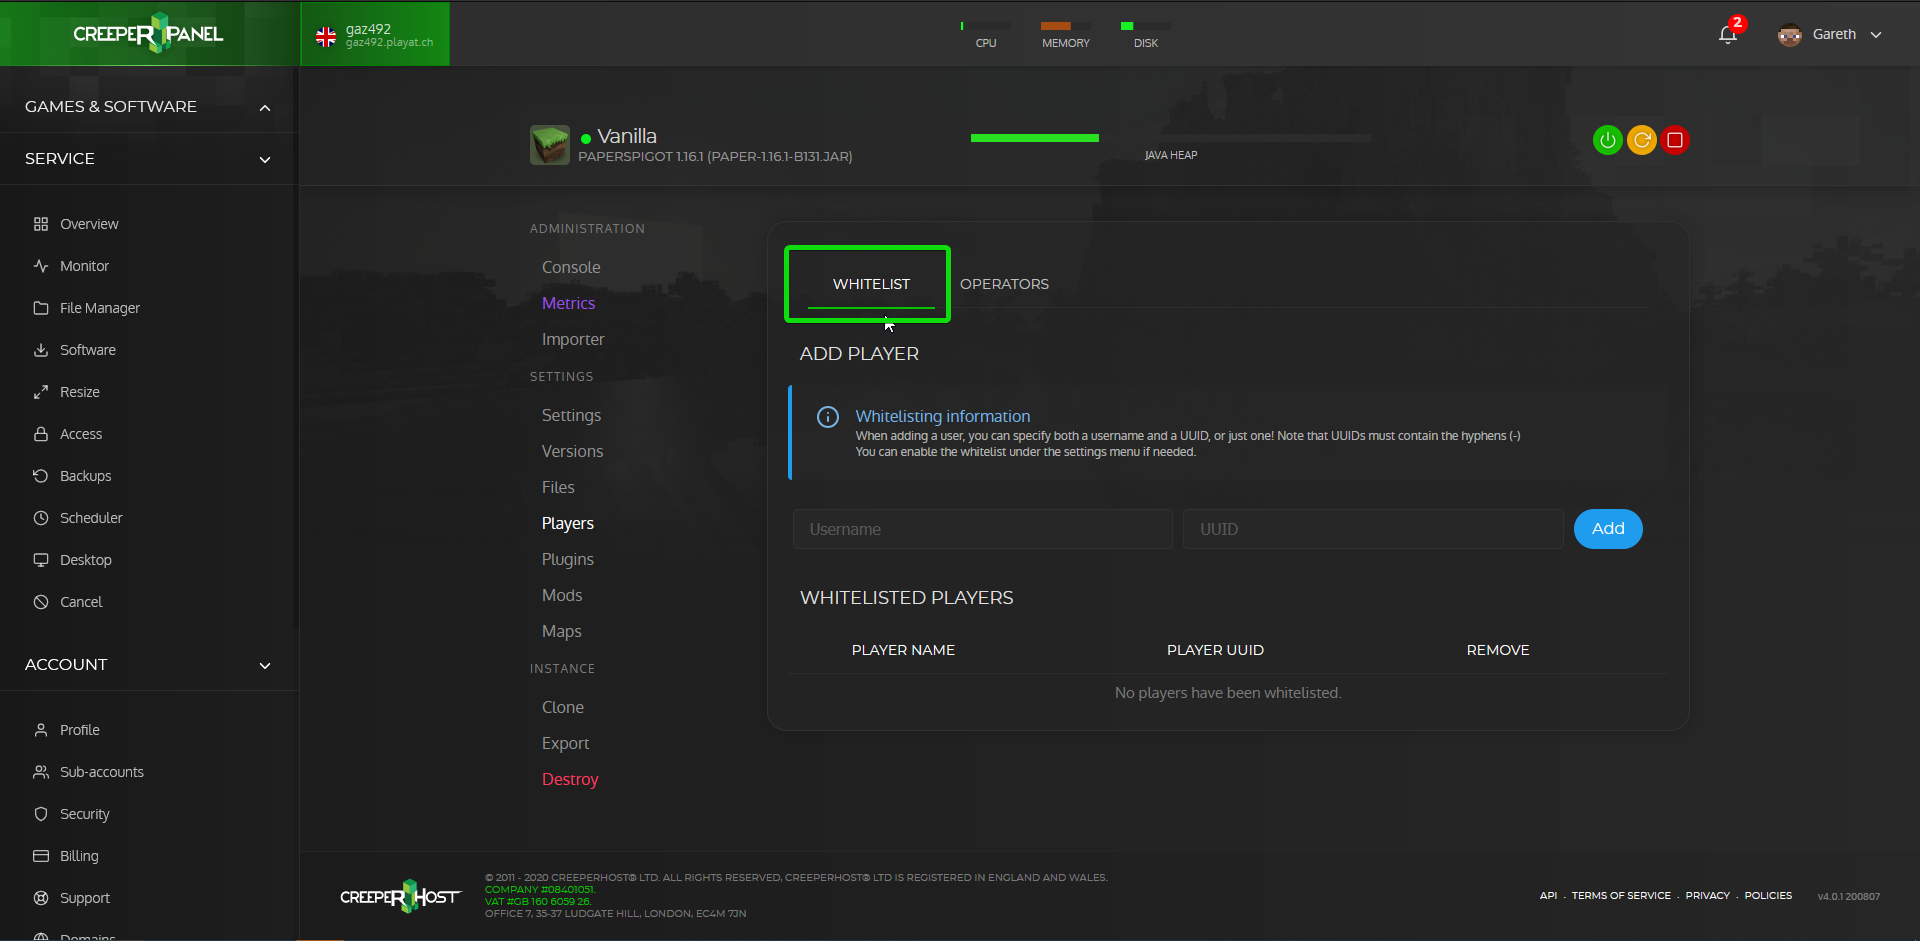](https://www.creeperhost.net/wiki/uploads/images/gallery/2020-08/Vuw5mFdbtt4MwTE5-2020-08-26_17-13-18.png) From here we can now enter either the user name of the player we want to add to the whitelist or use the UUID, Once you have entered the username or the UUID of the player click the add button [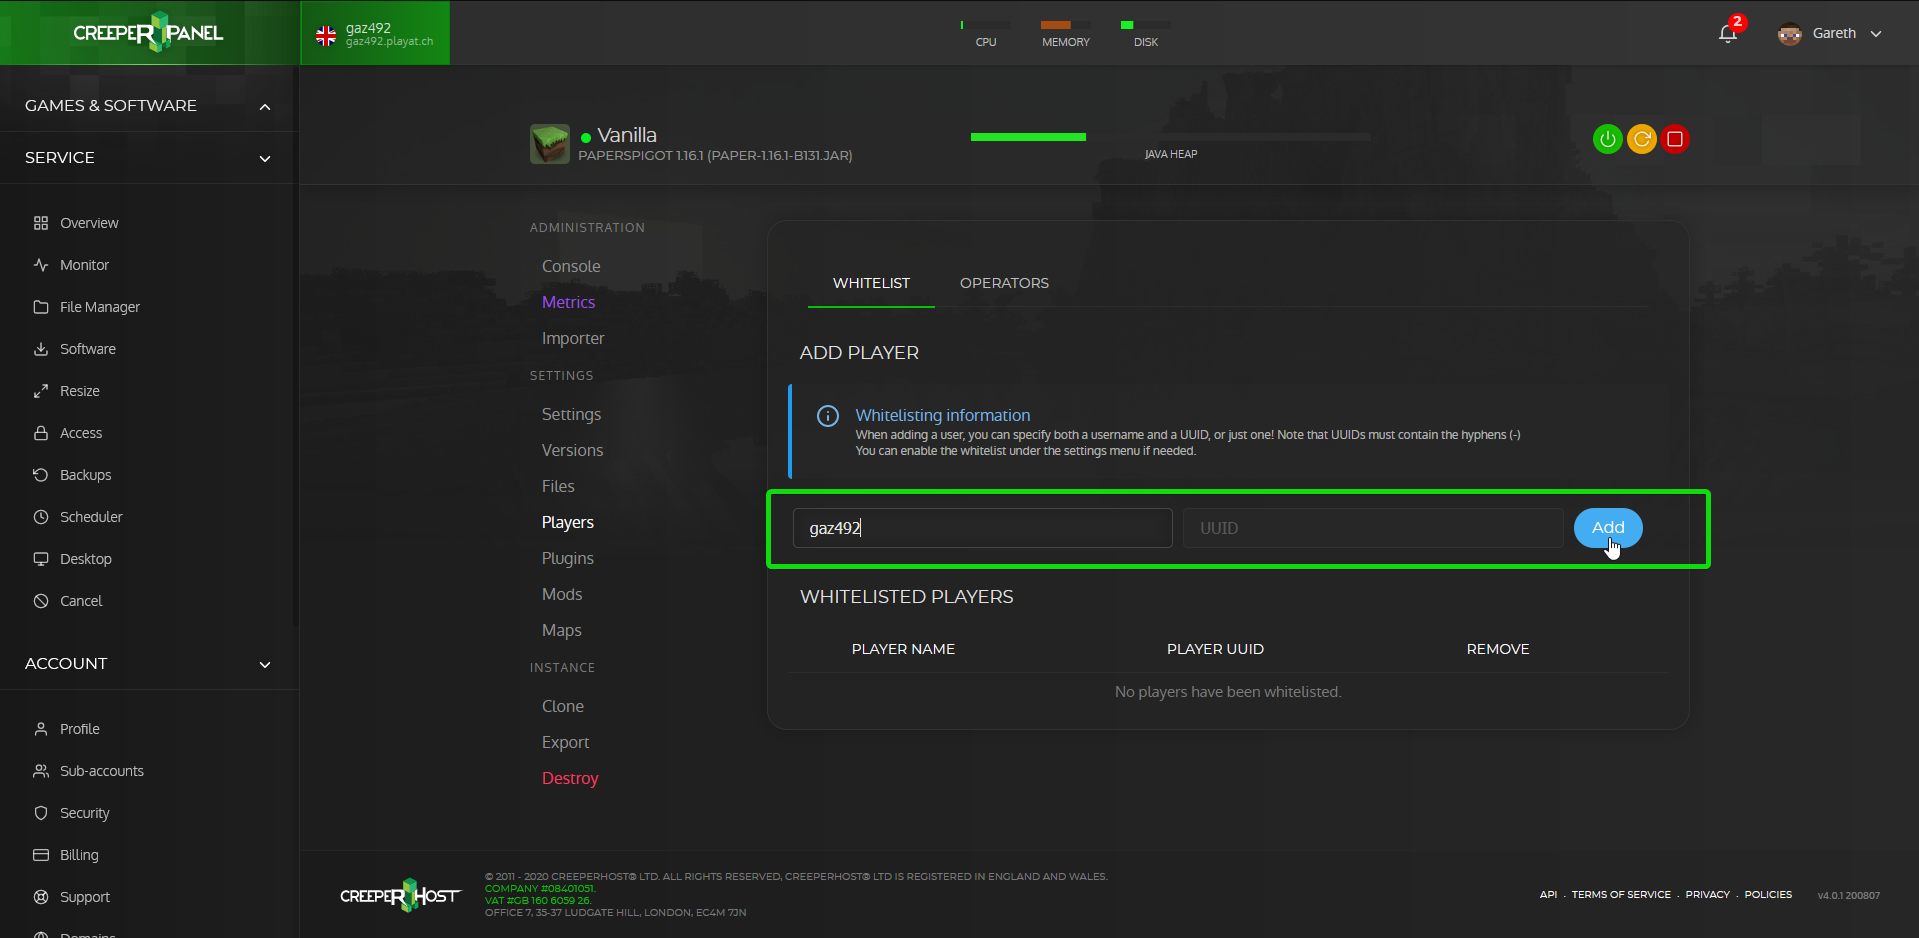](https://www.creeperhost.net/wiki/uploads/images/gallery/2020-08/yba8C0U4KnSsQIlE-firefox_2020-08-26_17-14-37.png) The page will now refresh and add the player to the whitelist. [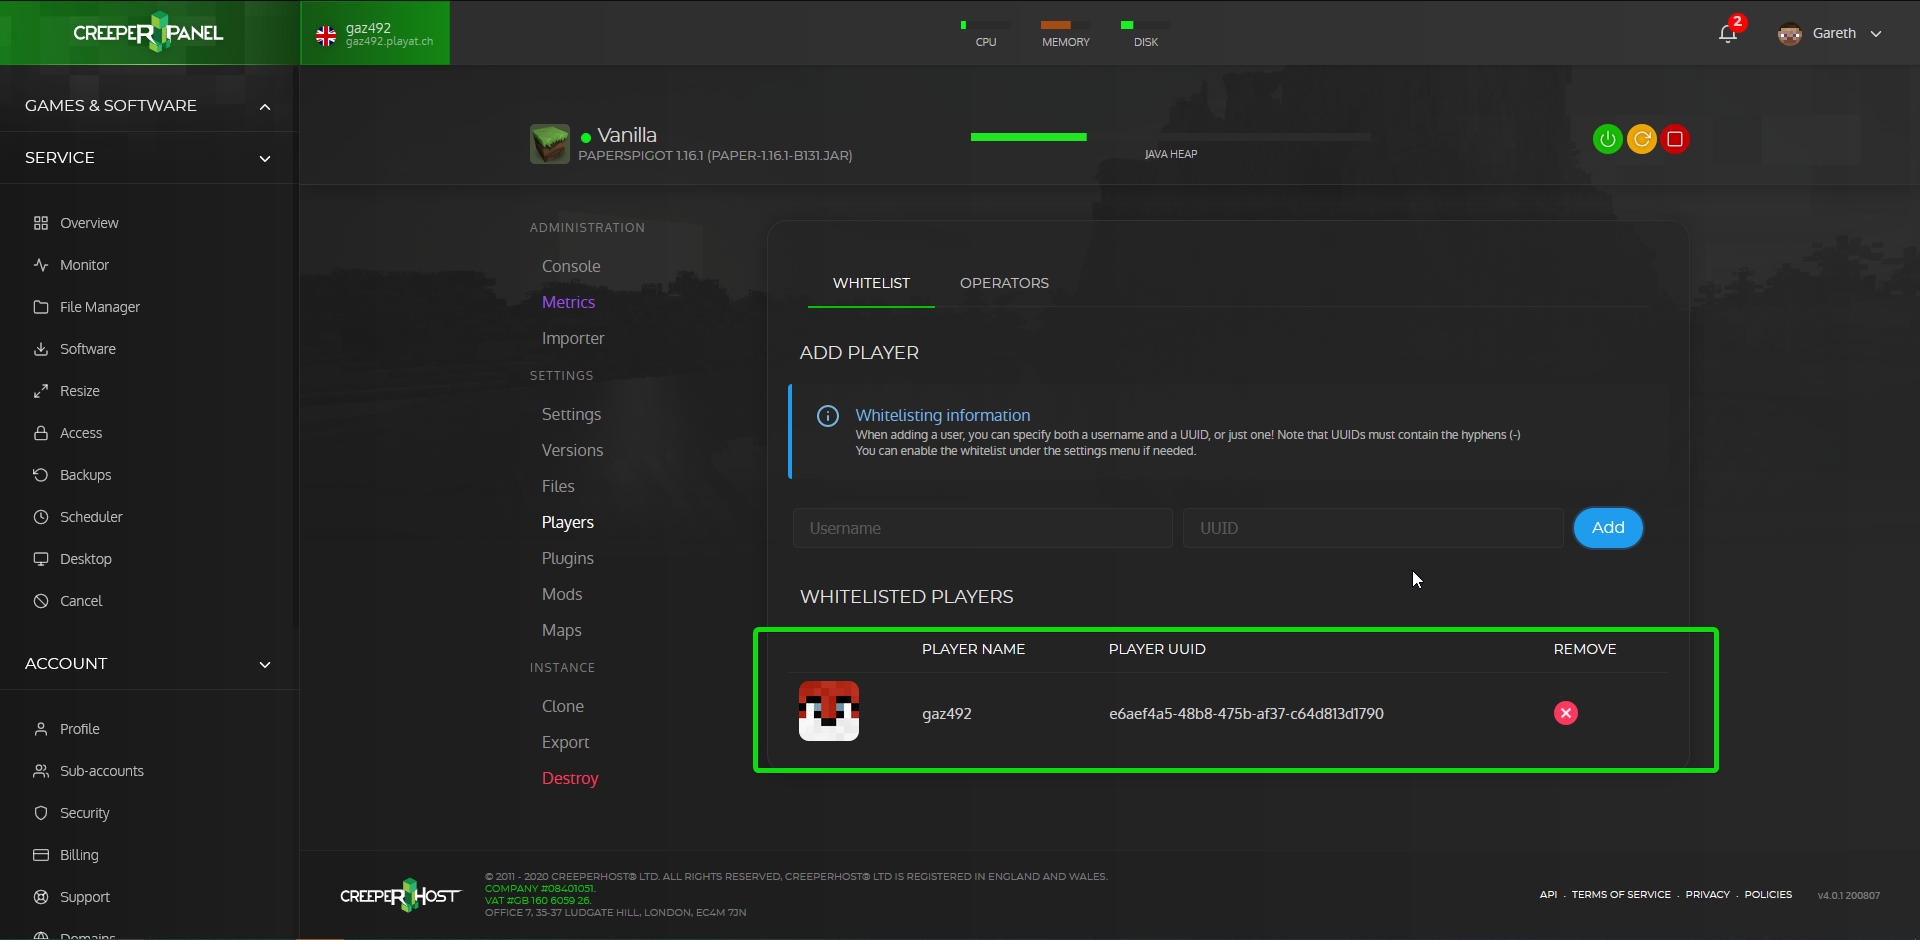](https://www.creeperhost.net/wiki/uploads/images/gallery/2020-08/SUckpah9LkSbeBPj-2020-08-26_17-15-48.png) # Enable Geyser MC (Bedrock support on java Minecraft) You will first need to go to the Console page of your instance, if you are not sure how to get to your instance, take a look at the How do I find my Instance guide here: **[https://www.creeperhost.net/wiki/books/minecraft-java-edition/page/finding-your-instances](https://www.creeperhost.net/wiki/books/minecraft-java-edition/page/finding-your-instances)**Before proceeding you will need to ensure that your instance is running on Vanilla Minecraft 1.16.2 or newer.
Once on the console page for your instance you will then have an Instance navigation menu to the left of the console window in here you will see a `Settings` option, if you click this it will take you to a new page that contains most of the settings available for your instance. [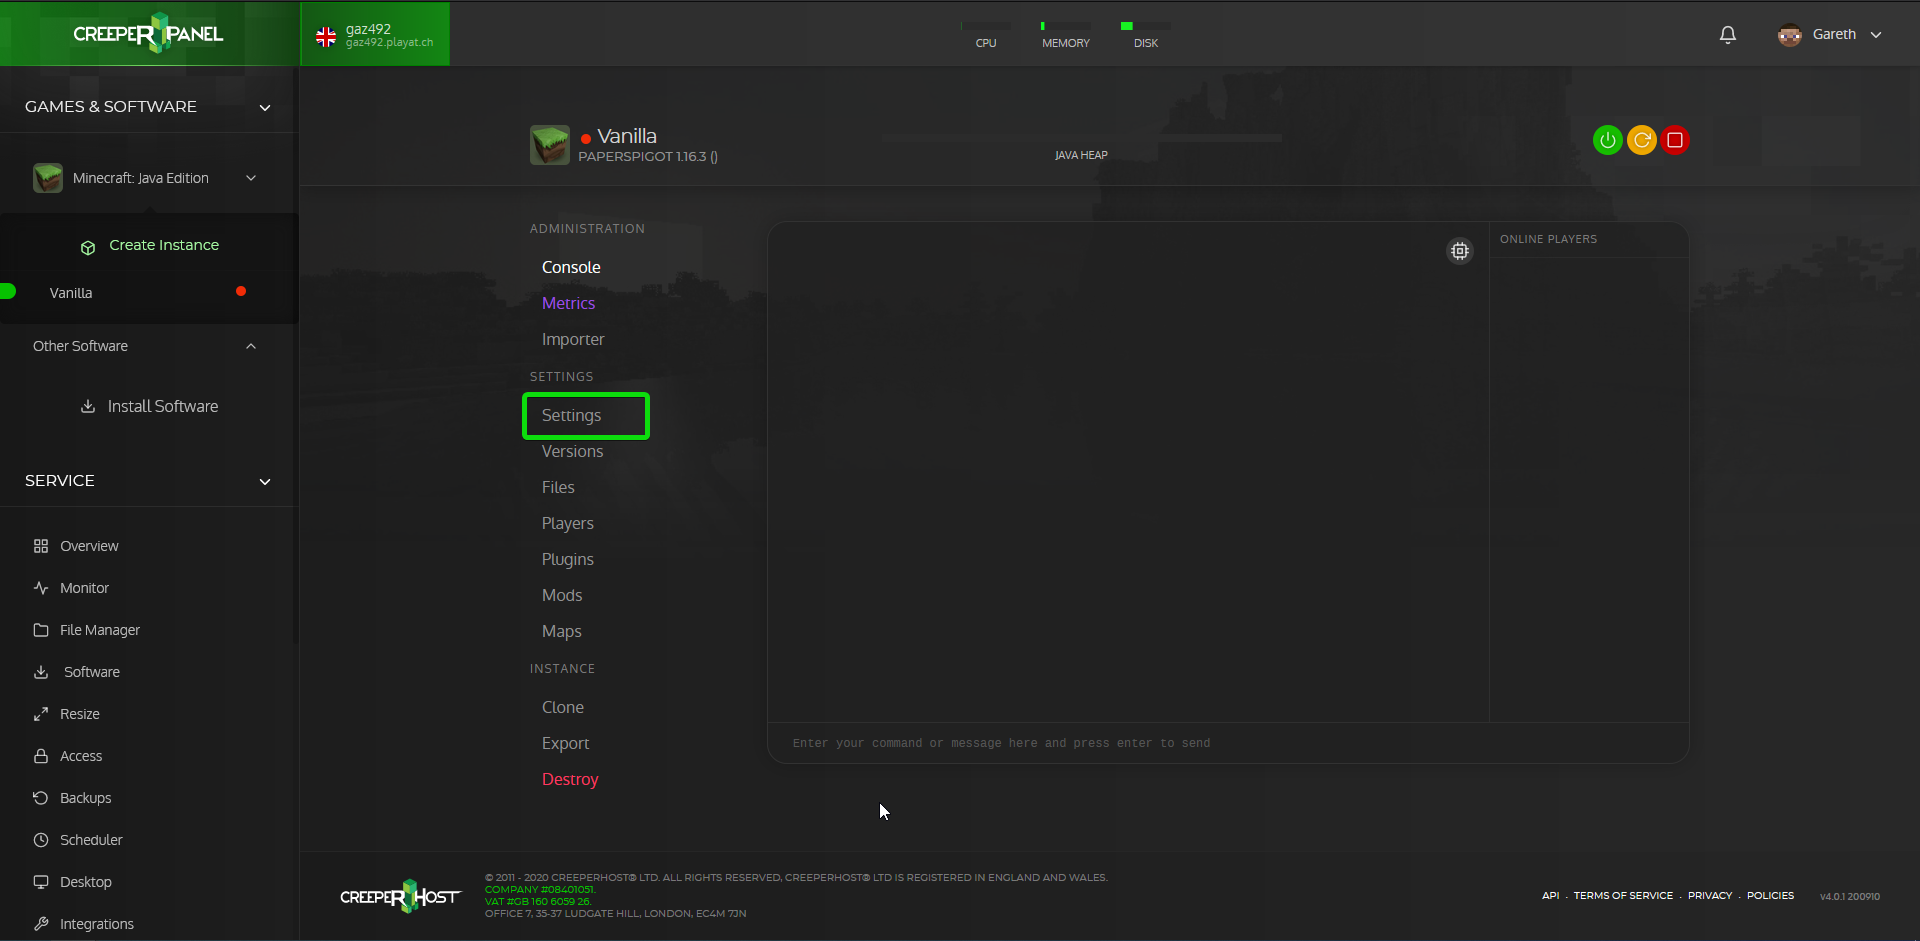](https://www.creeperhost.net/wiki/uploads/images/gallery/2020-10/mPF6kaYTkjnx0UeI-2020-10-01_23-01-58.png) On the settings page, click on the `Network` tab then scroll down a little bit until you see an option called `Allow Bedrock`. By default this option is disabled, to enable it simply click on it to enable it then scroll down to the bottom and click on save. [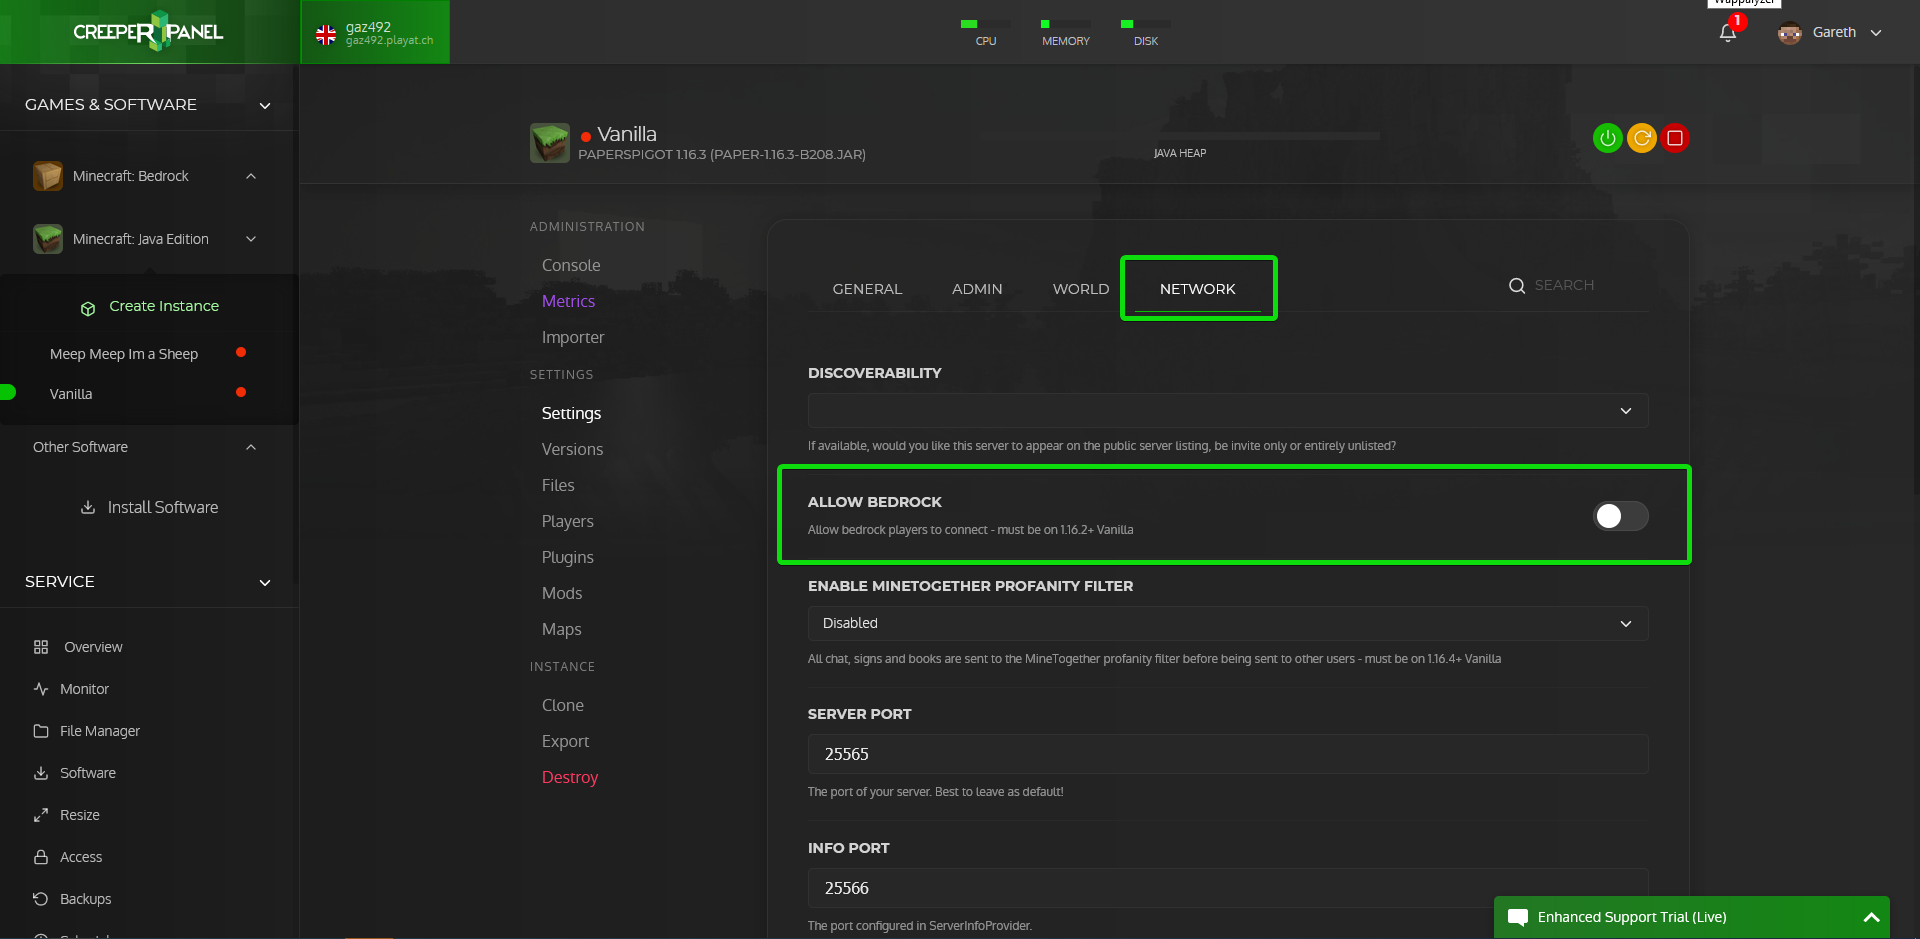](https://www.creeperhost.net/wiki/uploads/images/gallery/2020-10/DC9tDDAGM3h7JwGN-2020-10-19_19-26-23.png) You can now start your server back up and you should be able to have players connect using both Minecraft: Java Edition and Minecraft: Bedrock. # Changing Java versions Minecraft 1.17 and onwards uses a newer version of Java compared to previous versions, so it may be necessary to change the Java version to start your Minecraft server. Older versions of Minecraft can also benefit from using a newer version of Java, see the table below on the compatibility between Minecraft versions and Java.| Minecraft Version | Java Version |
| 1.11 and older | Java 8 |
| 1.12 - 1.13 | Java 8 or Java 11 |
| 1.14 - 1.16 | Java 8, Java 11, Java 14, Java 15 |
| 1.17 | Java 16 |
| 1.18 and newer | Java 17 |
If you are strugging to find your minecraft server please take a look at the following guide.
1\. Go to your minecraft server on the panel, then click on the image that's to the left of the instance and modpack name. [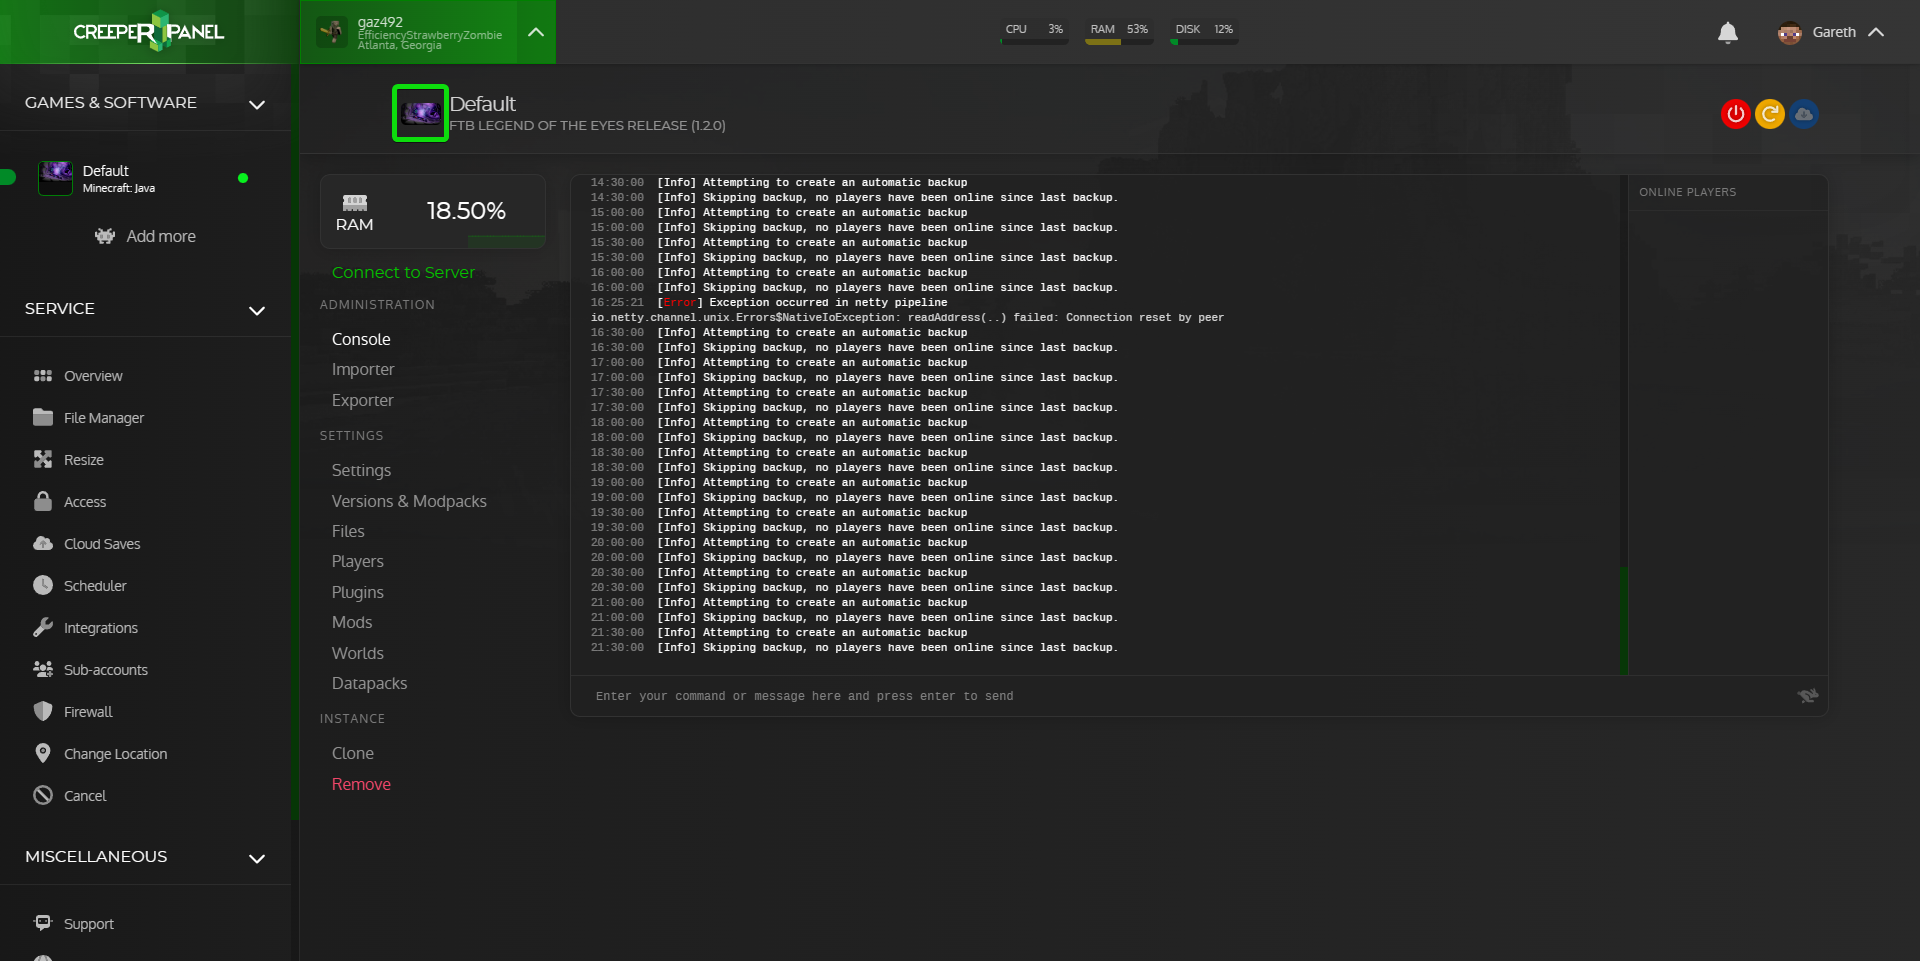](https://www.creeperhost.net/wiki/uploads/images/gallery/2023-02/0Kcv7W7Z8pmNllbs-msedge-2023-02-06-21-30-51.png) 2\. A popup will open that will ask you to either click in the highlighed box or drag an image into the box. The image you upload **MUST** be 64x64 in size and a PNG. [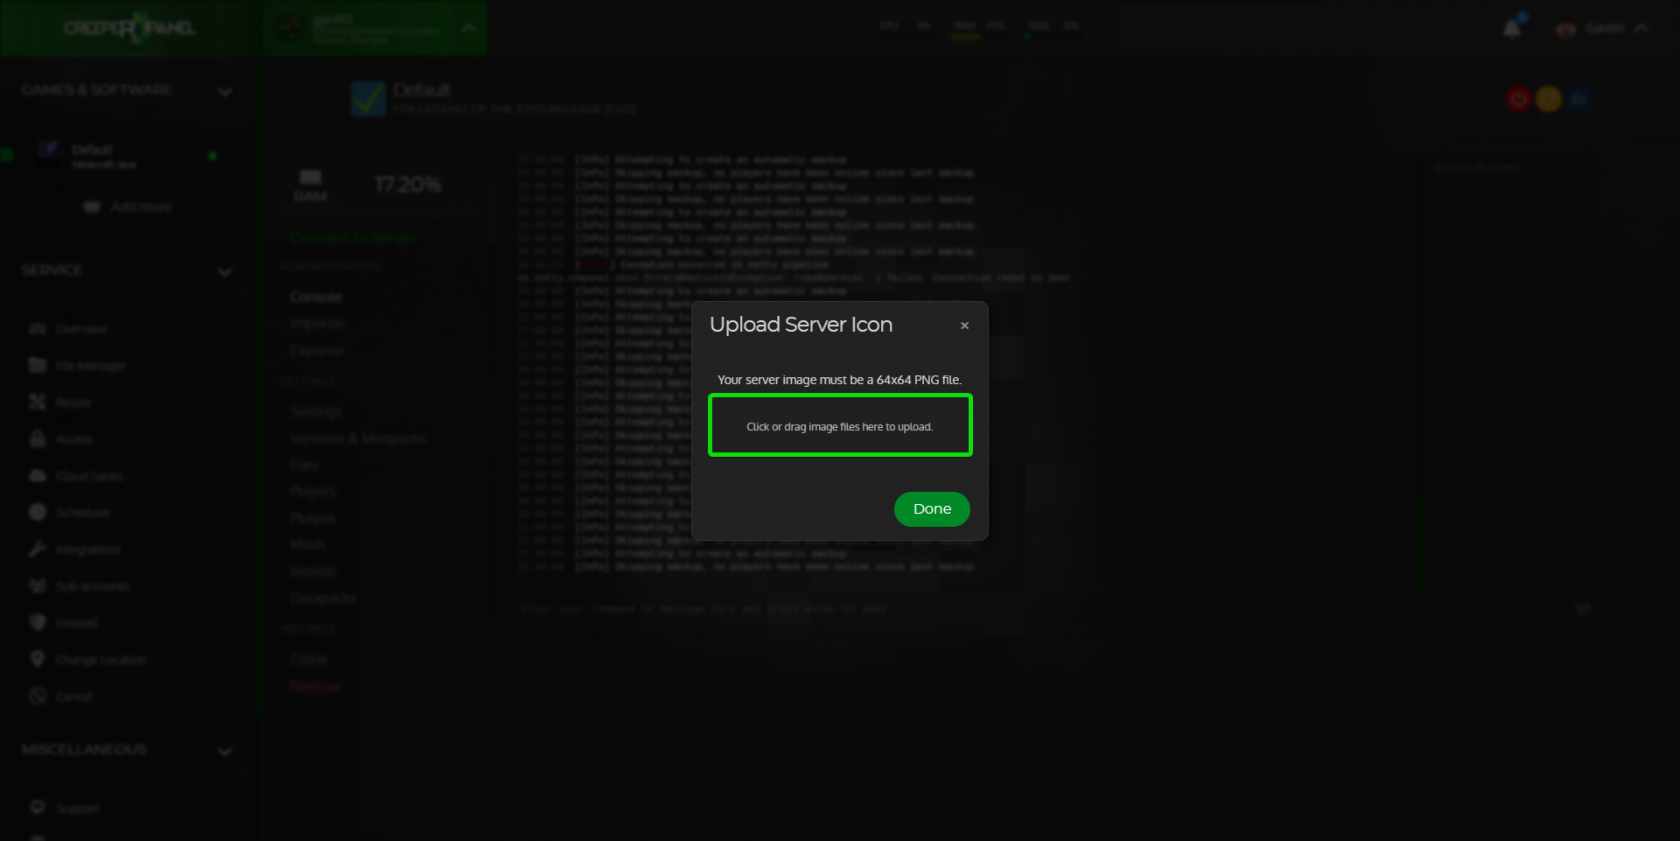](https://www.creeperhost.net/wiki/uploads/images/gallery/2023-02/luH03s7yiZ9Wg4BX-msedge-2023-02-06-21-40-37.png) 3\. After clicking done, you will see that the icon next to the instance and modpack name will change to the image you uploaded. # World pregen Pre-generating a minecraft world can help reduce the lag you may encounter when starting a new server as world generation is one of the most common sources of lag in minecraft. If you would like to pre-generate your world start your server up then head to to the World & Backups page, we recommend you only pre-generate your world when there are little or no players online as it can cause severe lag. [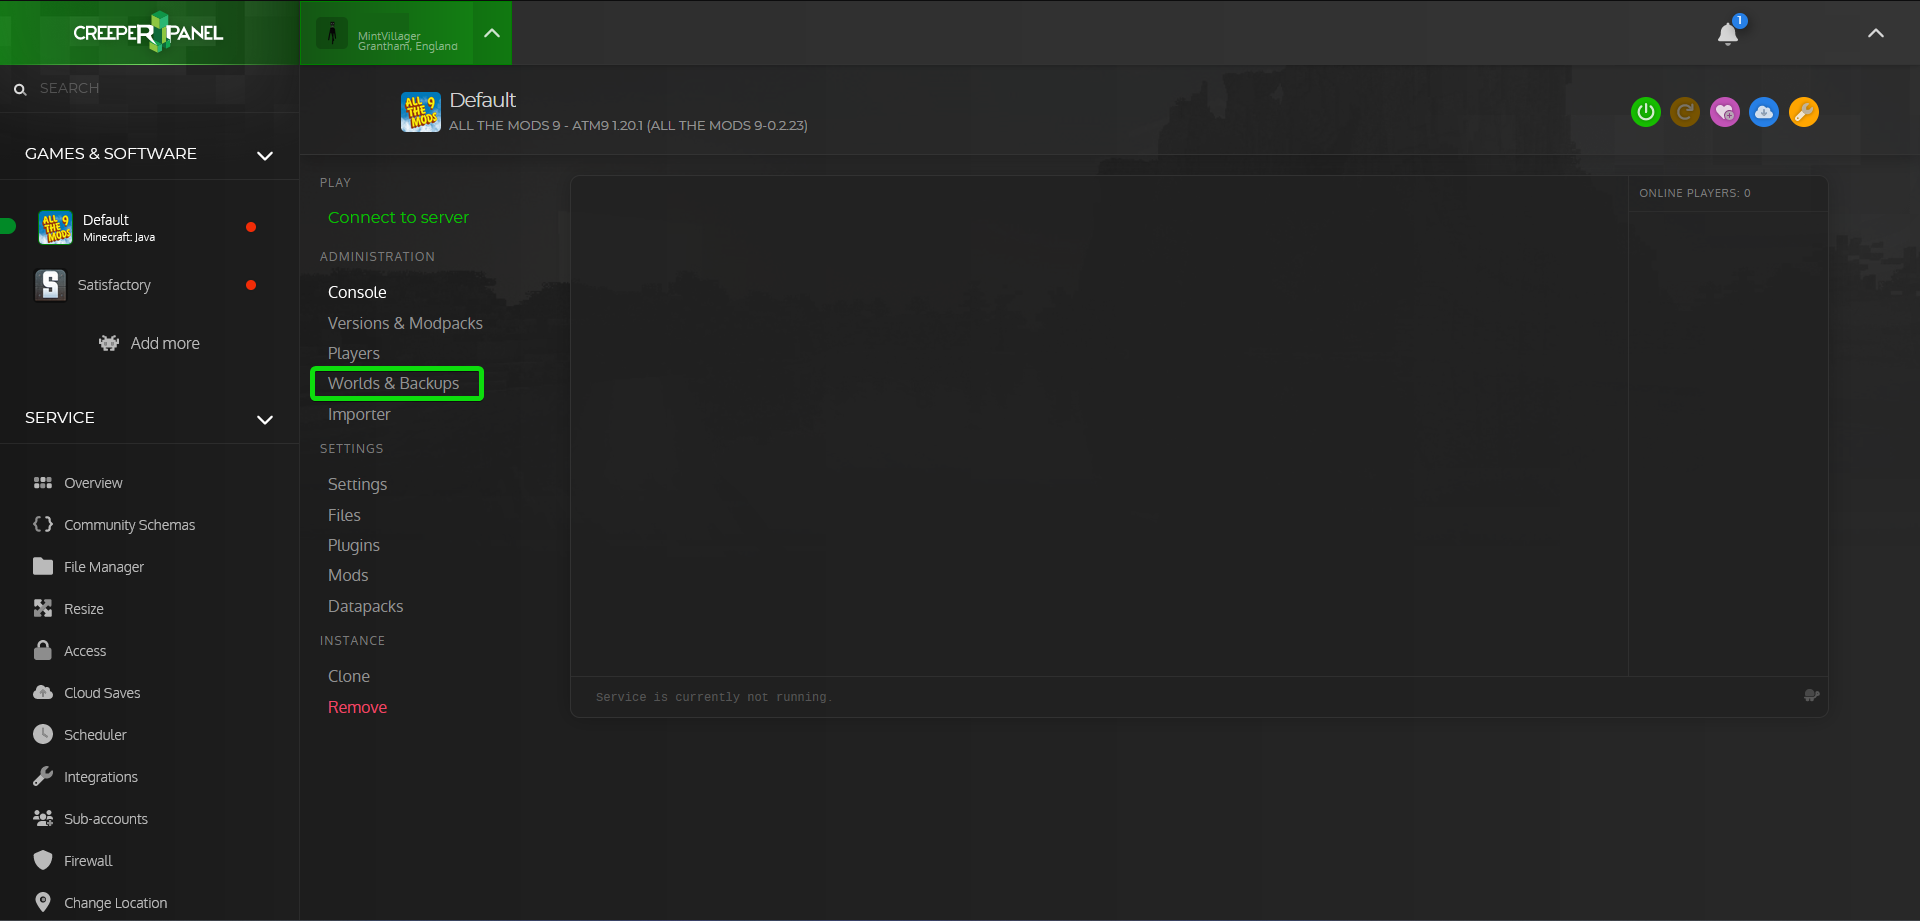](https://www.creeperhost.net/wiki/uploads/images/gallery/2023-12/PjLCIdW80eXjKChQ-2023-12-02-01-12-23.png) Once there, you should see a little blue button with a sapling icon. [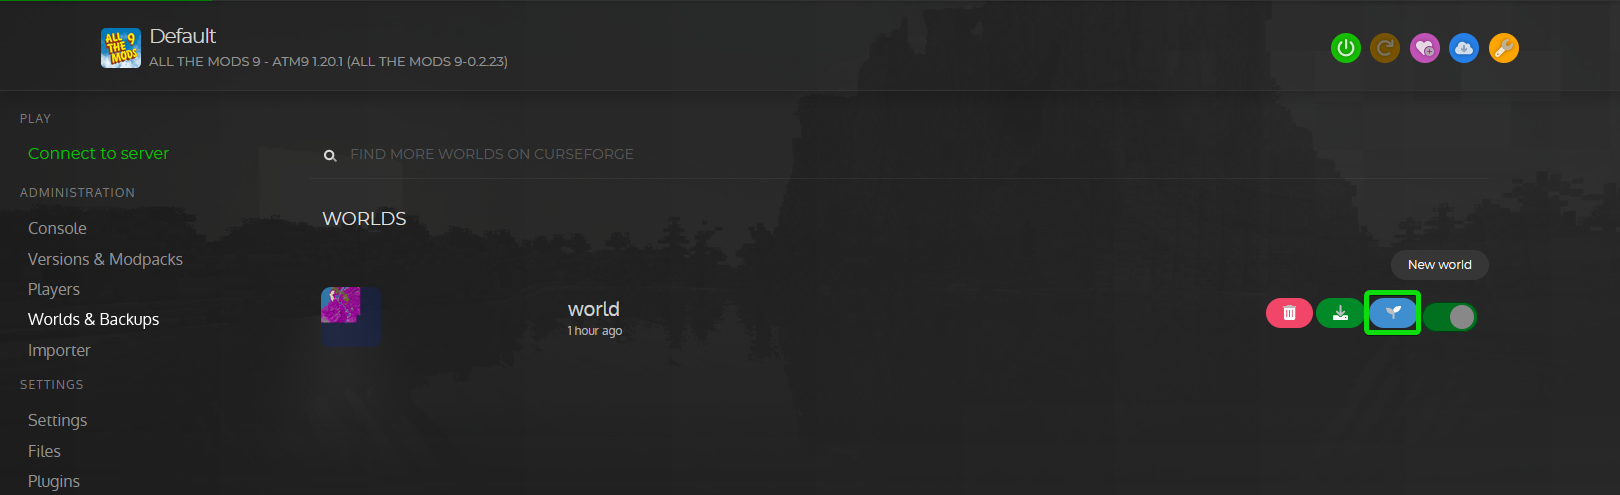](https://www.creeperhost.net/wiki/uploads/images/gallery/2023-12/SKpNdxa8Iue4sPmf-firefox-2023-12-02-01-12-48.png) Clicking this button will open up a popup which will allow you to select how many blocks in each direction you want to pre-generate using the slider, changing this will also update the estimate of how long it will take to finish pre-generating the chunks. [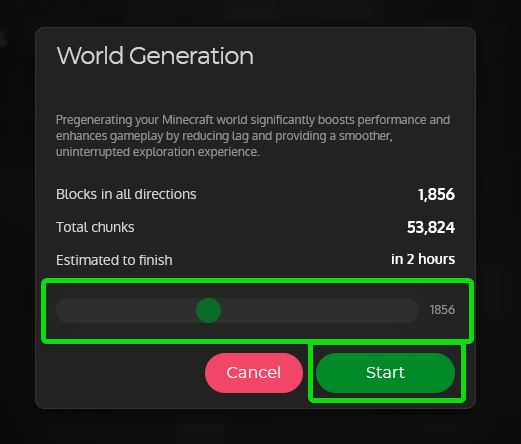](https://www.creeperhost.net/wiki/uploads/images/gallery/2023-12/nvQ8EEyuDTy4DSOB-firefox-2023-12-02-01-13-33.png) # File Management Editing, adding, removing, backup restoration... # Installation Location Minecraft: Java Edition is stored in the ./home/minecraft/mc-instances/mc-INSTANCEIDHERE/ directory, it can be accessed via the Files menu for your game instance, or, **[sFTP/SSH](https://www.creeperhost.net/wiki/books/general-information/chapter/file-management "File management")**. Files added to the instance's directory will be detected by the control panel and software utilizing them.The instance ID is in your browser URL, eg: "panel.creeper.host/TestServer/services/mc/**mc-5c604c6ddc398**/files" when visiting any submenu for that instance.
Uploading files using the 'root' login details for SSH/sFTP *may* cause problems with the control panel being able to access files/folders. Where possible, always login using the standard 'minecraft' level key.
An example of a healthy structure listing (Note: "Files" menu does not show the /home/minecraft/\* part of the file structure): - /home/minecraft/mc-instances/mc-INSTANCEIDHERE/server.jar - /home/minecraft/mc-instances/mc-INSTANCEIDHERE/configs/ - /home/minecraft/mc-instances/mc-INSTANCEIDHERE/mods/ - /home/minecraft/mc-instances/mc-INSTANCEIDHERE/world/level.dat - /home/minecraft/mc-instances/mc-INSTANCEIDHERE/server-icon.png Any files dropped into the /home/minecraft/ directory via [**sFTP/SSH**](https://www.creeperhost.net/wiki/books/general-information/chapter/file-management "File management") will not be detected by the instances sub-menus, they must be within the /home/minecraft/mc-instances/mc-INSTANCEIDHERE/ directory. # My world is too big, how do I upload it? If your world is too big to # Restoring Backups #### Backup Restoration: To restore a backup created by mods such as FTBU (Feed The Beast Utilities) or Aroma1997's Backup: 1\) Visit your instances **Console** page - Make sure the server is shut down via the red stop button on the right. 2\) Click on the **Files**, since you were on the console you'll now be loaded into the installation directory for that Minecraft instance. 3\) Right-click on your current **/worldname/** folder and rename or delete it (make sure you have backups before deleting!) - We want to replace it, not overwrite it. 4\) Open the **/backups/** directory, find the backup you want to use (The backups are named as follows: Year-Month-Day-Hour-Minute-Second, the most recent backup is usually the last one listed in the directory: Filename formats may vary depending on the mod or mod version). If it is a .zip file, right-click > **Extract** to extract the files from the backup. 5\) Open the directory that matches the name of the backup that you just extracted then right-click on the world folder and select Move. In the window that opens click on the topmost folder then click confirm. 6\) Start the server via the green start button on the right side of the **Console** page - You're done! #### Backup configuration (FTBU): The FTBU backup configuration file is located in /configs/ftbutilities.cfg. FTBU configurations for ranks etc, are stored within /local/ftbu/\* Note: /local/ftbutilities/ may show as /local/ftbu/ depending on mod version, and, older versions store the 'master configuration' in the /local/ftbu/, it can be accessed via the instances Files menu or **[sFTP](https://www.creeperhost.net/wiki/books/general-information/chapter/file-management)** (see **[Installation Location](https://www.creeperhost.net/wiki/books/minecraft-java-edition/page/installation-location)** ). ``` backups { # Timer in hours # 1.0 - backups every hour # 6.0 - backups every 6 hours # 0.5 - backups every 30 minutes # Min: 0.05 # Max: 600.0 D:backup_timer=2.0 # The number of backup files to keep # More backups = more space used # 0 - Infinite # Min: 0 # Max: 32000 I:backups_to_keep=12 # 0 - Disabled (output = folders) # 1 - Best speed # 9 - Smallest file size # Min: 0 # Max: 9 I:compression_level=1 # Prints (current size | total size) when backup is done B:display_file_size=true B:enabled=true # Absolute path to backups folder S:folder= B:silent=false # Run backup in a separated Thread (recommended) B:use_separate_thread=true ``` Reducing "backups\_to\_keep" is recommended if: a) You have a very large world, as you can quickly fill your SSD disk space. b) You use our own backup system (Service > Backups menu) - This system will backup the entire Minecraft installation directory, you can easily end up exceeding your SSD disk space limit as the backup will backup FTBU's backups too. Backup inception! If you reduce the backups\_to\_keep (3~6), it is also recommended to increase the backup\_timer to 6.0, 12.0 or 24.0 to spread out the backups over a larger range of time, so you have plenty of time intervals to easily distinguish between and roll back to. # Adding Mods To find your instance please follow this guide:[**https://www.creeperhost.net/wiki/books/minecraft-java-edition/page/finding-your-instances**](https://www.creeperhost.net/wiki/books/minecraft-java-edition/page/finding-your-instances) --- On the instance page of the server you want to add a mod to click on `Mods` in the instance navigation list. [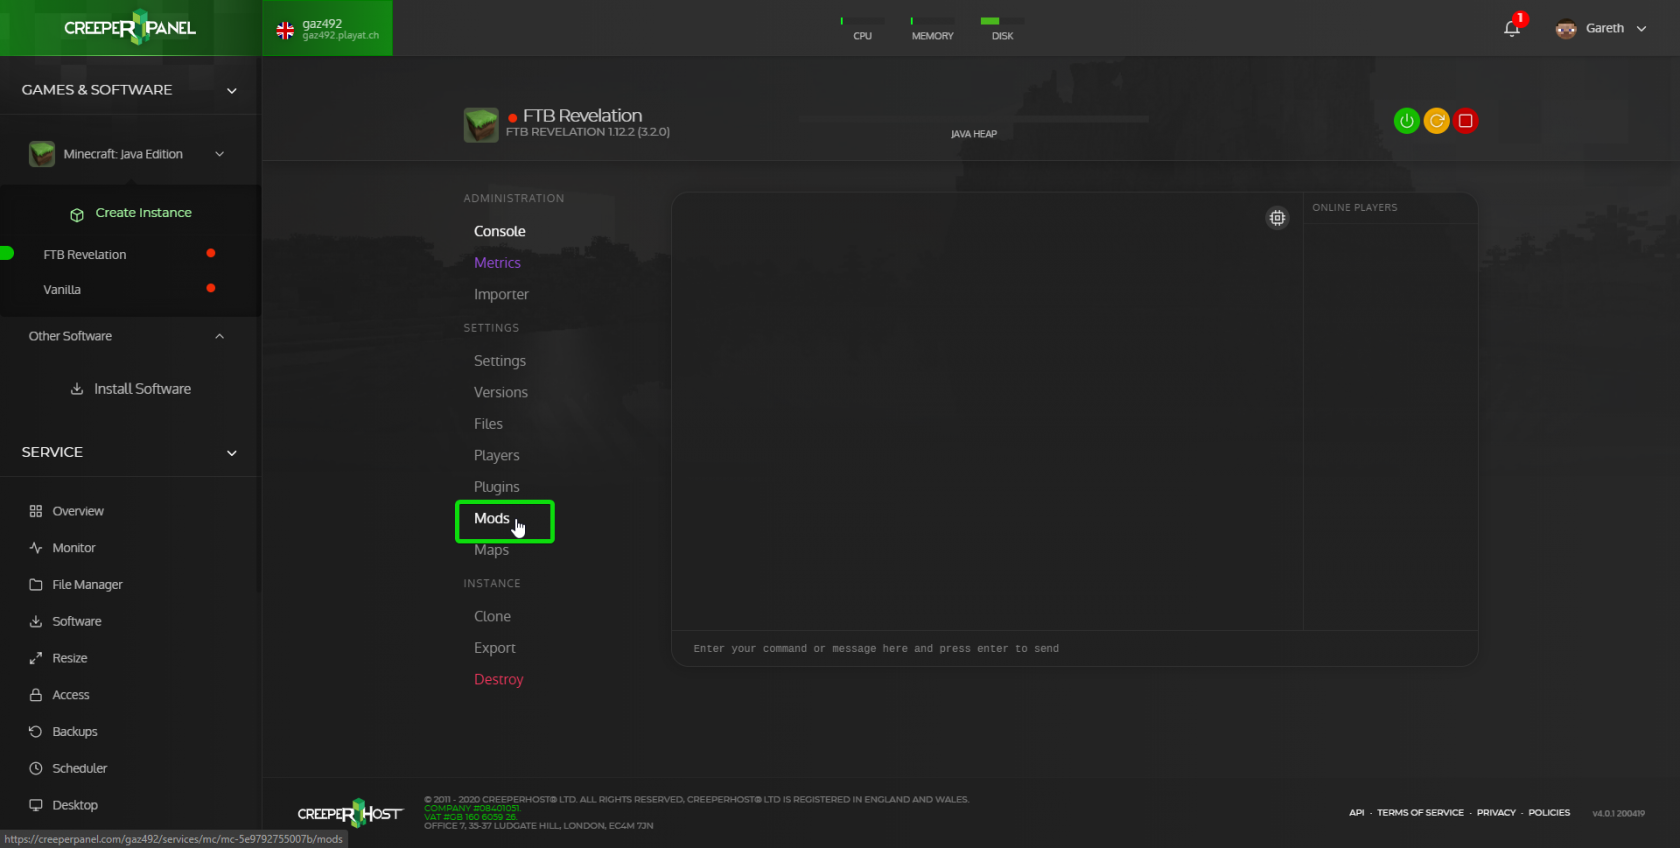](https://www.creeperhost.net/wiki/uploads/images/gallery/2020-04/tO76fAl1TTJRE1ld-msedge_2020-04-21_00-40-08.png) Once on the `Mods` page there are multiple methods to install a mod. Each method has been described below. ##### Method 1 Click on the large textbox that says `Find On Curse` and search for the mod you want to install [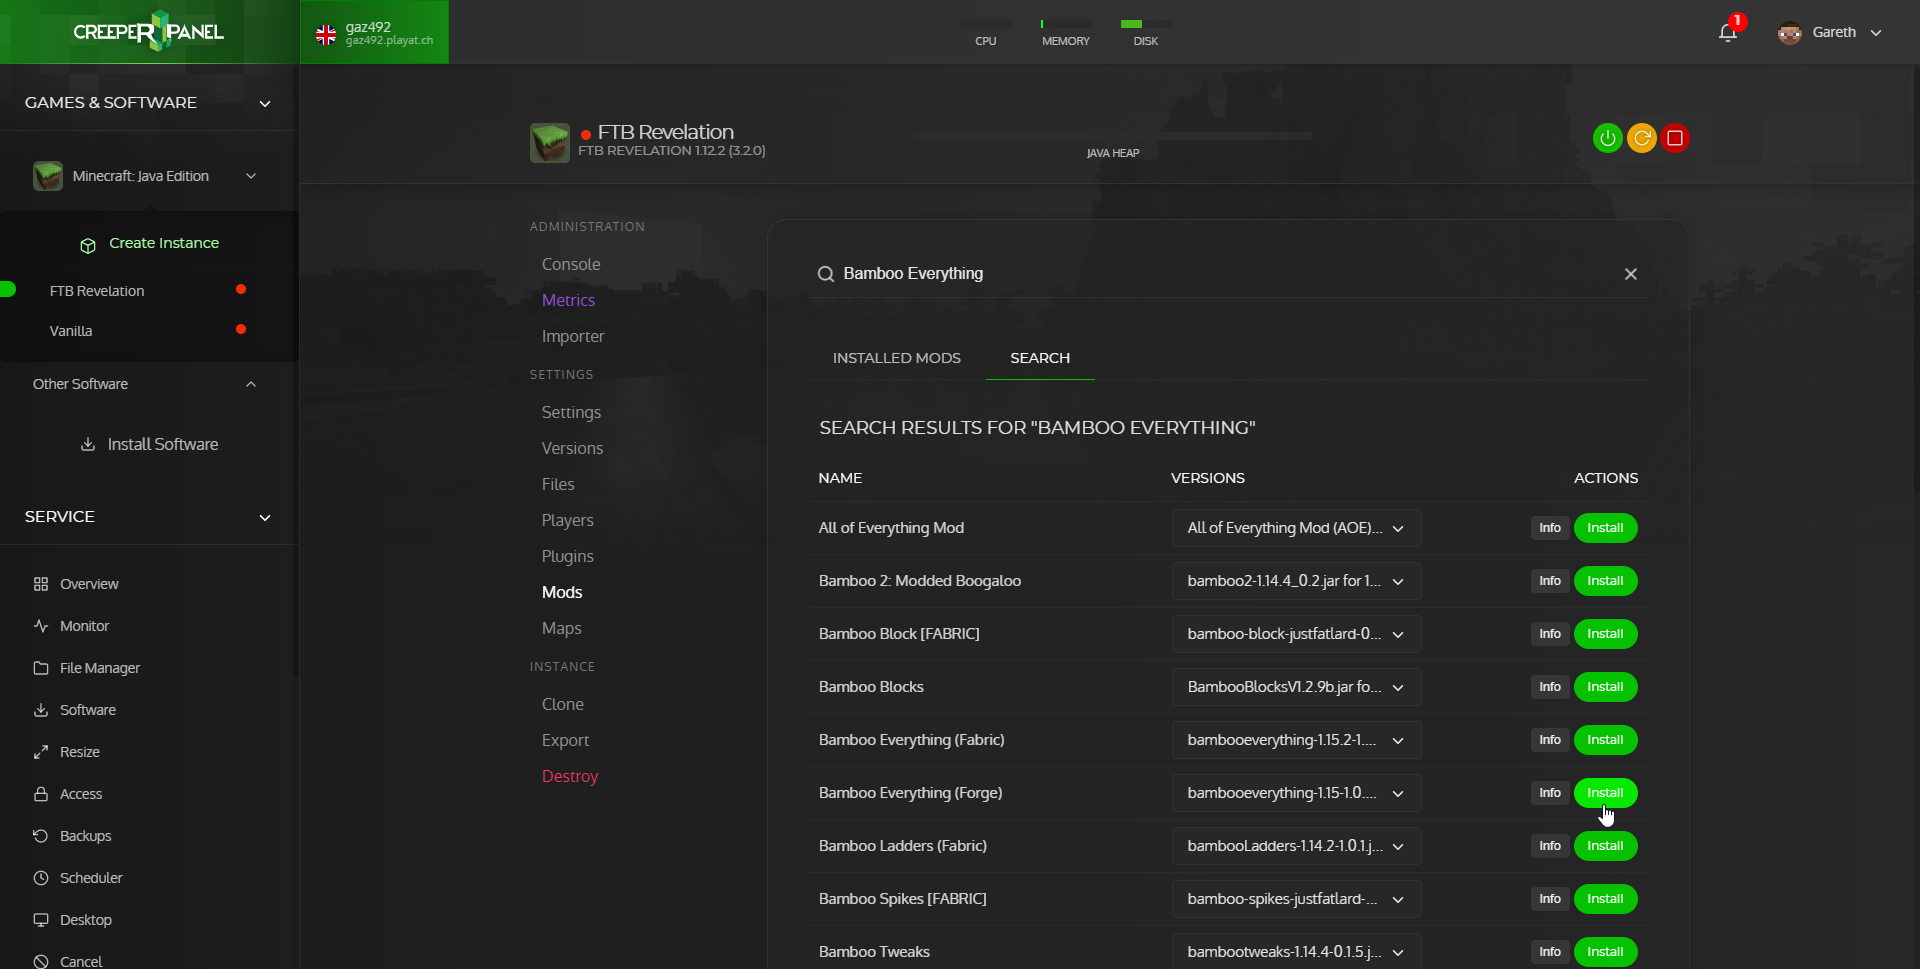](https://www.creeperhost.net/wiki/uploads/images/gallery/2020-04/OHqN3dyUURPNxgP7-msedge_2020-04-21_01-26-27.png) After you find the mod you want to install make sure to select a version that will work with the version of Minecraft running on your server and click `Install` [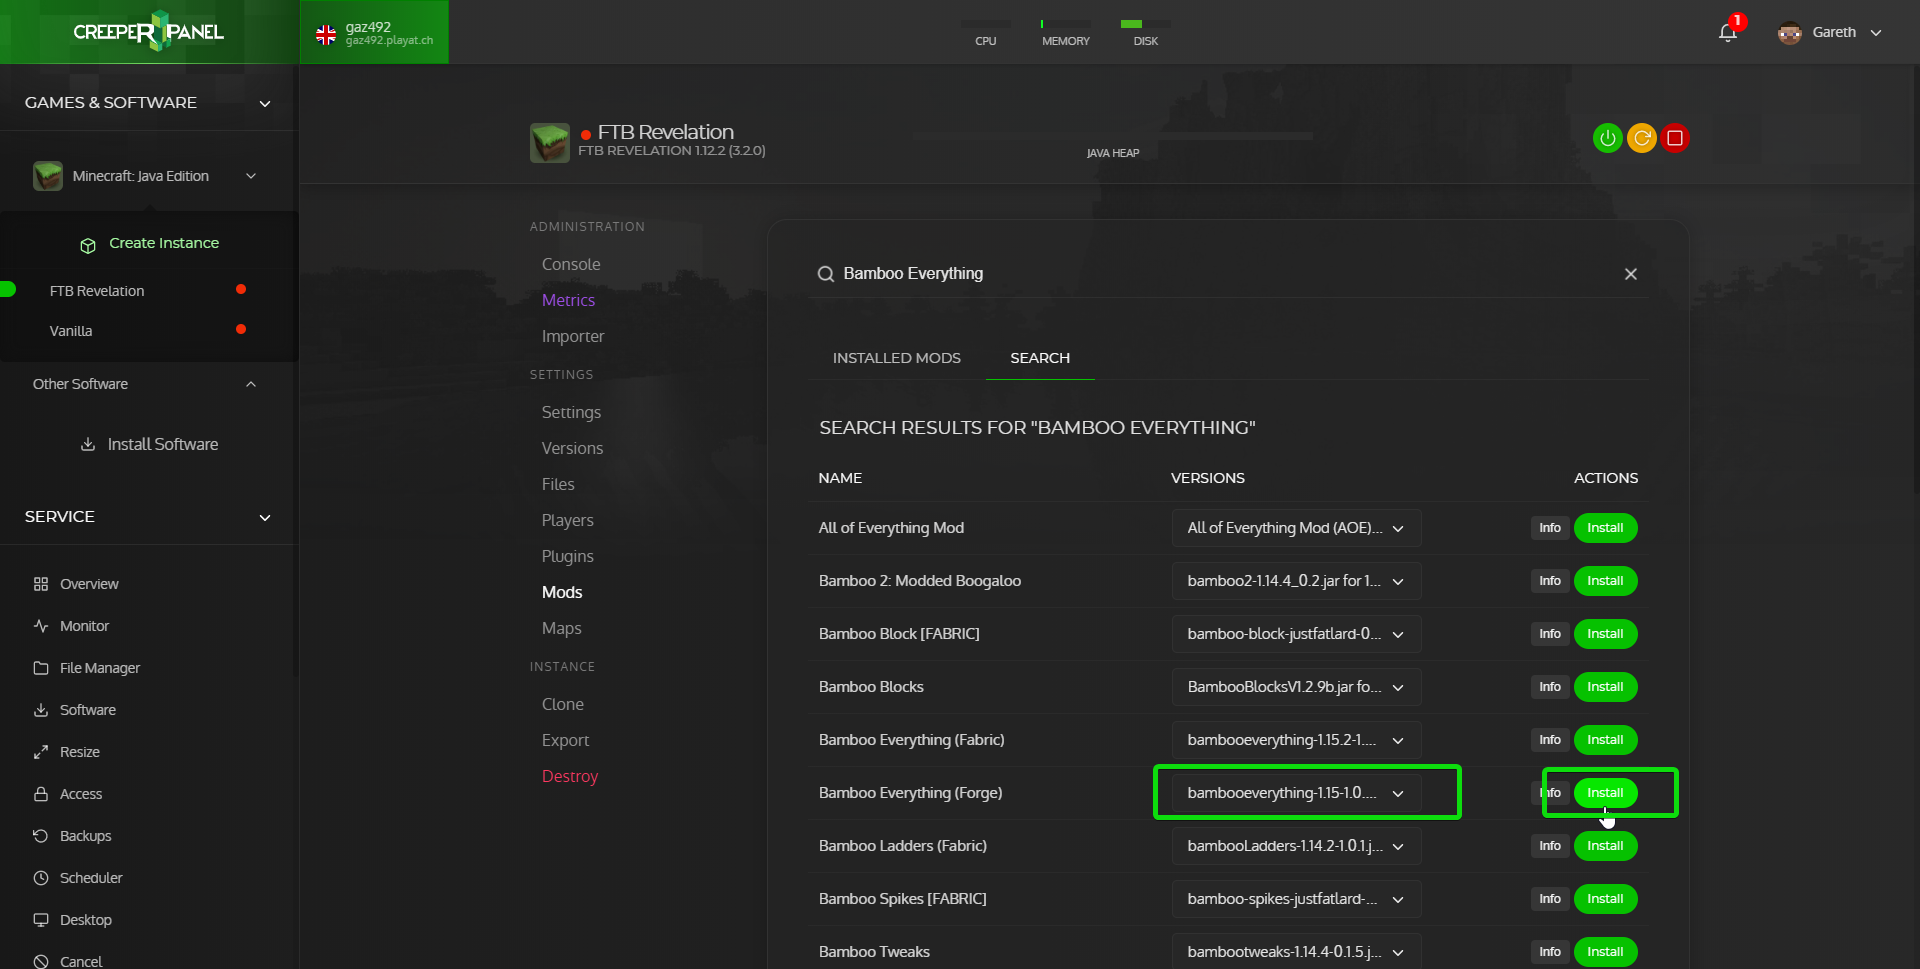](https://www.creeperhost.net/wiki/uploads/images/gallery/2020-04/5YnOopL9AYW9YWnx-msedge_2020-04-21_01-28-14.png) ##### Method 2 If you have the mod(s) that you want to add to your server already downloaded then you can click on the darker box that says `Click or drag files here to upload to your server` [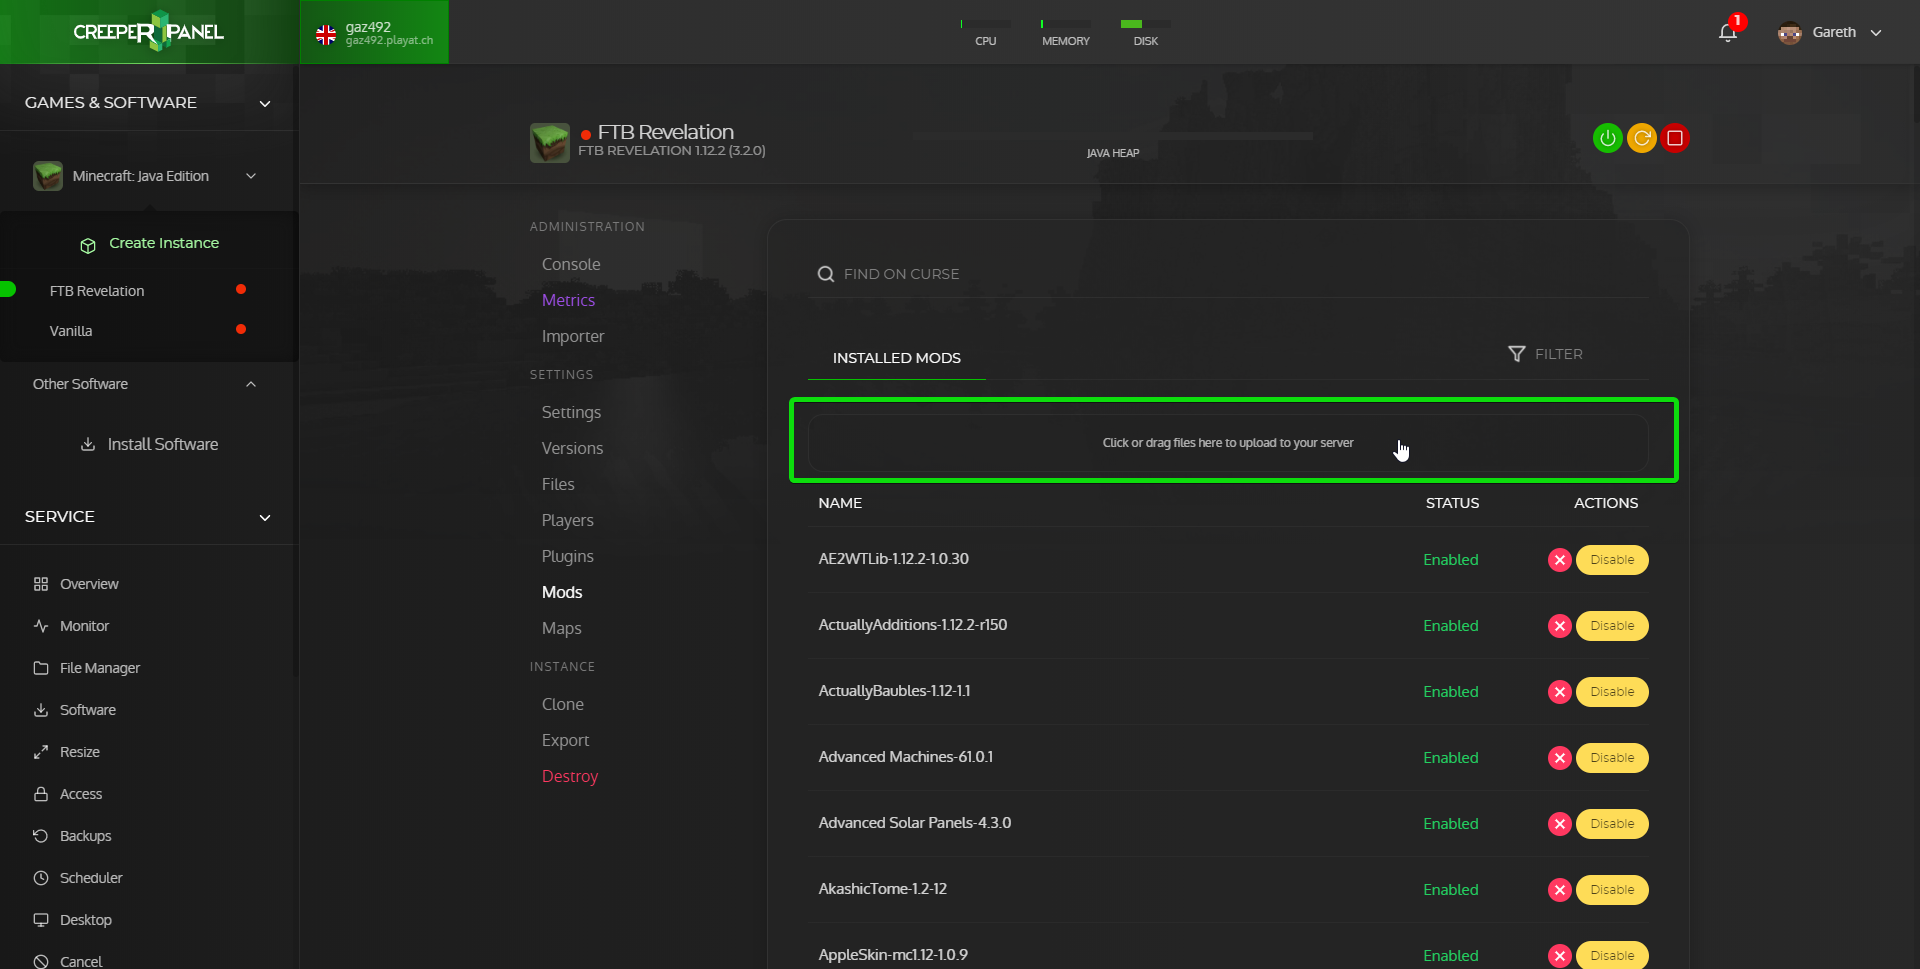](https://www.creeperhost.net/wiki/uploads/images/gallery/2020-04/x4NMfEzAJYviJ0Vz-msedge_2020-04-21_01-45-58.png) In the window that opens you can then navigate to where the mods you want to upload are located then click `Open` [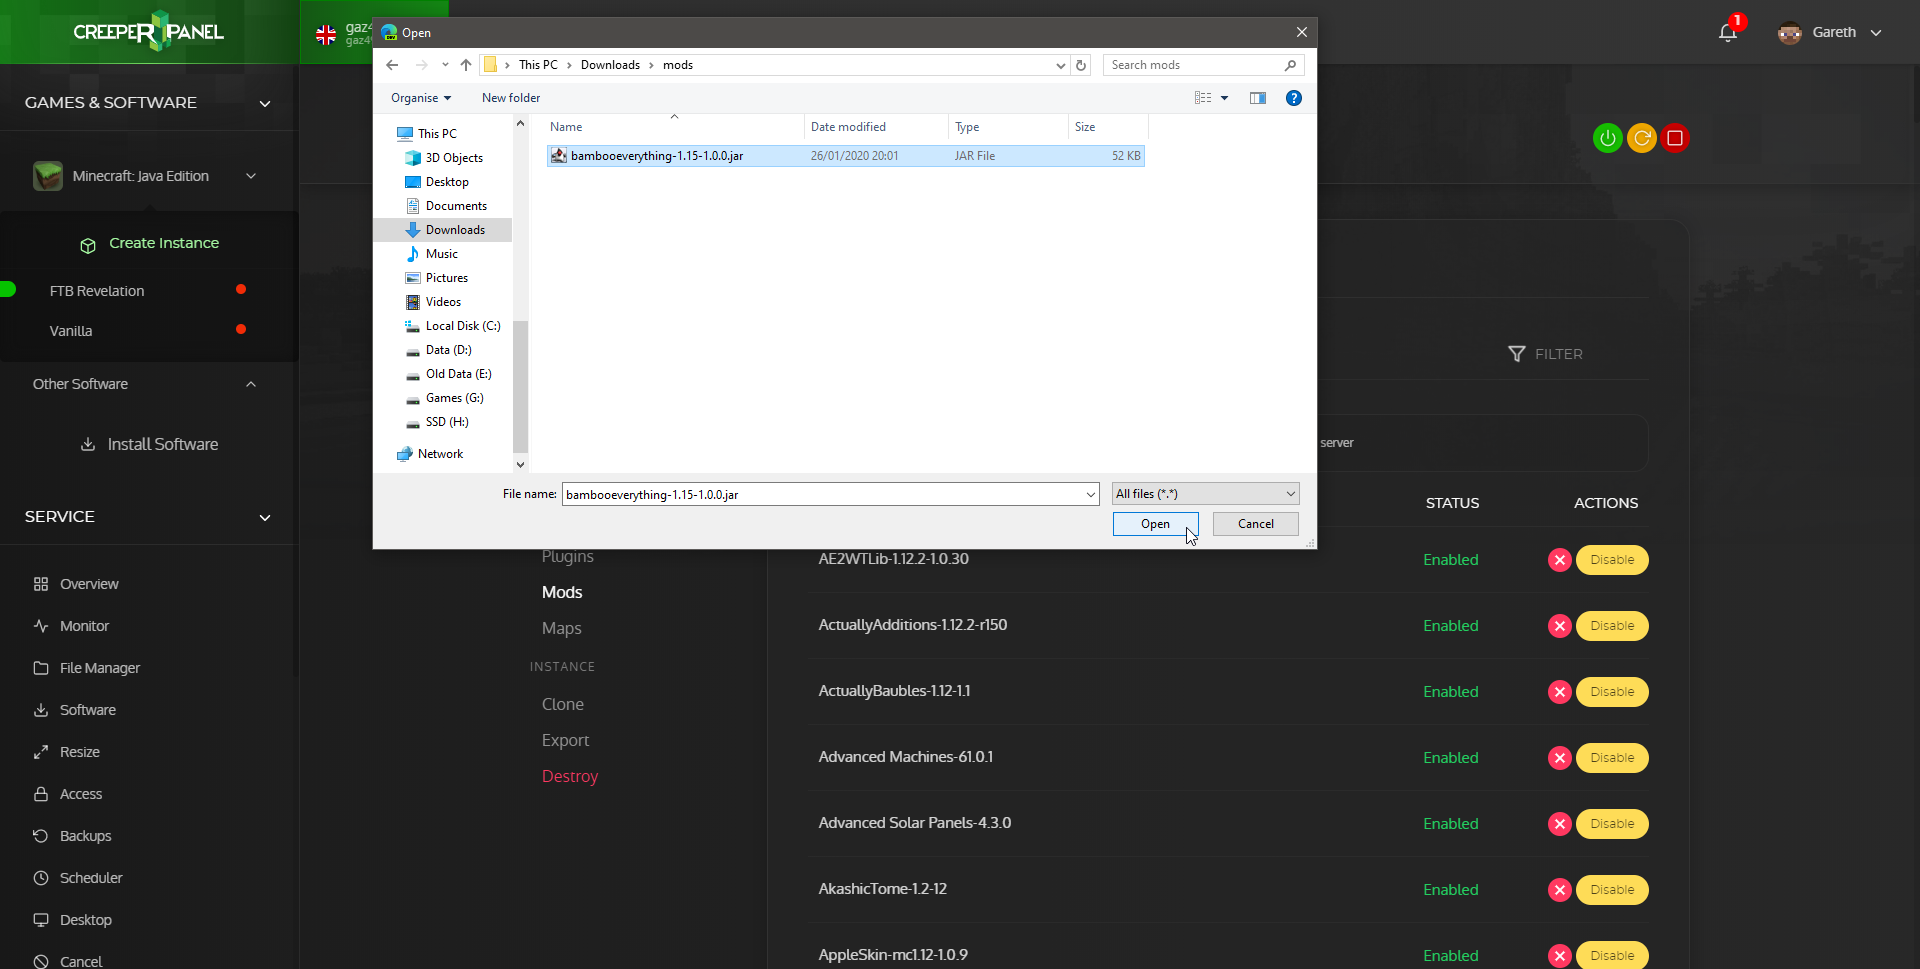](https://www.creeperhost.net/wiki/uploads/images/gallery/2020-04/EDaKCyY5fdu51JIk-msedge_2020-04-21_01-48-49.png) Once you have the mods you wanted installed you will need to restart the server to enable them. # Importing your world Click on the instance you want to upload your world to (**[https://www.creeperhost.net/wiki/books/minecraft-java-edition/page/finding-your-instances](https://www.creeperhost.net/wiki/books/minecraft-java-edition/page/finding-your-instances)**) then click the red stop button in the top right. Next click on the Import link in the instance navigation. [](https://www.creeperhost.net/wiki/uploads/images/gallery/2020-05/tJf4M1MJGVTM6N2Q-2020-05-23_22-21-46.png) On the importer page click on where it says `Click or drag your compressed world folder to upload`. This will bring up a window where you can browse to where your compressed world is. Select the world.zip and click on `Open` [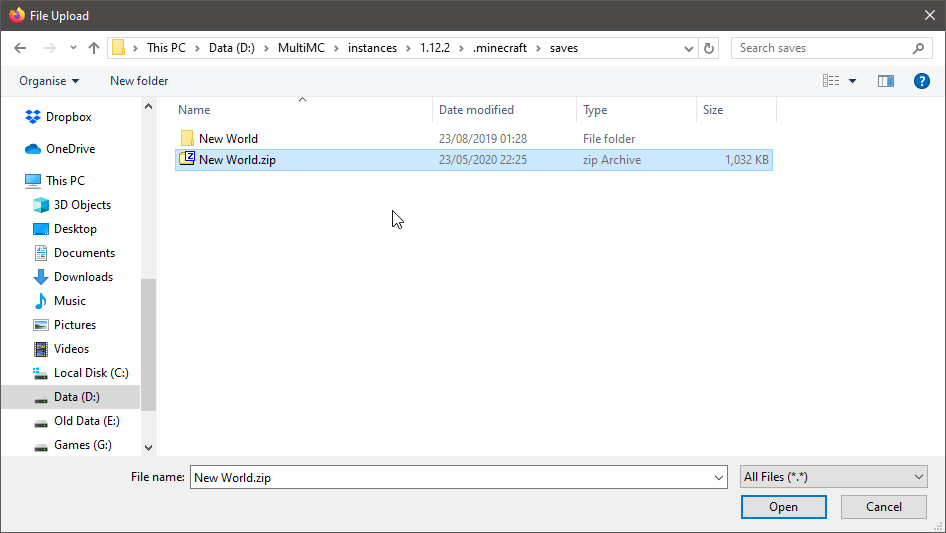](https://www.creeperhost.net/wiki/uploads/images/gallery/2020-05/L65LPugeoOcXQap7-firefox_2020-05-23_22-25-30.png) It will now upload the world for you and once it has finished uploading and extracting the world it will ask you if you would like to set the world you uploaded to the default world. [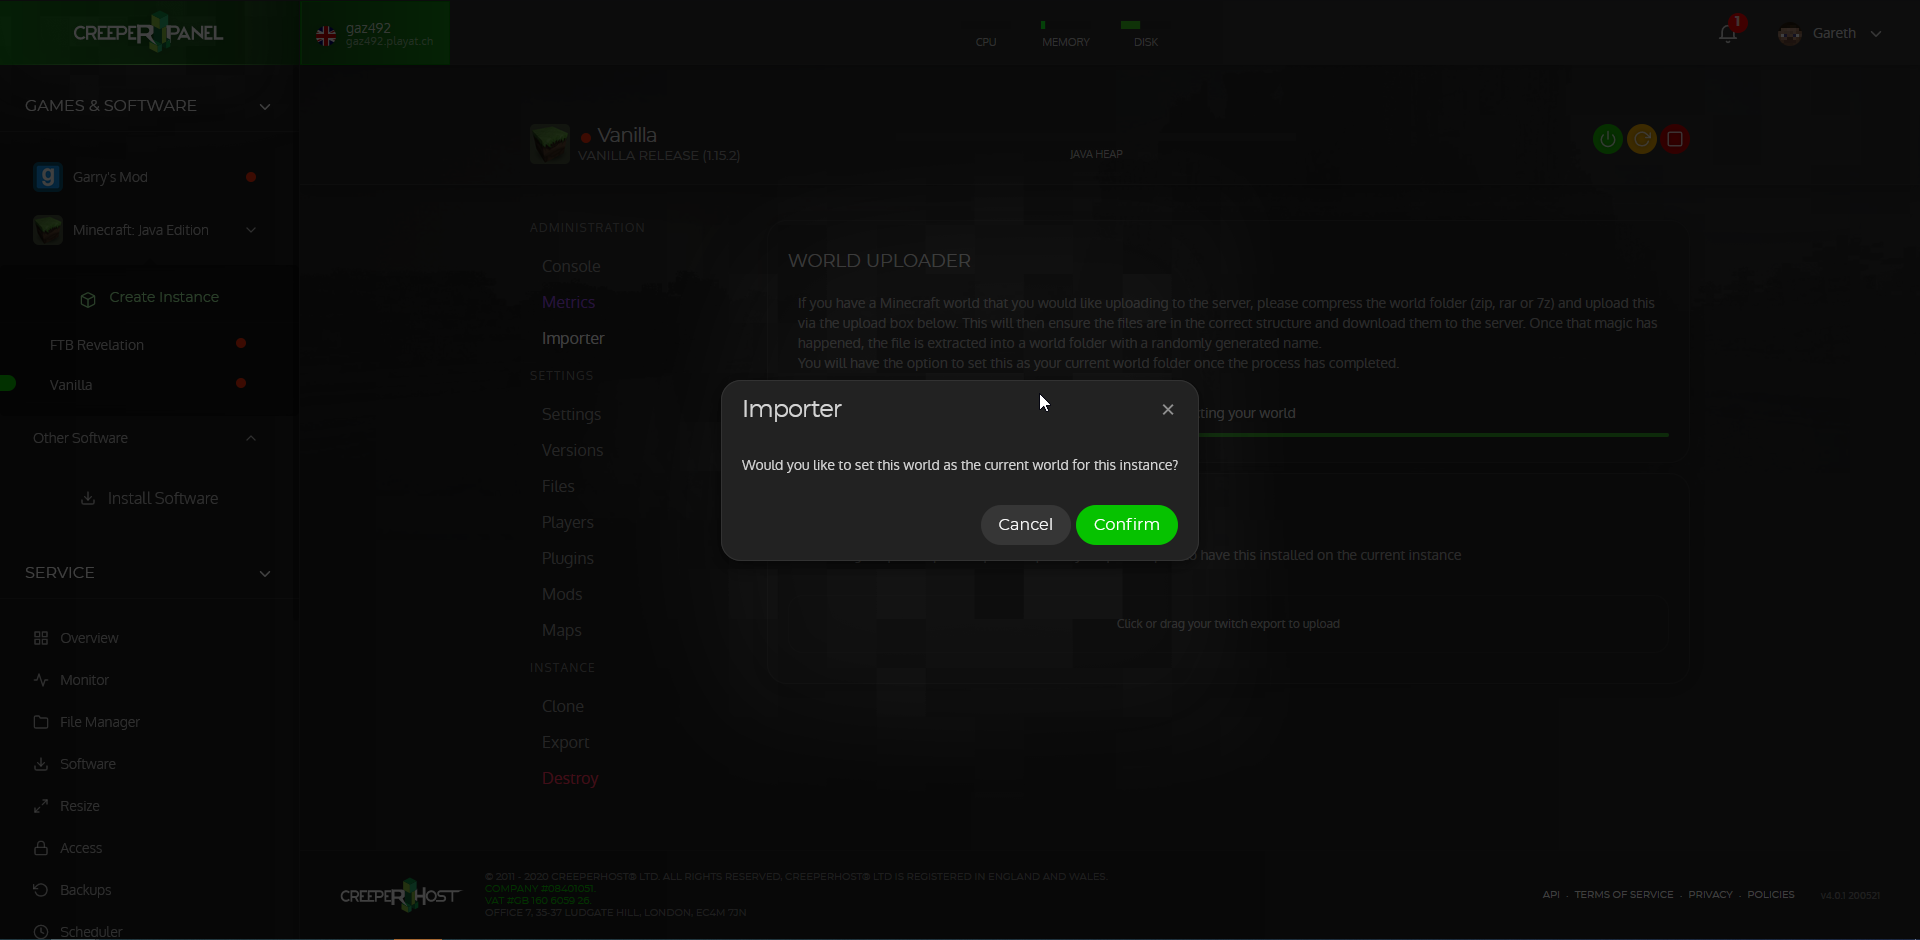](https://www.creeperhost.net/wiki/uploads/images/gallery/2020-05/ULUt7vnjmxmXeXHQ-2020-05-23_22-29-10.png) Selecting `Confirm` will set it to be the default world and selecting `Cancel` will leave your settings as they are. You can now start your server back up by pressing the green power button in the top right. # Adding Plugins To find your instance please follow this guide: **[https://www.creeperhost.net/wiki/books/minecraft-java-edition/page/finding-your-instances](https://www.creeperhost.net/wiki/books/minecraft-java-edition/page/finding-your-instances)** --- On the instance page of the server you want to add a mod to click on `plugins` in the instance navigation list. [](https://www.creeperhost.net/wiki/uploads/images/gallery/2020-10/J0CjGB1kQ793e44T-2020-10-19_20-28-17.png) Once on the `Plugins` page proceed to the steps below. --- If you have the plugin(s) that you want to add to your server already downloaded then you can click on the darker box that says `Click or drag files here to upload to your server` [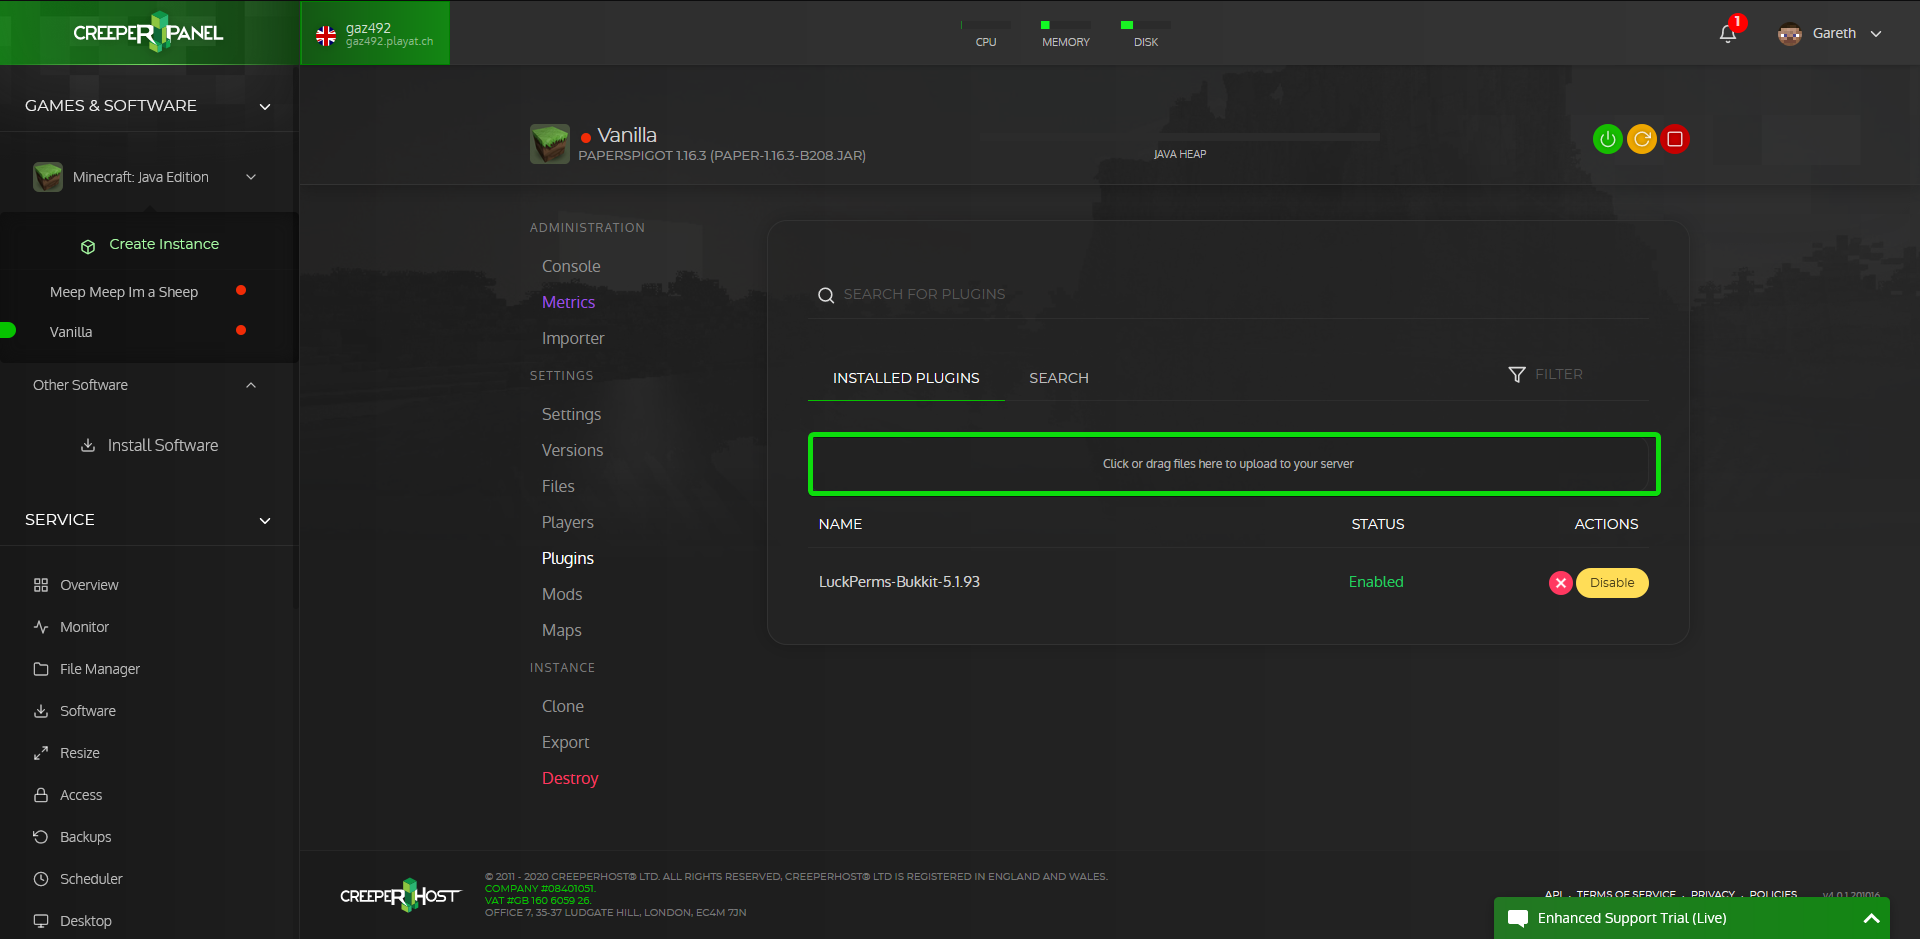](https://www.creeperhost.net/wiki/uploads/images/gallery/2020-10/pdTqNA79L16151z3-firefox_2020-10-20_18-17-22.png) In the window that opens you can then navigate to where the plugin(s) you want to upload are located then click `Open` [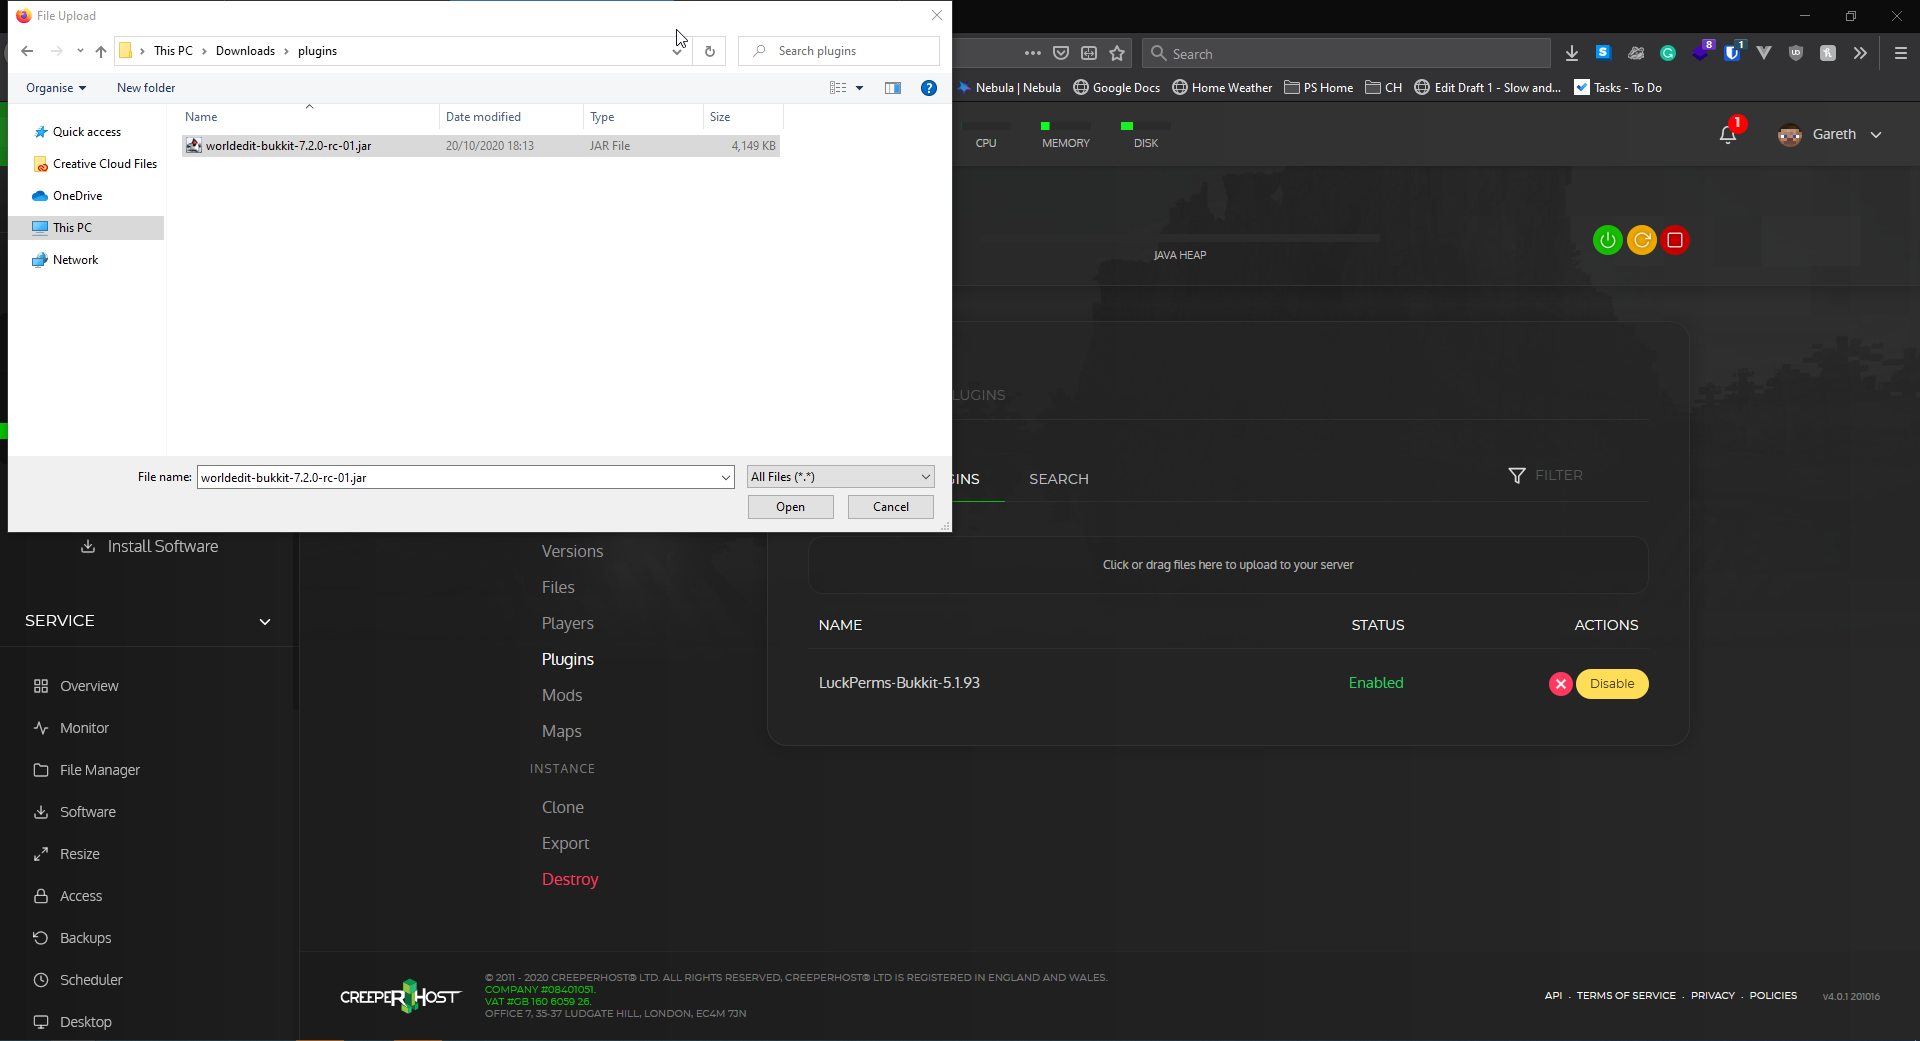](https://www.creeperhost.net/wiki/uploads/images/gallery/2020-10/HwH6yGgk6vrUjJDo-2020-10-20_18-18-31.png) Once you have the plugin(s) you wanted uploaded you will need to restart the server to enable them. # Adding datapacks To find your instance please follow this guide: **[https://www.creeperhost.net/wiki/books/minecraft-java-edition/page/finding-your-instances](https://www.creeperhost.net/wiki/books/minecraft-java-edition/page/finding-your-instances)** --- On the instance, you want to add the datapack to, click on the FIles link [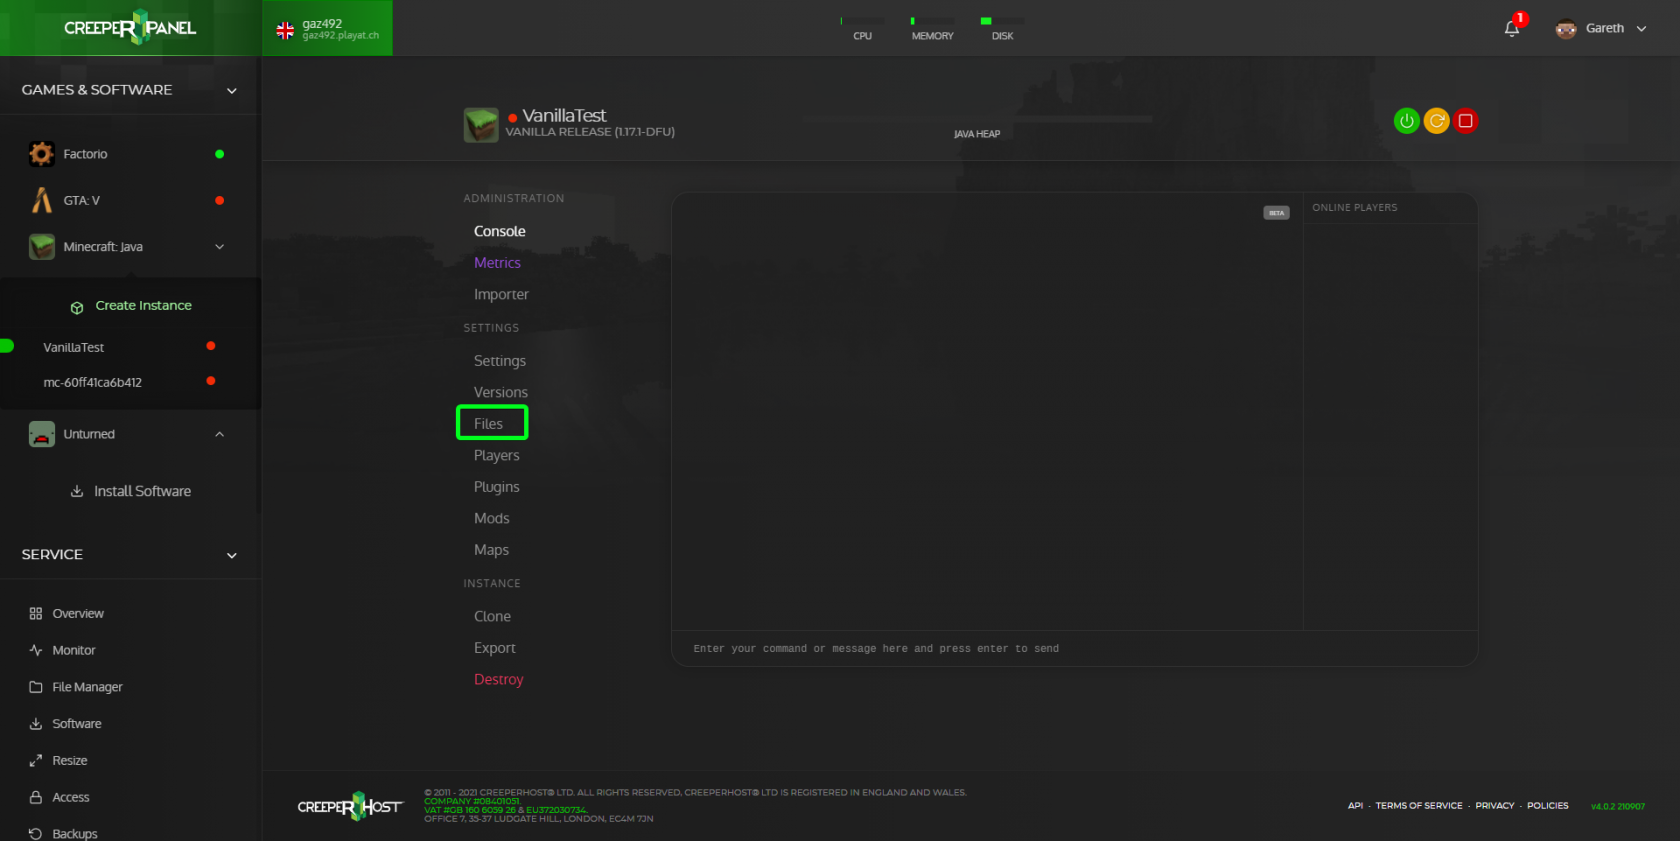](https://www.creeperhost.net/wiki/uploads/images/gallery/2021-09/A5qg7Izd6YtbnpID-msedge-2021-09-08-00-13-03.png) Once the files and folders have loaded double click on the world folder (the world folder may vary in name if you have modified the level-name in the settings or imported a world) [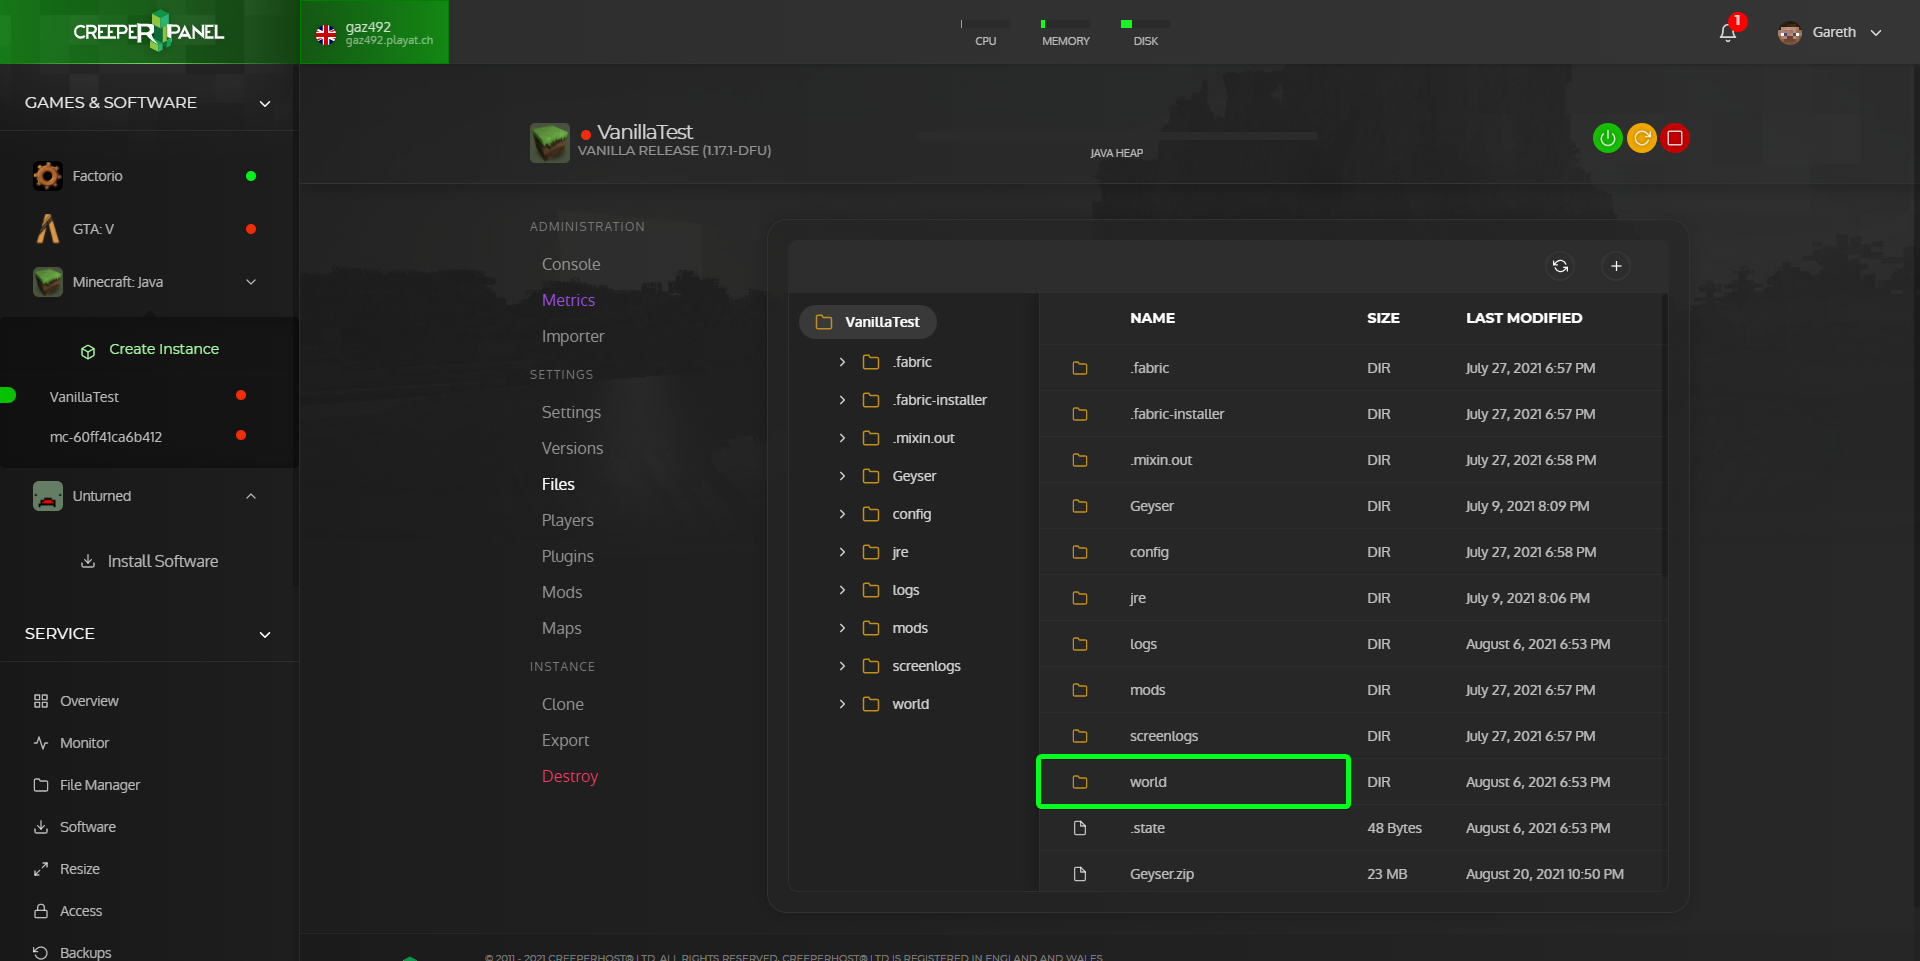](https://www.creeperhost.net/wiki/uploads/images/gallery/2021-09/kqYW9MoMCpeiox7q-msedge-2021-09-08-00-13-18.png) Now double-click on the datapacks folder [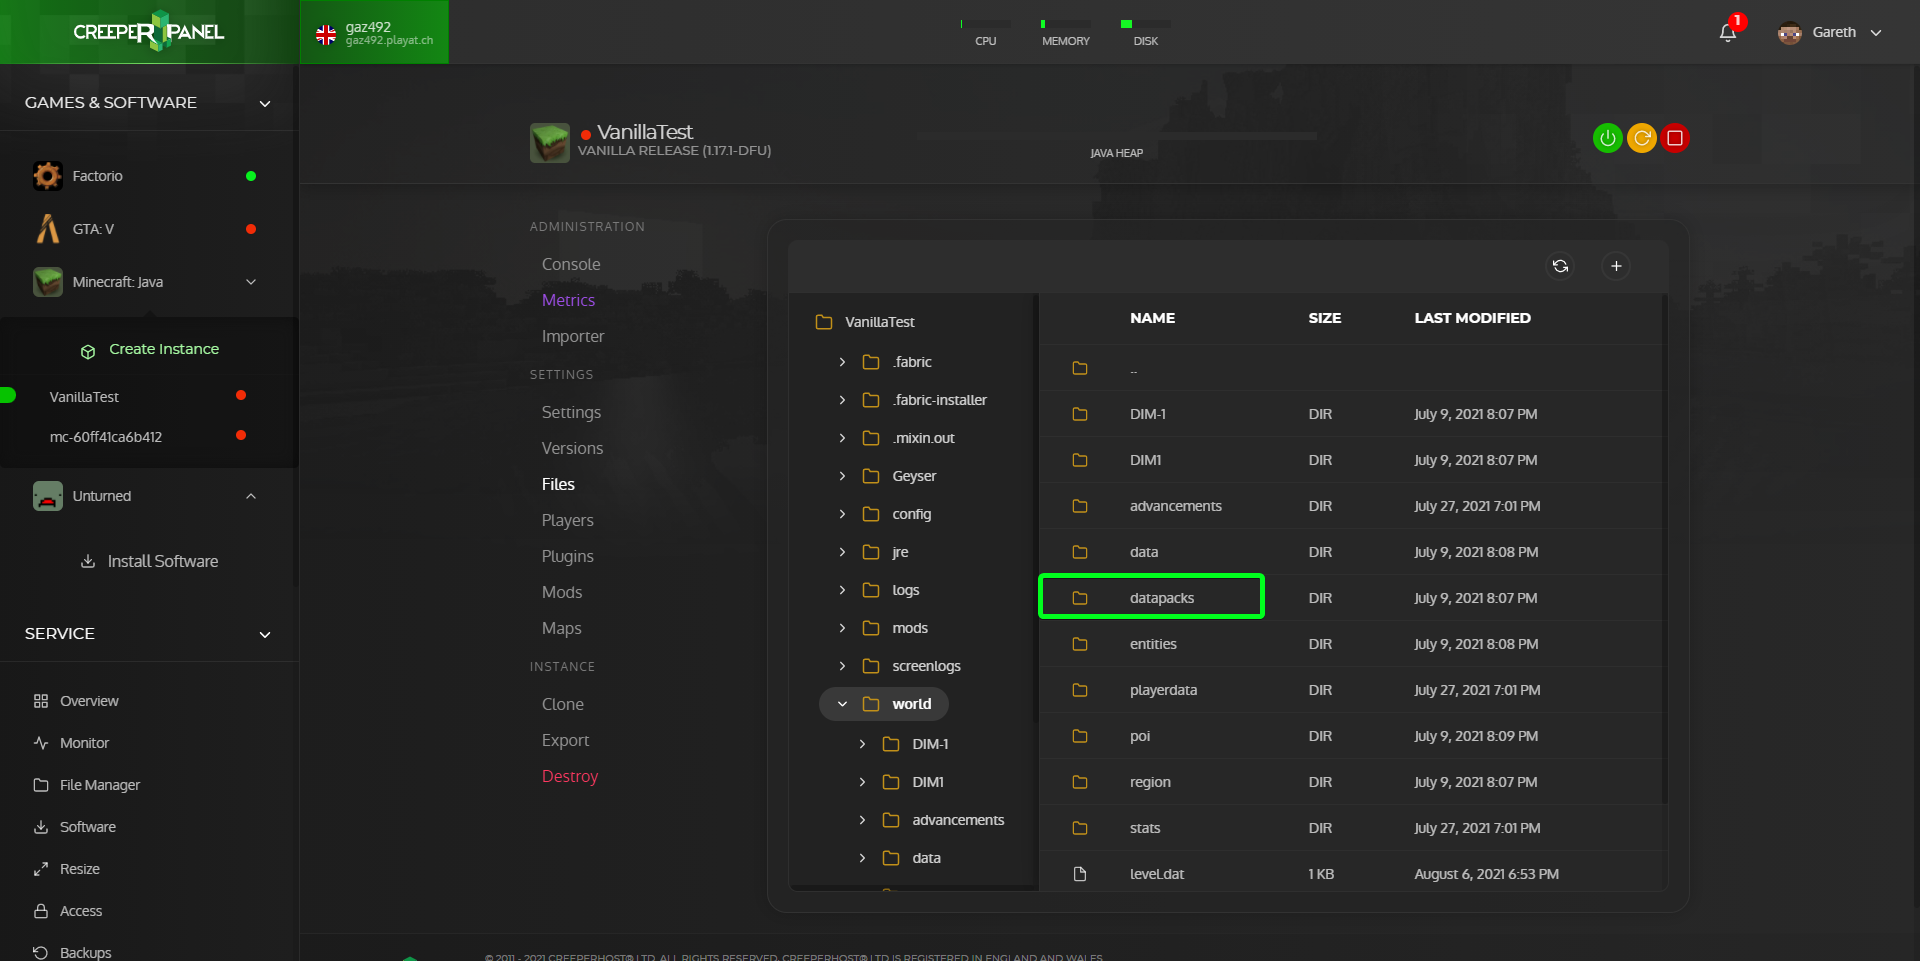](https://www.creeperhost.net/wiki/uploads/images/gallery/2021-09/HPQvJw0Zz98KMkdo-msedge-2021-09-08-00-13-28.png) Once in the datapacks folder drag and drop your datapack zip file into the files list and wait for it to upload [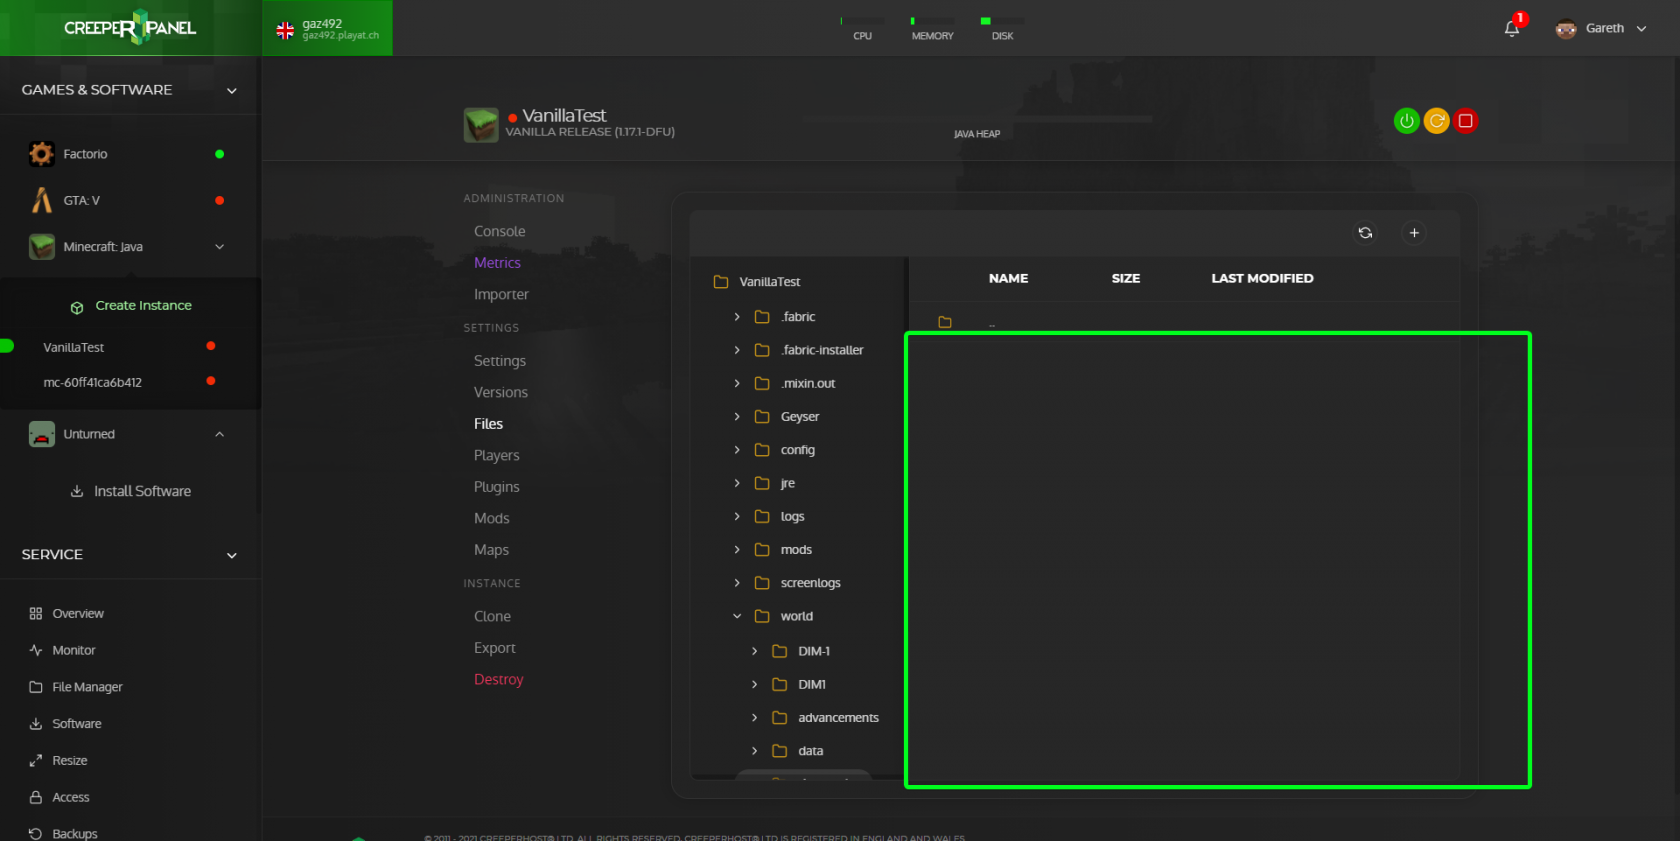](https://www.creeperhost.net/wiki/uploads/images/gallery/2021-09/2gsszKnutOju1Zyv-msedge-2021-09-08-00-13-39.png) Once its uploaded you will get a notification and you should then be able to use the /reload command in the console of your server or in-game if you are OPped to load the datapack or you can also reboot the instance. # Instance options List of all instance options and explaining their functions # Export/Import Instance #### **Exporting Instances:** A feature in the control panel allows you to export an instance to download to your computer, in which you can restore them later on. - Visit the Control Panel > Minecraft: Java Edition > Instance sub-menus. - Click Export Instance and wait for it to complete, this could take a few minutes, or longer (hours) depending on the size of your installation. - You will get a pop up in the panel with a URL to download your instance file. \- If for some reason this popup does not show, you can find the URL by going to Account > Security then you should see an entry with the command `exportInstance` if you click on that it will expand the box and show you the URL you can use to download the export. NOTE: If you do not have enough disk space to copy your server files the export process will fail and the URL generated will produce a "404" error. We would recommend using the Files sub-menu or **[sFTP/SSH](https://www.creeperhost.net/wiki/books/general-information/chapter/file-management "File management")** to remove excess backups or logs that could be 'inflating' the export size. On rare occasion, the export files may be left on the disk after the task has completed, increasing disk use, these files are located in /home/export/ and the zip is in /home/, to remove these files, either; a) Login using your root sFTP key and delete them, or, b) Send in a ticket and support will nuke them for you! The .instance file is a ZIP, it can be opened in any ZIP management program such as 7zip, WinRAR, WinZIP etc. It contains a complete copy of your Minecraft installation, the world, configs, mods. #### **Importing Instances:** Instances on the new panel can be imported via the "Create Instance" option, this menu will popup a dialog containing the clickable "I'd like to import an instance" option. The "I'd like to import an instance" option will allow you to enter the URL to your instances .instance or CurseForge .zip file. Legacy panel importing: Instances can be imported to your control panel later on using the Control Panel > Minecraft > Import Instance menu if you decide to re-implement that installation of Minecraft. Advanced note: You can also upload the .instance file via **[sFTP/SSH](https://www.creeperhost.net/wiki/books/general-information/chapter/file-management "File management")**, rename it to a .zip and 'wget' via **[sFTP/SSH](https://www.creeperhost.net/wiki/books/general-information/chapter/file-management "File management")**, or, use the Files sub-menu for your game to 'extract/decompress' your file. # Changing modpacks # Settings Every Minecraft instance has its own individual settings options. The settings page contains all of the following options: Note: (\*) options are unique to our panel functionality. (\*\*) options relate to [MineTogether](https://minecraft.curseforge.com/projects/creeperhost-minetogether) configuration.| **OPTION:** | **DESCRIPTION:** | **DEFAULT:** |
| Display Name (\*) | This is the name displayed for this Minecraft instance. | Name you give your instance when you create it |
| MOTD | The message of the day of your server. | A Minecraft Server |
| Allow Bedrock | Allows Bedrock players to connect - must be using Vanilla 1.16.2 or newer | False |
| Discoverability (\*\*) | If available, would you like this server to appear on the public server listing, be invite only or entirely unlisted? [Part of the MineTogether mod.](https://www.curseforge.com/minecraft/mc-mods/creeperhost-minetogether) | Unlisted |
| Server Port | The port of your server. Best to leave as default! | 25565 |
| Info Port | The port configured in ServerInfoProvider (If installed). | 25566 |
| Jar file to start (\*) | The jar file started by the control panel. | Auto-Detect |
| Memory (\*) | Memory to allocate to the server - usually fine on adaptive if only running one instance. | Adaptive |
| Arguments (\*) | Would you prefer the java arguments to try and optimize CPU usage, or, optimize RAM usage? | Low memory usage |
| PermGen/Metaspace (\*) | Permgen/Metapsace to assign. Should be Dynamic unless you are using Java 7 (default is Java 8). | Dynamic |
| Maximum Players | The maximum number of players that can be connected to the server. | 20 |
| Whitelist | Whether whitelist is enabled on the server. | false |
| Online Mode | Whether your server allows people without paid accounts. Please note - This will need to be set to 'false' to allow BungeeCord to work, as BungeeCord handles authentication. | True |
| Allow Flight | Allow flight for hacked clients. Usually should be disabled. Note: Mod packs may have additional flight settings in mod configs for certain flight-related items. | False |
| Enable PVP | Whether Player Vs Player is enabled. | True |
| Enable Command Block | Whether command blocks are enabled. | False |
| Announce Player Achievements | Announce in chat when a player gets a achievement in game. | True |
| Op Permission Level | The permissions that ops have by default. 1: Ops can bypass spawn protection 2: ops can use /clear, difficulty, /effect, /gamemode, /gamerule, /give and /tp - and can edit command blocks. 3: Ops can use /ban, /deop, /kick, and /op 4: Ops can use /stop. | 4 |
| Player Idle Timeout | If non-zero, players are kicked from the server if they are idle for more than that many minutes. | 0 |
| Enable Query | Whether your server has the query port enabled. Used by many server listing sites. | False |
| Query Port | Port used for server queries. | 25565 |
| Enable Rcon | Whether your server has the rcon port enabled. Used to control your server remotely. | False |
| Rcon Port | Port used for remote server control. | 25575 |
| Snooper Enabled | Sets whether the server sends snoop data regularly to Mojang. | True |
| Difficulty | The difficulty level: Easy, Normal, Hard. | Easy |
| Default Gamemode | Default set gamemode for new joining players. | Survival |
| Force Gamemode | Whether to force the default gamemode when a new player joins | False |
| View Distance | The view distance. Recommended 1~10. Note: View distance of 7 or lower can reduce mob/animal spawns dramatically. Increasing the view distance beyond 10 is not recommended. | 10 |
| Level Name | Which world folder to load. | World |
| Level Seed | The seed used to generate the world. | |
| Level Type | The level type used to generate your world, eg: Amplified, Default, Voidworld, Biomes'O'Plenty etc. | Default |
| Generate Structures | Whether world structures (such as villages) will be generated. | True |
| Hardcord Mode | Enable hardcore mode. Please note that this is set on generation of a new world, and can not be unset! | False |
| Generator Settings | Options to pass to the world generation. Useful with super-flat worlds. Usually blank. | |
| Max World Height | Maximum build height. | 256 |
| Max World Size | Maximum possible world size in blocks, expressed as a radius. | 29999984 |
| Allow Nether | Whether the Nether can be generated and travelled to. | True |
| Spawn Monsters | Allow mob spawns: true - yes, false - no. | True |
| Spawn NPC/Villagers | Allow villagers to spawn: true - yes, false - no. | True |
| Spawn Animals | Allows animals to spawn: true - yes, false - no. | True |
| Spawn Protection | Spawn protection radius. 0 is disabled! | 16 |
NOTE: You will not be able to use the Plugins/Mods menu's if the installation does not contain the appropriate folders. These folders are generated during startup with the applicable software: **Vanilla Minecraft** **can** **not load mods or plugins**. **Bukkit-based** Minecraft **can load plugins** (Not mods). **Forge-based** Minecraft **can load mods** (Not plugins). **Hybrid software can load mods and plugins**, however, depending on which software you opt for is unsupported, depreciated and unstable. We recommend 1.10.x+ mod servers can use [SpongeForge](http://www.spongepowered.org) to load plugins.
- View installed plugins/mods All detected plugins/mods will be listed on the Plugins/Mods Manager. You can click the buttons on the right side of the plugin or mod to disable or enable them. Disabled plugins/mods are renamed to prevent them loading with the .disabled filetype. - Upload plugins/mods from your PC Drag a plugin/mod jar file into the \[Upload\] box at the top of the Plugins/Mods Manager. Note: If the plugin/mod is too big, it may not upload via the browser, you would need to upload it via [sFTP/SSH](https://www.creeperhost.net/wiki/books/general-information/chapter/file-management "File management") to the corresponding plugins or mods folder for [your instances directory](https://www.creeperhost.net/wiki/books/minecraft-java-edition/page/installation-location "Installation Location"). - Install plugins from [Bukkit](https://dev.bukkit.org/bukkit-plugins) or mods from [Curse](https://minecraft.curseforge.com/mc-mods): Type the plugin/mod name into the search bar at the top of the Plugins/Mods menu, then click search. This may take a few seconds/minutes depending on the speed of the search. Once your plugin or mod has been found it will appear with a drop-down box next to it and an install button. The drop-down box dictates which 'build' you want installing, you can select older builds via this box, the newer build should always be displayed first. NOTE: Make sure to type the correct plugin/mod name, especially for modded searches, as "Exnihilo" is not the same as "Ex Nihilo", if the Bukkit/Curse website cannot display the correct results on their website, our panel will likely not be able to display an install for it either. # Changing Java VersionTo find your instance please follow this guide: [https://www.creeperhost.net/wiki/books/minecraft-java-edition/page/finding-your-instances](https://www.creeperhost.net/wiki/books/minecraft-java-edition/page/finding-your-instances)
First, you will need to make sure that the instance you are changing the version on has been stopped (you can find out how to stop your server [https://www.creeperhost.net/wiki/books/minecraft-java-edition/page/startingrestartingstopping-your-server](https://www.creeperhost.net/wiki/books/minecraft-java-edition/page/startingrestartingstopping-your-server))
If you need to change the Java version that is used to run your server you can follow the step by step guide below. #### Step 1 Click on Settings as highligted in the image below [](https://www.creeperhost.net/wiki/uploads/images/gallery/2020-12/lECLtqLxdfhkG3PE-msedge_2020-12-08_20-41-43.png) #### Step 2 On the settings page click on the Advanced tab #### [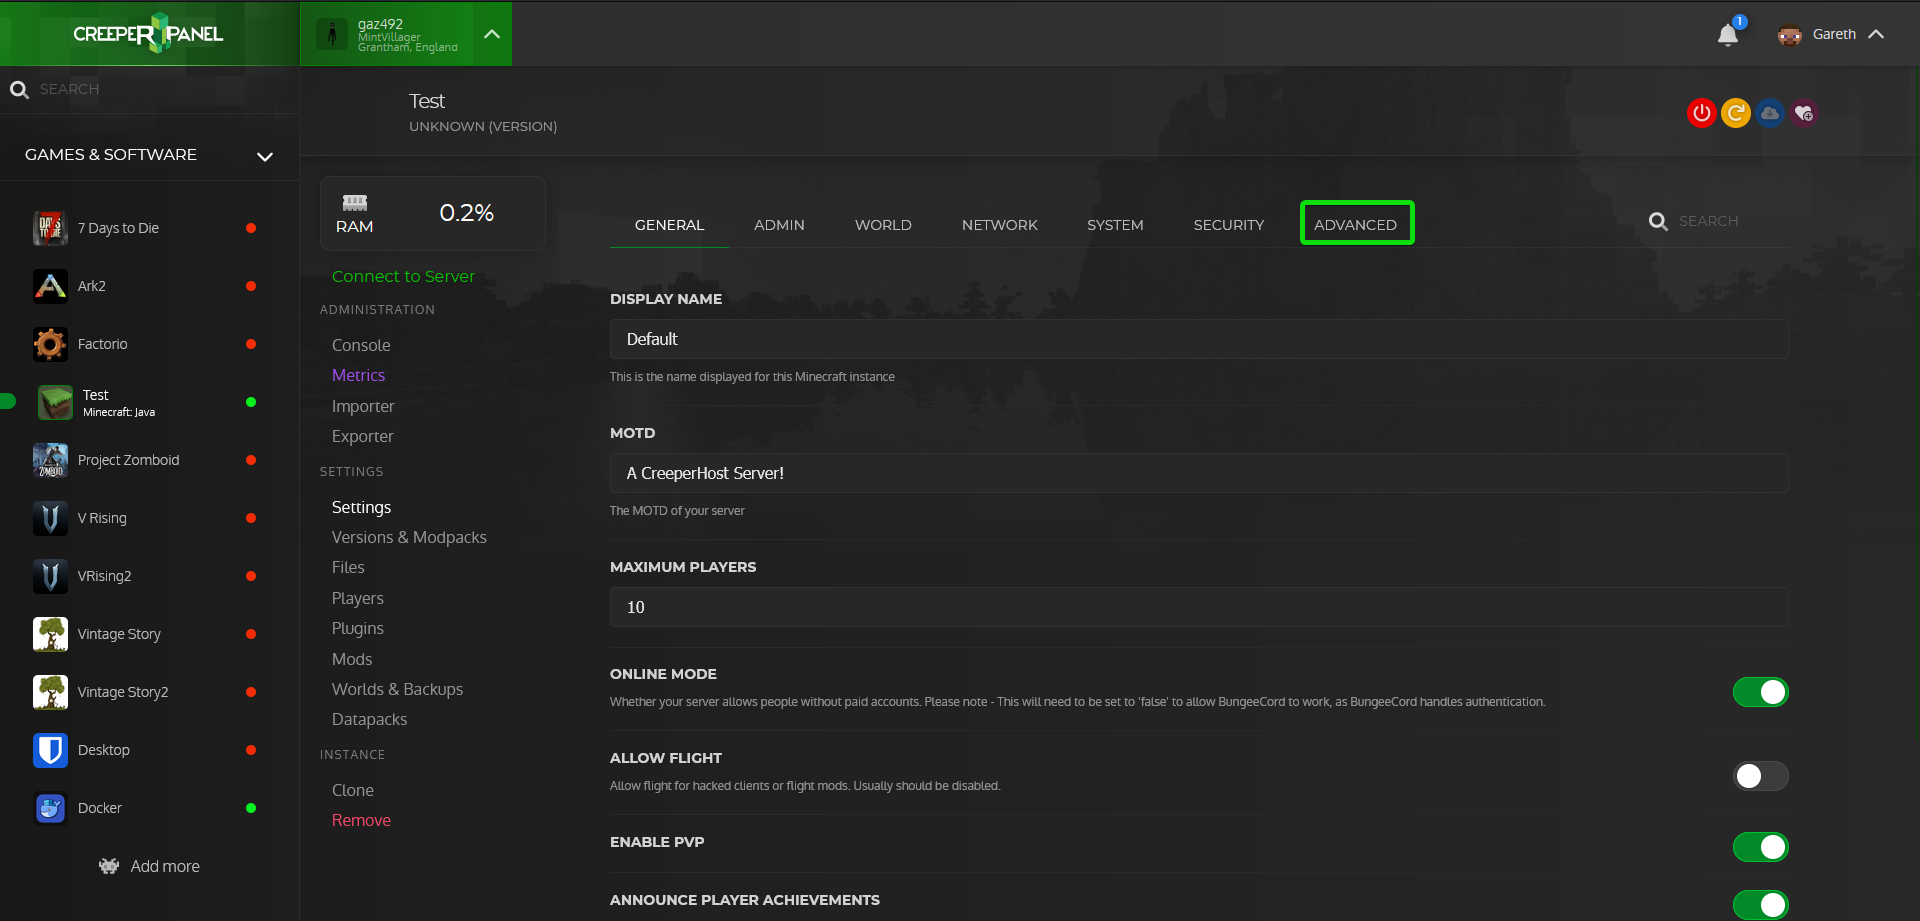](https://www.creeperhost.net/wiki/uploads/images/gallery/2023-09/CsZdlbdz62IMXBSU-firefox-2023-09-26-01-06-17.png) You will now be shown a warning message where you will need to click Show Advanced to continue [](https://www.creeperhost.net/wiki/uploads/images/gallery/2023-09/LSN8ANrhaZ2n72JM-firefox-2023-09-26-01-06-35.png) #### Step 3 Click on the JAVA dropdown box then select the Java version you need and click save [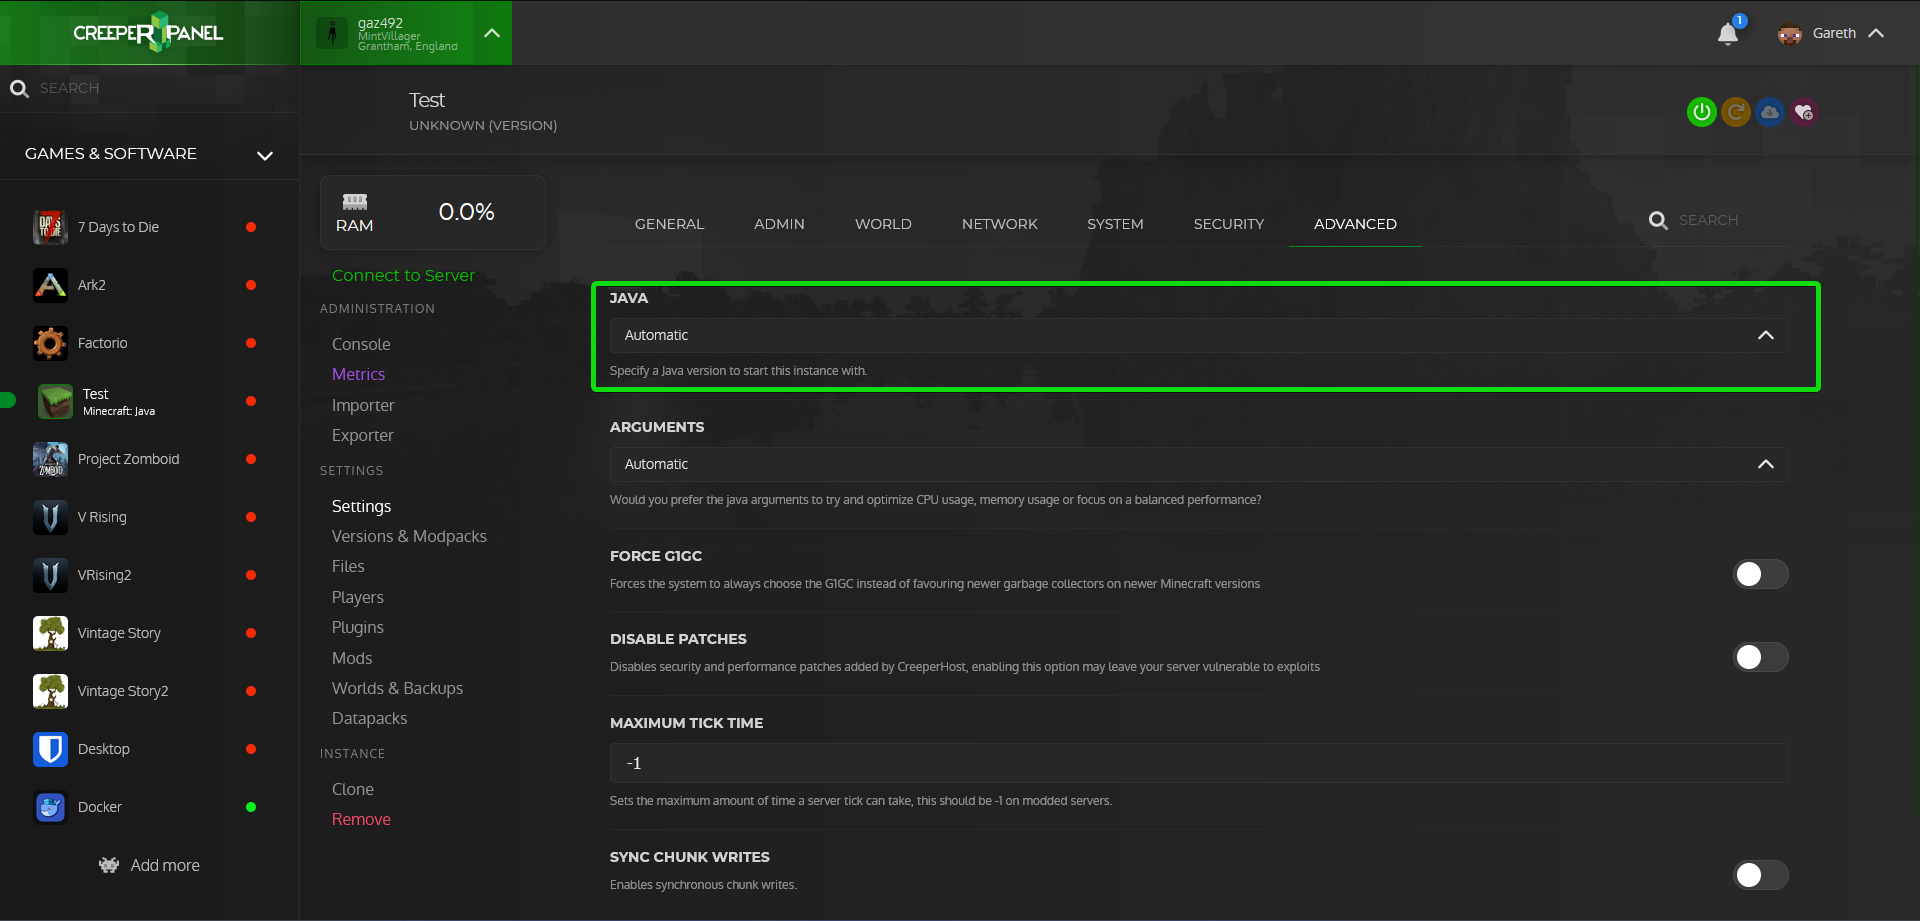](https://www.creeperhost.net/wiki/uploads/images/gallery/2023-09/mj21TxycQWHMGCFZ-2023-09-26-01-07-14.png) #### Step 4 You can now start your server back up and it will now be using the Java version you selected in the previous step. # Troubleshooting Crashes, start failures, mod rejections, errors etc. # Minecraft Connection Failures #### **Cannot Connect to Server** Example: "Internal Exception: java.io.IOException: An existing connection was forcibly closed by the remote host" This error means you cannot connect; The server is offline, the traffic is being blocked, the server is rejecting the connection etc - You can't connect. - Check the server is started to completition; The console will report "Done! X seconds" when it has fully started and is waiting for players. - Check the server is responding: You can type commands such as "help" or "forge tps" in the console to see if the server responds to command input at all. - Check your able to contact the server: If you are using the hostname, try using the numerical IP from the Server > Overview > Access menu ([Legacy Panel](https://legacy-panel.creeper.host/login): Virtual Server > sFTP/SSH Access). See: [Connection Failures](https://www.creeperhost.net/wiki/books/general-information/page/connection-failures) #### **Mod Rejections** Example: "\[Netty Epoll Server IO #4/INFO\] \[FML\]: Rejecting connection CLIENT: Compact Drawers: Requires version 1.12.2-1.0.4.111 but mod is not found on client." Most Minecraft modpacks (excluding client-side-only mods) require that you are running the same version+build as you do on the server. This means if you are running for example "FTB Infinity Evolved 1.7.10, build 3.0.1" on the server and you attempt to connect with "FTB Infinity Evolved 1.7.10, build 3.0.2" the server may reject the connection. Mod rejection errors print to both server and client logs. The server's installed version is usually visible above the "Overview/Console" menu (Old panel). The new control panel (at the time of writing this) does not yet display installed versions, but you can still 'guestimate' which build is installed. Mod rejection errors will display both versions in conflict, first: the server version, secondly: the client version. As most build numbers tend to go up the numerical scale and not down, if the server shows a higher build number for a mod, it is likely the client is out of date - If the client shows a higher build number for a mod, it is likely the server is out of date. You can change your installed server build via the "Versions" sub-menu for your Minecraft instance, alter mod builds directly via the "Mods" menu ([Legacy Panel](https://legacy-panel.creeper.host/login): "Mods Manager"), or alter the files directly via [sFTP/SSH](https://www.creeperhost.net/wiki/books/general-information/chapter/file-management). Note: It is recommended to change official mod packs via the "Versions" sub-menu first for your Minecraft instance. Any changes to the mods, without updating the configs, can result in odd server/gameplay behaviour; Versions will ensure your mod pack comes installed with all the 'trimmings' (configs, scripts etc) as intended. # Mods and Plugins General Minecraft Software Rules: **Vanilla** Minecraft can load Minecraft (Not mods and not plugins). **Bukkit-**based Minecraft can load plugins (Not mods). **Forge-**based Minecraft can load mods (Not plugins). **Hybrid** software can load mods and plugins, however, depending on which software you opt for is unsupported, depreciated and unstable. Note: 1.10.x+ mod servers can use [SpongeForge](http://www.spongepowered.org) to load plugins. ##### Unable to open file stream The plugins and mods directory is created when the server is first run with the appropriate folder. If you get the error "Unable to open file stream" (or similar) when attempting to install mods/plugins via the mods/plugins menu, this means the panel cannot find the folder to install to; Make sure your server has the appropriate directories setup by starting the software via the console first. Note: You can use the Files menu, or [sFTP/SSH](https://www.creeperhost.net/wiki/books/general-information/chapter/file-management "File management") to create a mods/plugins folder manually, however, if you do not have the correct software (mentioned at the top of this page) installed, you will not be able to load those mods or plugins. # Additional Information Miscellaneous guides # Operator LevelsLevel 3 OPs can use the /op command, if they use this command then they will be able to give anyone access to OP level 4 as this is what Minecraft defaults to.
Operator levels allow the server administrator to control the level of access each operator has. By default, if you use the /op command or another method listed in our adding operators guide it will use level 4 which grants full access the server commands list. There are 4 levels that can be assigned to an operator, each grants access to different sets of commands. Each level will also inherit access to the commands from the level below.| **Level** | **Details** |
| Level 1 | OPs can bypass the spawn protection |
| Level 2 | OPs can use all singleplayer cheat command with the exception of `/publish` and `/debug`. They are also given access to command blocks. |
| Level 3 | OPs can use most multiplayer-exclusive commands, including` /debug`, and commands that manage players (`/ban`, `/op`, `/deop`, `/kick`). |
| Level 4 | OPs can use all commands including `/stop`, `/save-all`. `/save-on`, `/save-off` |
| Expression | Description |
| 0 \*/30 \* \* \* ? | Every 30 minutes at 0 seconds |
| 0 0 \*/1 \* \* ? | Every hour at 0 minutes and 0 seconds |
| 0 0 \*/2 \* \* ? | Every 2 hours at 0 minutes and 0 seconds |
| 0 0 \*/4 \* \* ? | Every 4 hours at 0 minutes and 0 seconds |
| 0 0 \*/6 \* \* ? | Every 6 hours at 0 minutes and 0 seconds |
This page is currently a work in progress and may not be complete
The following guide contains a list of useful commands added by FTB Utilities, it will also cover how to configure the commands and other aspects of the mod. --- #### Commands FTB Utilities is a mod that adds the following commands to servers. Argument types: <required>, \[optional\]| /warp <name> | Teleport to a specified warp location |
| /setwarp <name> | Creates a new warp location |
| /delwarp <name> | Removes specified warp |
| /home \[name\] | Teleport to your set home |
| /sethome \[name\] | Creates a new home point |
| /delhome \[name\] | Deletes your home point |
| /tpl <player> | Teleports to the last known position of a player |
| /tpa <player> | Sends a TP request to another player. If they accept it, player will be teleported to them |
| /tpaccept <player> | Accept TP request |
| /back | Teleport to the previous location before death/teleport |
| /spawn | Teleport to the world spawn |
| /mute <player> | Mutes player. They can no longer send chat messages |
| /unmute <player> | Umutes player |
| /heal \[player\] | Heal yourself or the specified player |
| /killall \[type\] | Kills all non-player, non-basic entities. Type can be specified |
| /nbtedit | Edits NBT of block or entity player is currently looking at |
| /nbtedit block <x> <y> <z> | Edits block NBT at coordinates |
| /nbtedit entity <id> | Edits entity from it's ID |
| /nbtedit player <player> | Edits player NBT |
| /nbtedit item | Edits the NBT data of the held item |
| /fly | Toggle creative flight |
| /leaderboards \[id\] | Shows leaderboard list. Specify ID to see a leaderboard |
| /cycle\_block\_state | Requires FTB Library debug commands enabled. Cycles block you are looking at states/rotations/types |
| /dump\_chunkloaders | Requires FTB Library debug commands enabled. Dumps a list of all chunk loaders in world |
| /nick \[nickname...\] | Changes your own nickname. Can contain spaces |
| /nickfor <player> \[nickname...\] | Changes nickname for another person |
| /inv view <player> | Opens the inventory of the specified player |
| /inv disable\_right\_click | Disables right clicking with the currently held items |
If you are using the FTBApp or hosting a server through CreeperHost you do not need to follow this guide as the issue has already been patched.
--- ##### How to install the patch on CurseForge First go to [**https://github.com/CreeperHost/Log4jPatcher/releases/latest**](https://github.com/CreeperHost/Log4jPatcher/releases/latest) and download the **Log4jPatcher.jar**. Once its downloaded open up the root of your Minecraft installation (this can be the .minecraft folder or an instance folder of the launcher you are using). To open the instance folder on CurseForge click on the image of the instance then click on the 3 vertical dots and select **Open Folder** **[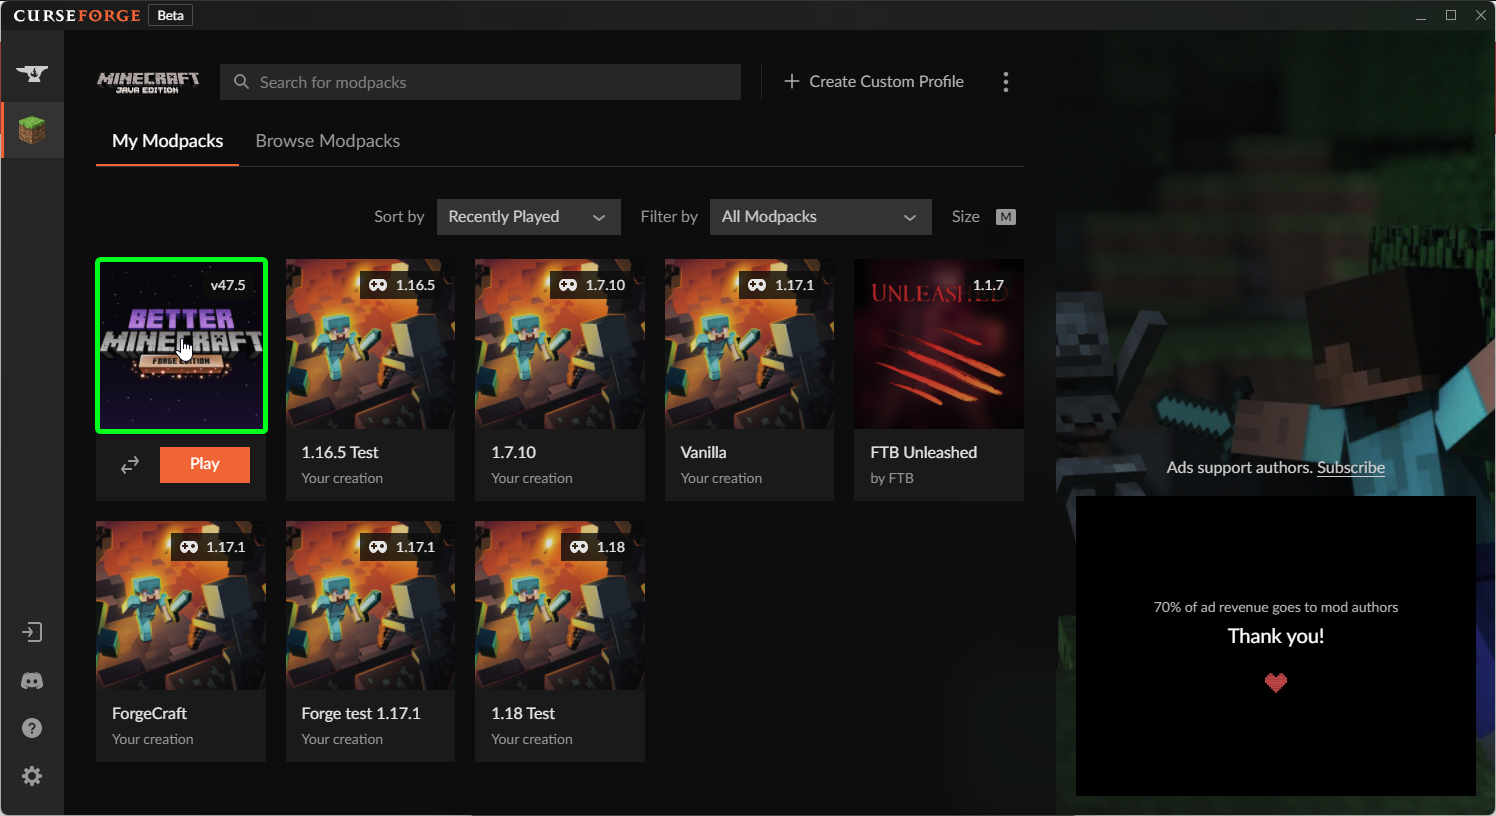](https://www.creeperhost.net/wiki/uploads/images/gallery/2021-12/B4QqKguSq0UXorT0-overwolf-2021-12-10-16-18-14.png)** **[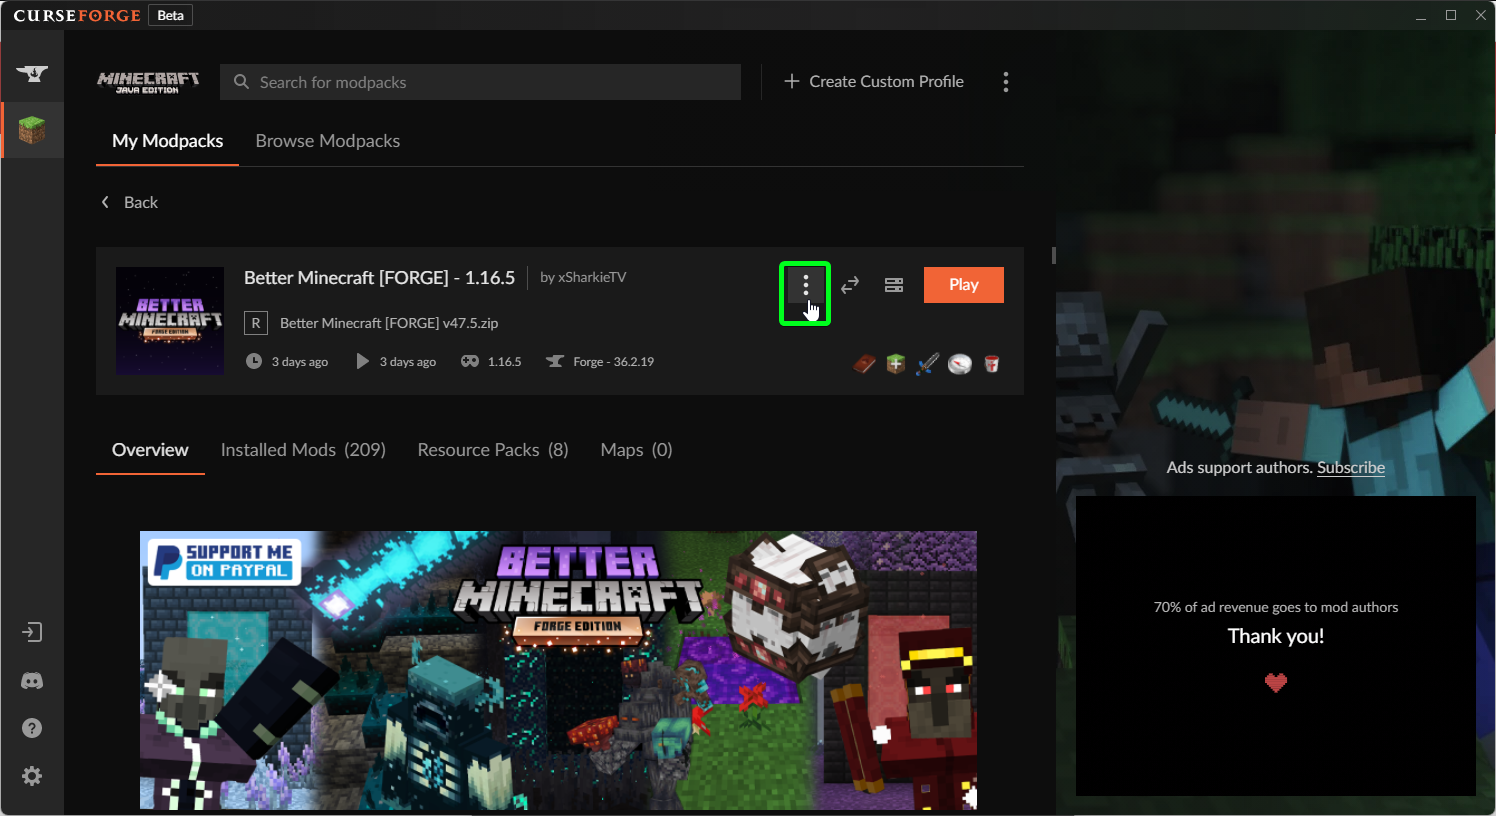](https://www.creeperhost.net/wiki/uploads/images/gallery/2021-12/GR1fj4qP9jHyEzWP-overwolf-2021-12-10-16-18-33.png)[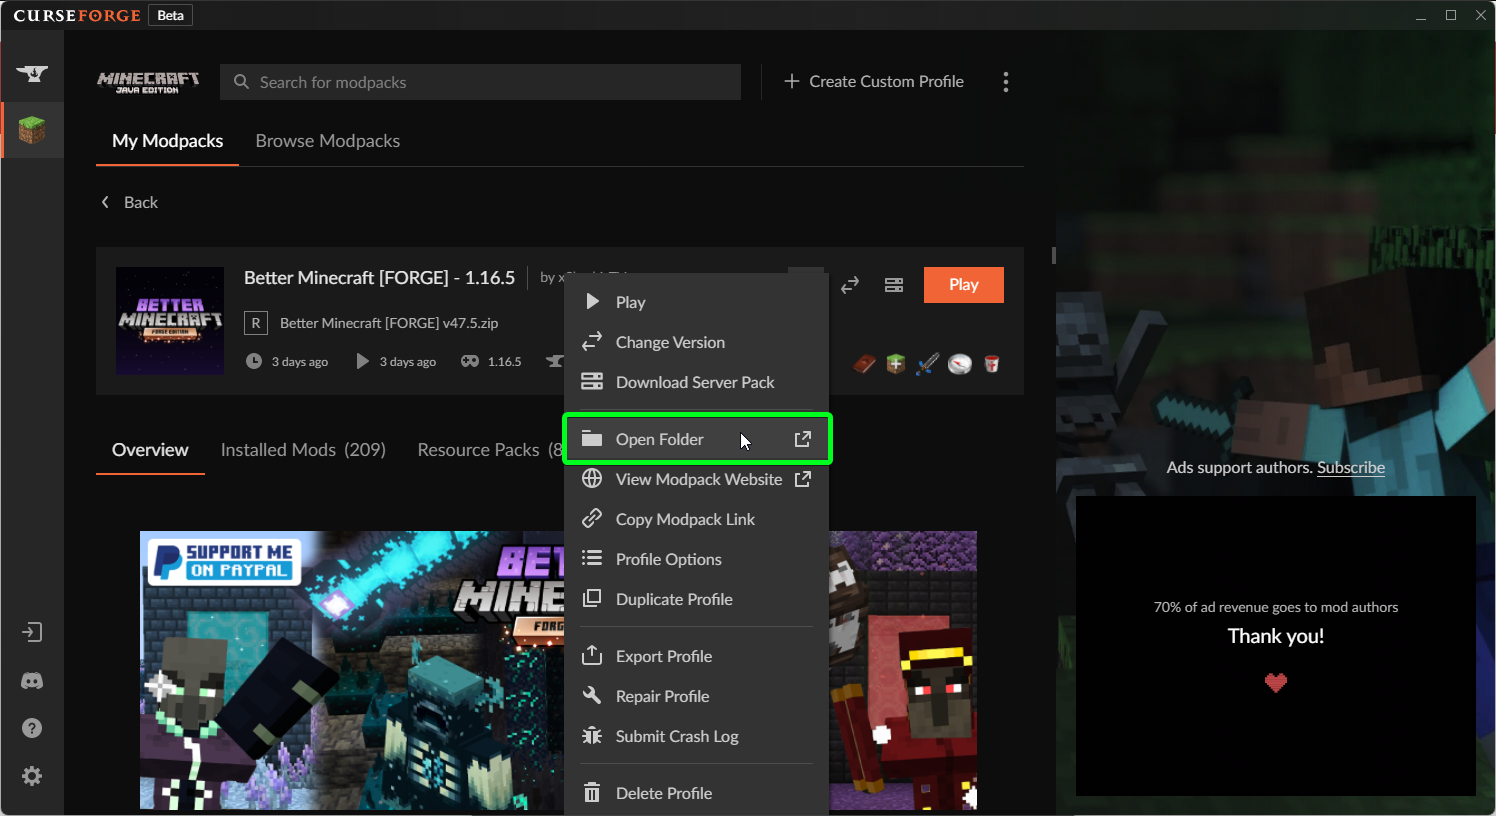](https://www.creeperhost.net/wiki/uploads/images/gallery/2021-12/zNNYfgug4skjkMfs-overwolf-2021-12-10-16-18-44.png)** It will now open a new Explorer/Finder window where you want to move/copy the **Log4jPatcher.jar** file to (Do **NOT** put this file in the mods folder)**.** If the file is name a little differently I would recommend renaimg the file to **Log4jPatcher.jar** as it will make it easier to follow the rest of the guide. After moving the file to the folder it should look similar to the image below [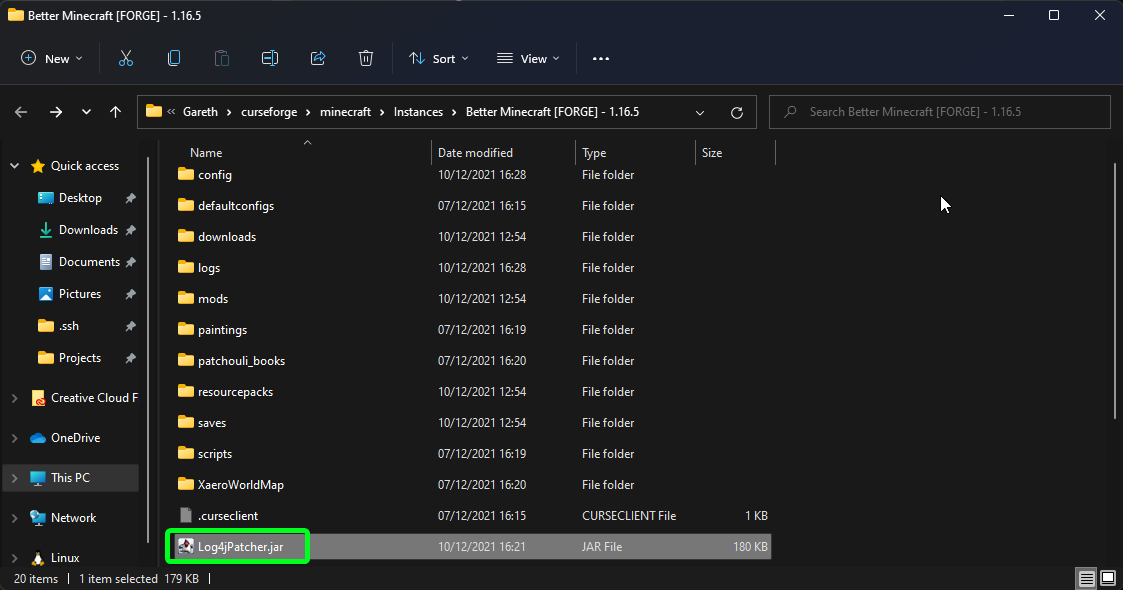](https://www.creeperhost.net/wiki/uploads/images/gallery/2021-12/btJSc82snnZ7mNql-explorer-2021-12-10-16-32-57.png) You can now close the Explorer/Finder window and go back to the CurseForge app. Once back in the CurseForge app click on the settings cog in the bottom right [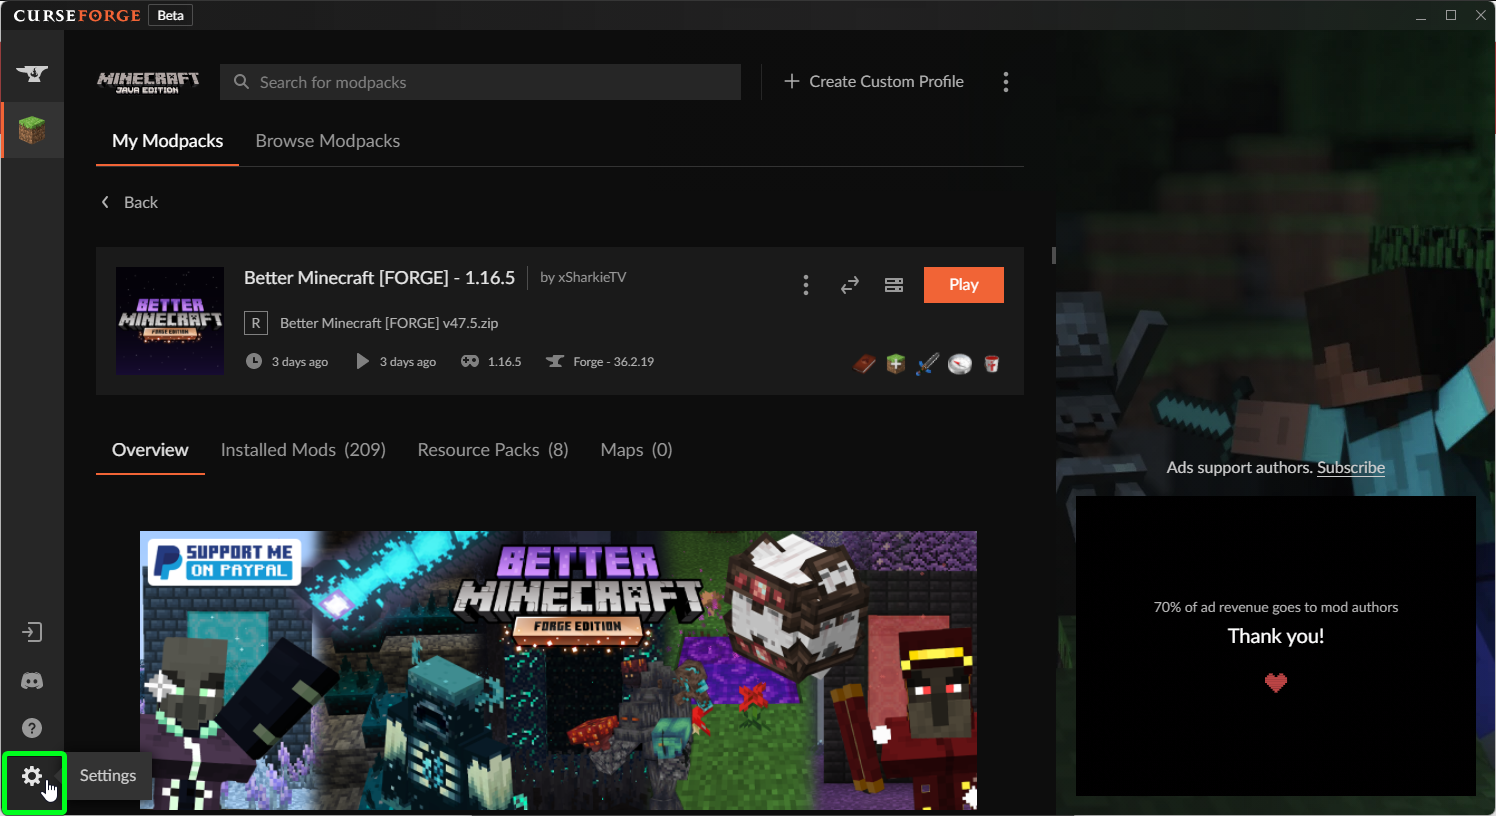](https://www.creeperhost.net/wiki/uploads/images/gallery/2021-12/mRgjXVv6xe6kPE3s-overwolf-2021-12-10-16-24-51.png) Now click on Minecraft and scroll down until you see an option named **Additional Arguments.** In the textbox below add the following argument **`-javaagent:Log4jPatcher.jar`** [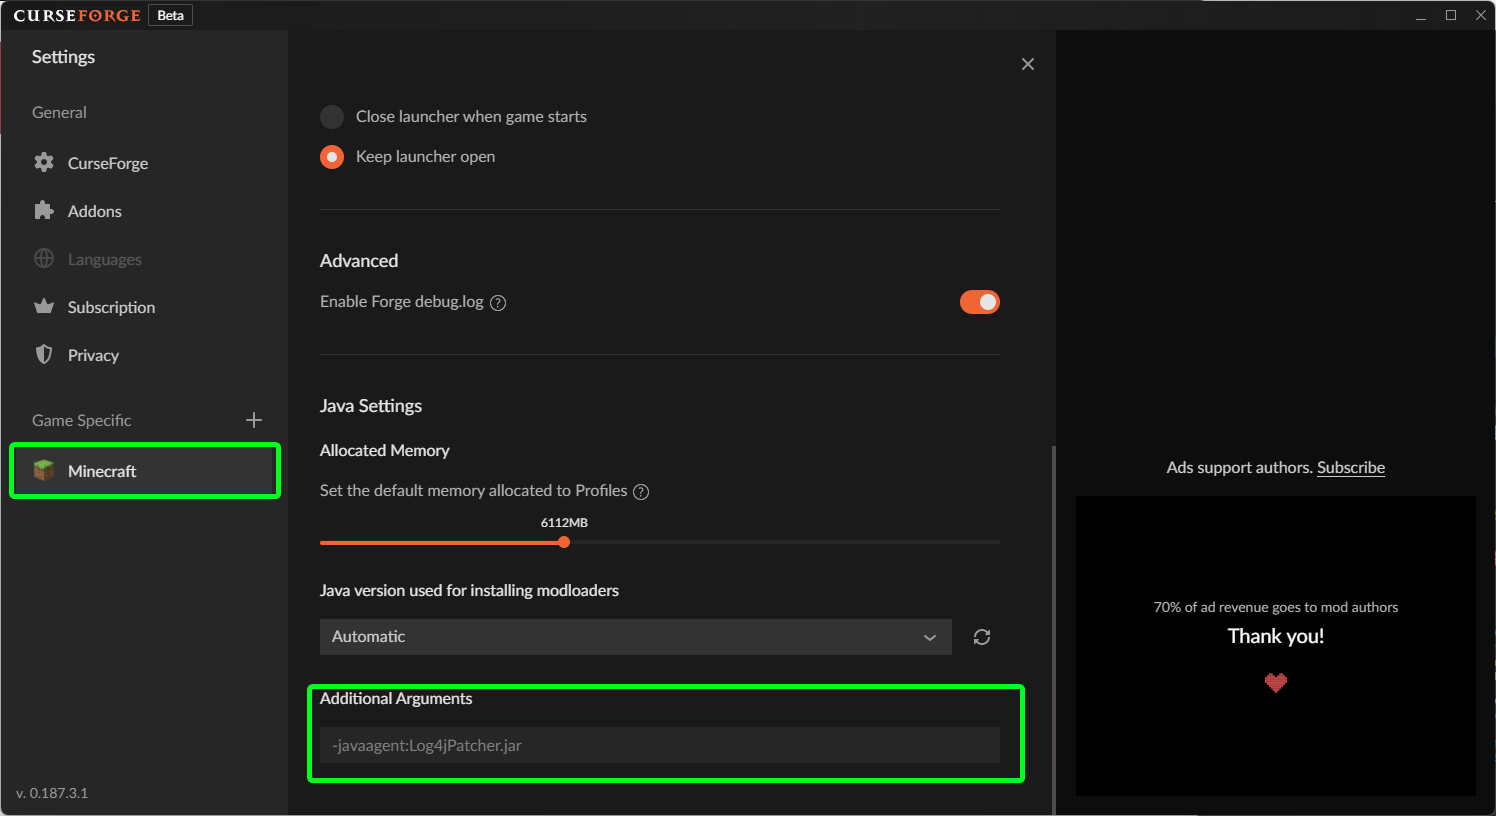](https://www.creeperhost.net/wiki/uploads/images/gallery/2021-12/5jJUsEpEGK5GCFzi-overwolf-2021-12-10-16-30-36.png) When you now click on play it will load the patch for you.If you do not have the Log4jPatcher.jar in the instance or did not place it in the correct place, Minecraft will crash after clicking play.
--- ##### How to install the patch when using the Vanilla launcher First go to [**https://github.com/CreeperHost/Log4jPatcher/releases/latest**](https://github.com/CreeperHost/Log4jPatcher/releases/latest) and download the **Log4jPatcher.jar**. If its named a little differently we recommend renaming to **Log4jPatcher.jar** to make it easier to follow the rest of the guide Now open up the Vanilla launcher and click on Installations [](https://www.creeperhost.net/wiki/uploads/images/gallery/2021-12/bqyK5MyYTxUqOFaZ-minecraftlauncher-2021-12-10-19-32-00.png) You should now see a list of all the installed versions, move your mouse over the install you wish to add the patch to and click on the folder icon [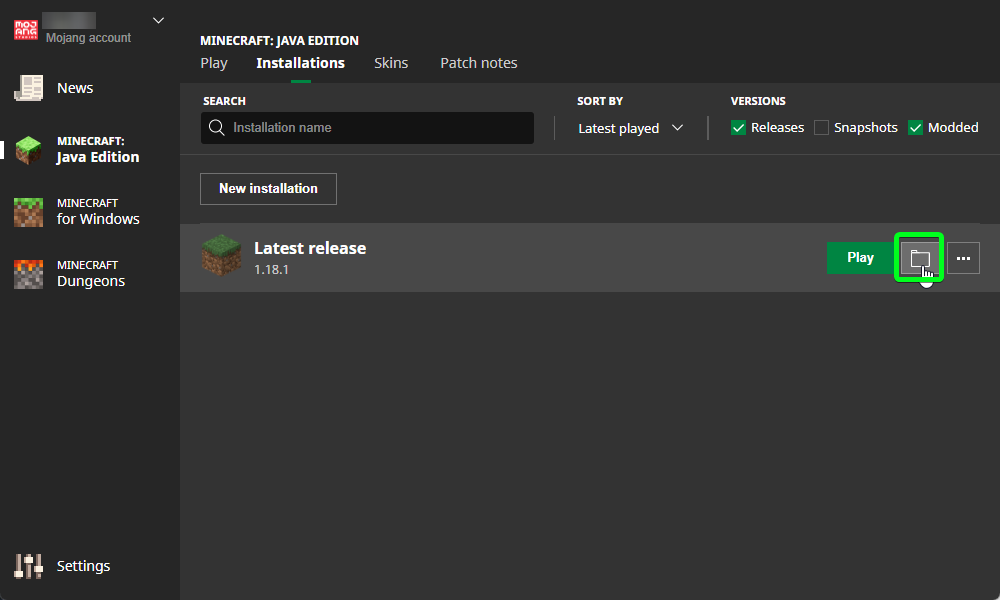](https://www.creeperhost.net/wiki/uploads/images/gallery/2021-12/E9rwEzbZcvlMShTt-minecraftlauncher-2021-12-10-19-33-24.png) This will now open a new Explorer/Finder window where you want to move/copy the **Log4jPatcher.jar** that we downloaded earlier to. Once its in the folder it should look something like the image below [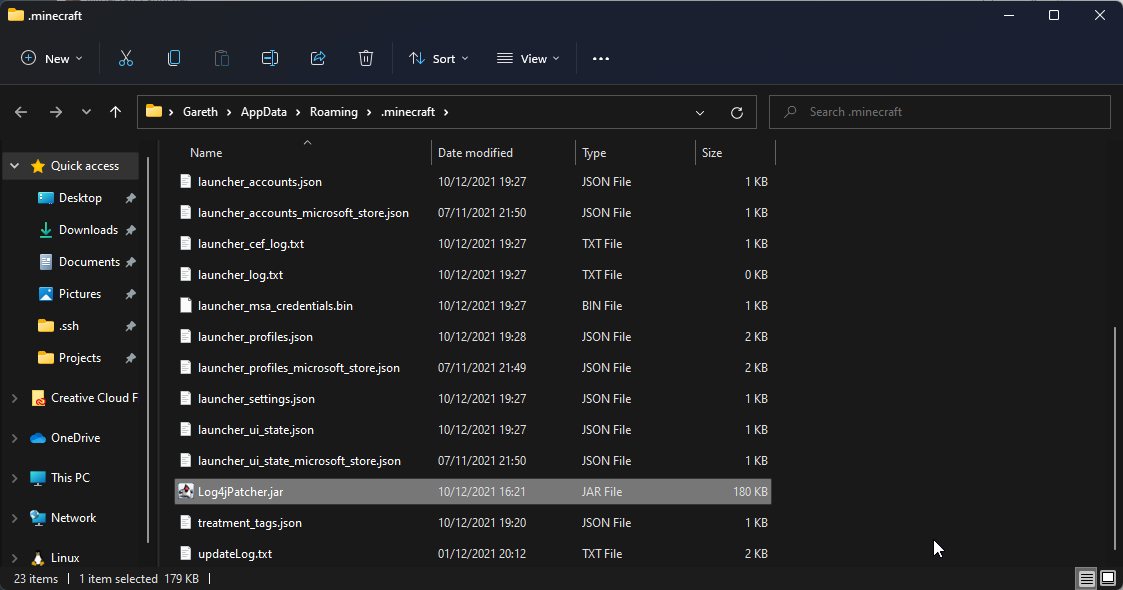](https://www.creeperhost.net/wiki/uploads/images/gallery/2021-12/pMaenE7zG81UbgfO-explorer-2021-12-10-19-36-07.png) You can now close the Explorer/Finder window and go back to the Vanilla launcher. Once on the Vanilla launcher, again hover over the install you want to add the patch to but this time click on the button that has 3 small dots then click edit. [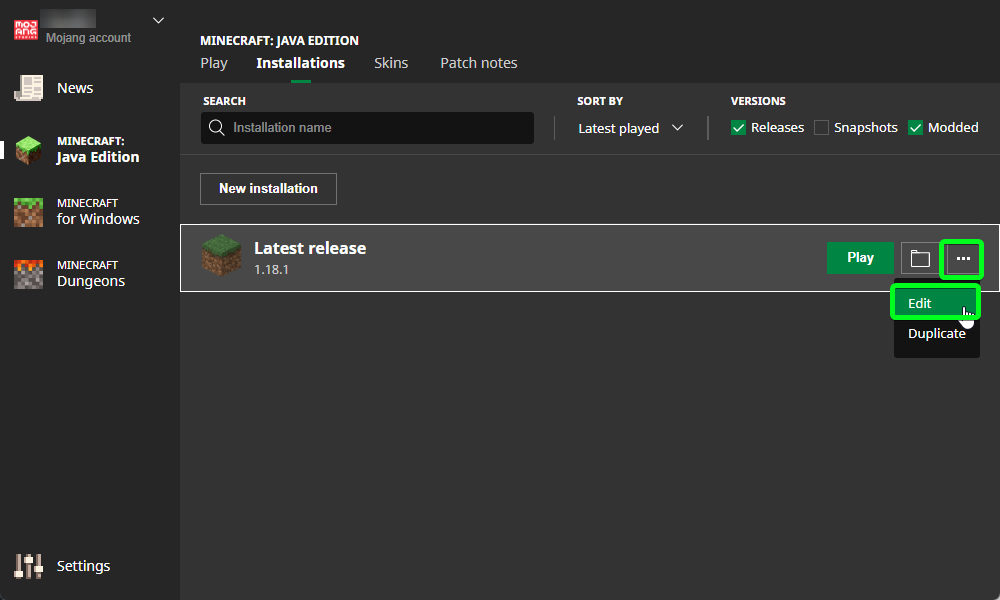](https://www.creeperhost.net/wiki/uploads/images/gallery/2021-12/471df0lZIRqKiAjm-minecraftlauncher-2021-12-10-19-38-49.png) You should now have a screen with some settings listed, if you click on More Options it will show some more settings, the one we are interested in is the JVM arguments. Click in the textbox and move the cursor to the end of the box by either pressing the right arrow key until its at the end or press the END key on your keyboard. Once at the end press the space key and add the following line **`-javaagent:Log4jPatcher.jar`** and click Save [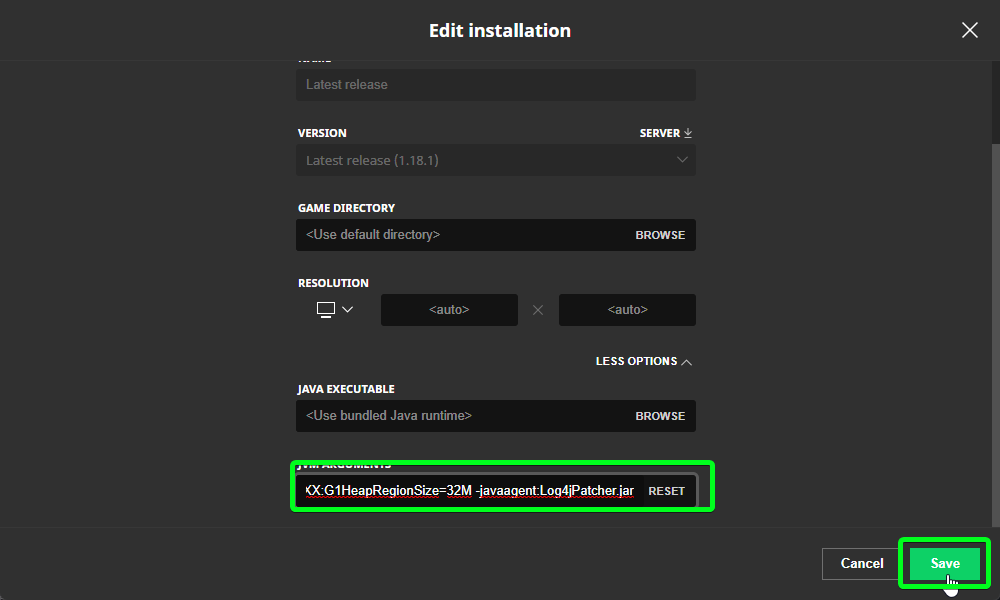](https://www.creeperhost.net/wiki/uploads/images/gallery/2021-12/cOvgaq4Ce76WbUZW-minecraftlauncher-2021-12-10-19-43-03.png) If all goes well Minecraft will start up, if any errors were made the game should not start up and show an error, if this happens go through the steps again to make sure everything is correct. --- ##### How to install the patch on a server First go to [**https://github.com/CreeperHost/Log4jPatcher/releases/latest**](https://github.com/CreeperHost/Log4jPatcher/releases/latest) and download the **Log4jPatcher.jar**. Now go to where your Minecraft server is installed and copy/move the **Log4jPatcher.jar** to that folder (Do **NOT** put this in the mods folder) You will now need to edit your startup script/arguments and add **`-javaagent:Log4jPatcher.jar`** before the minecraft\_server.jar. E.g `java -javaagent:Log4jPatcher.jar -jar minecraft_server.jar --nogui` # Installing BungeeCord/Waterfall So you are interested in running a Bungeecord/Waterfall proxy server to connect your minecraft servers together. #### Whats different between Bungeecord and Waterfall The most significant difference between Bungeecord and Waterfall is performance and stability improvements. Waterfall was forked from Bungeecord and changed to provide better performance and stability while maintaining full compatilibily with Bungeecord which means, everything that works with BungeeCord works with Waterfall If you would like to read more about Waterfall you can find all the details at https://papermc.io/software/waterfall #### Where to download BungeeCord / Waterfall ##### Bungeecord Bungeecord can be download from the following link [https://ci.md-5.net/job/BungeeCord/lastSuccessfulBuild/artifact/bootstrap/target/BungeeCord.jar](https://ci.md-5.net/job/BungeeCord/lastSuccessfulBuild/artifact/bootstrap/target/BungeeCord.jar) ##### Waterfall Waterfall can be downloaded at the following page https://papermc.io/downloads/waterfall #### Installing ##### Creating the instance Now that you have downloaded your chosen proxy server, you will need to create a new Minecraft Java instance on the panel (https://www.creeperhost.net/wiki/books/minecraft-java-edition/page/creating-a-new-minecraft-server) if you are following the guide on creating a new server, you can skip the final step where you install a version of minecraft as we will be uploading the files ourself ##### Uploading the files With the instance created, click on the Files link, then drag and drop the file you downloaded earlier onto the right-hand side of the file manager to start uploading it. #### Starting You can start the server up as you normally would, using the power buttons in the top right of the panel. #### Settings You will need to start the server up once so the proxy specific settings can be generated, once they have been generated you can edit them from the Files page and double-clicking on the file you want to edit. # Launchers # Uploading logs from MultiMc/Prism Launcher If you are using MultiMc/Prism to start minecraft on your computer you can use the following guide to upload your client logs. If you have minecraft started through prism you # Retrieving modpack logs from the CurseForge app Navigate to the Minecraft section of the CurseForge app and right-click on the modpack you want to get the logs for and select `Open Folder` [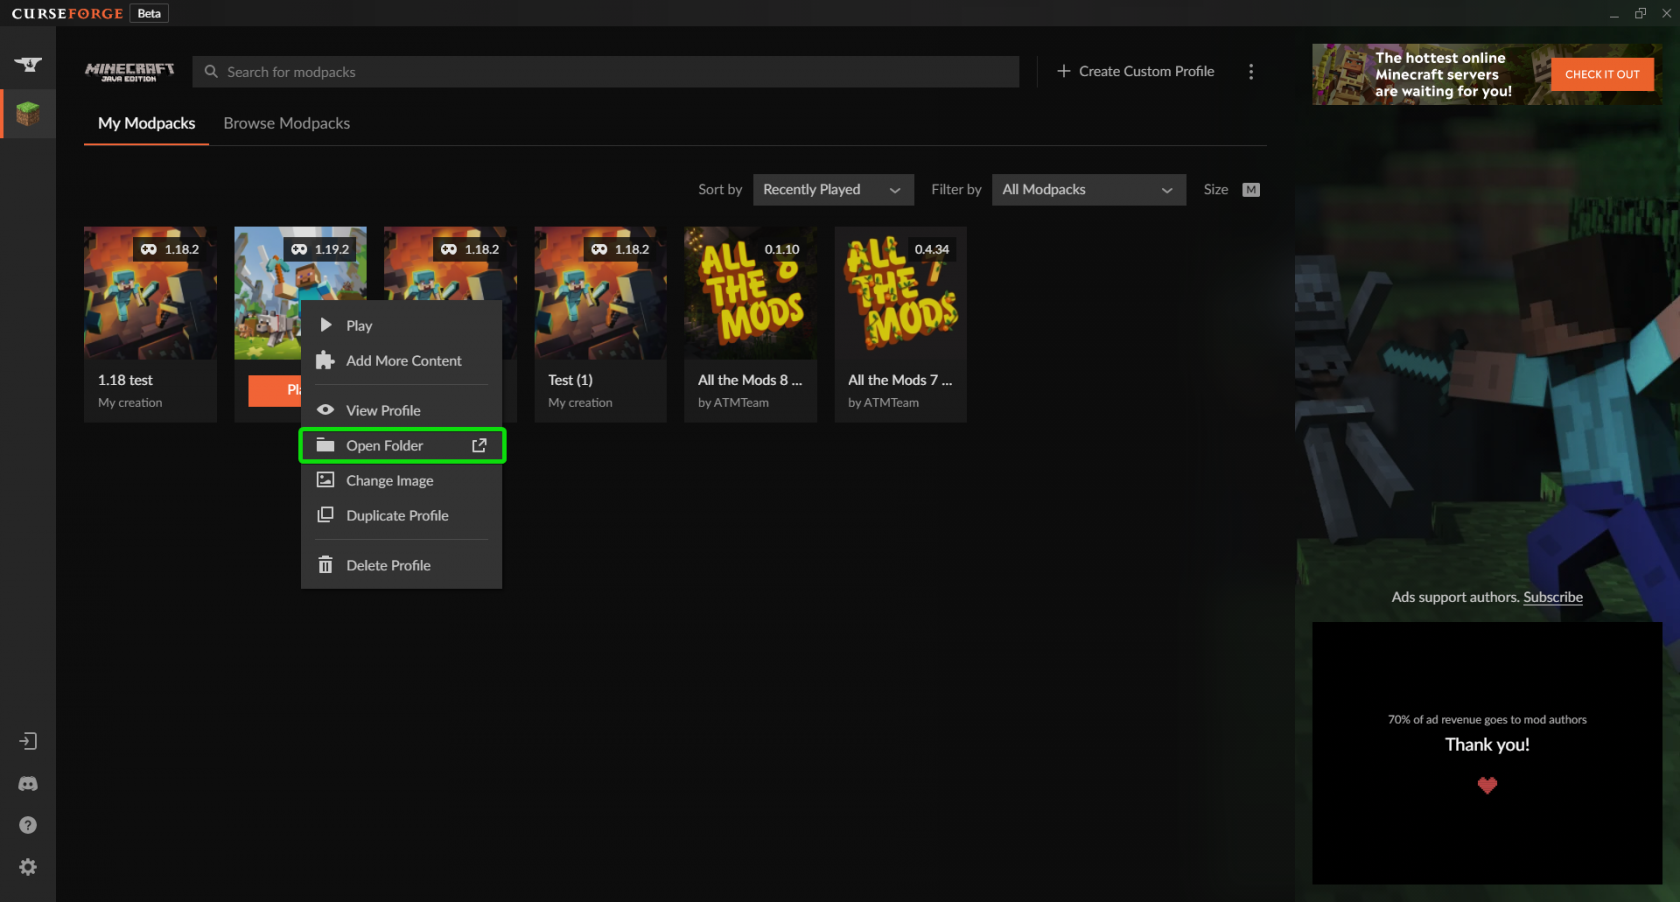](https://www.creeperhost.net/wiki/uploads/images/gallery/2023-02/O8WNQebMYj9M9azK-overwolf-2023-02-06-22-53-36.png) Double click on the `logs` folder to open it and then right-click on a file called `latest.log` or `fml-client-latest.log` and click on `Edit` or `Open with` > `Notepad` [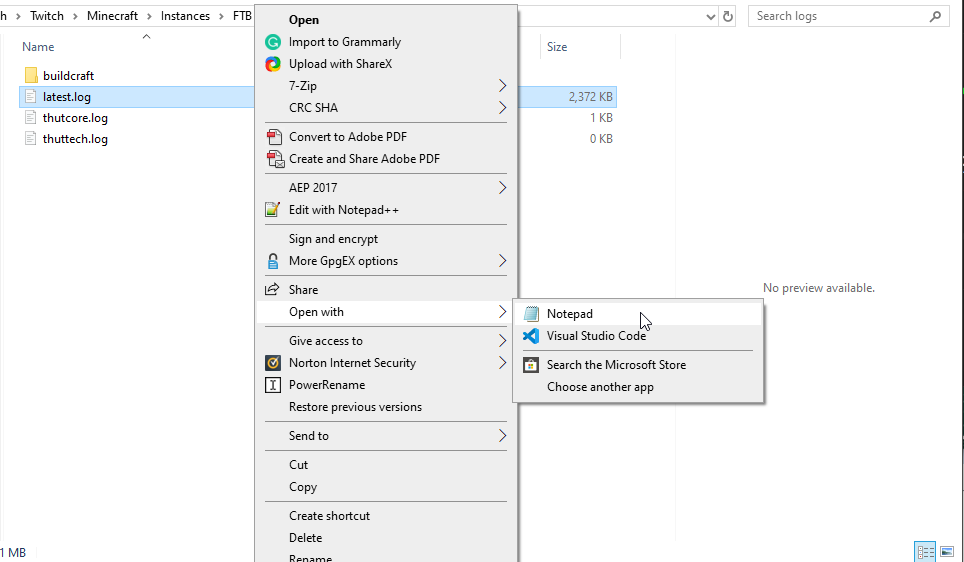](https://www.creeperhost.net/wiki/uploads/images/gallery/2020-05/TtKlznkUyMUWr8BV-WinSCP_2020-05-11_20-29-26.png) Right-click then click on `Select All` then right-click again and click `Copy` [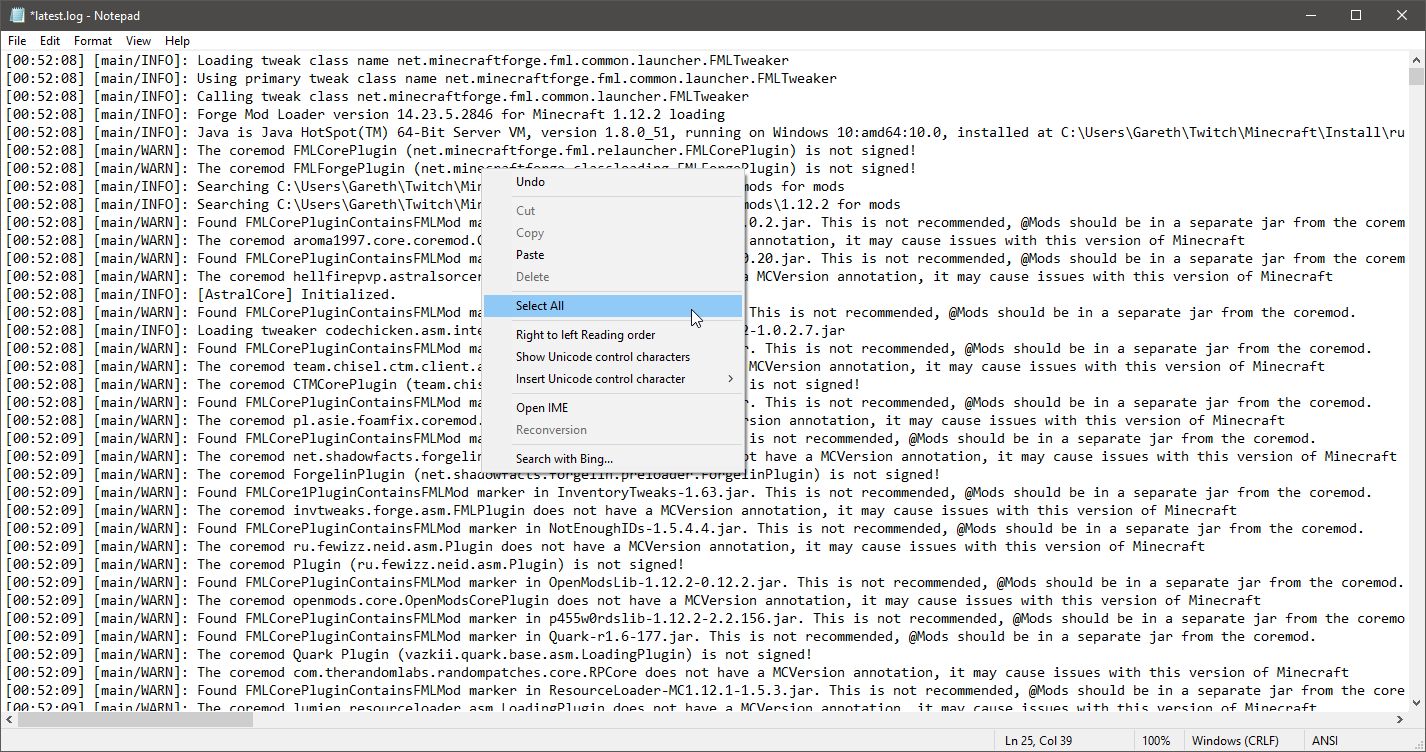](https://www.creeperhost.net/wiki/uploads/images/gallery/2020-05/g5LQjfrysjR2sHaF-notepad_2020-05-11_20-48-41.png)[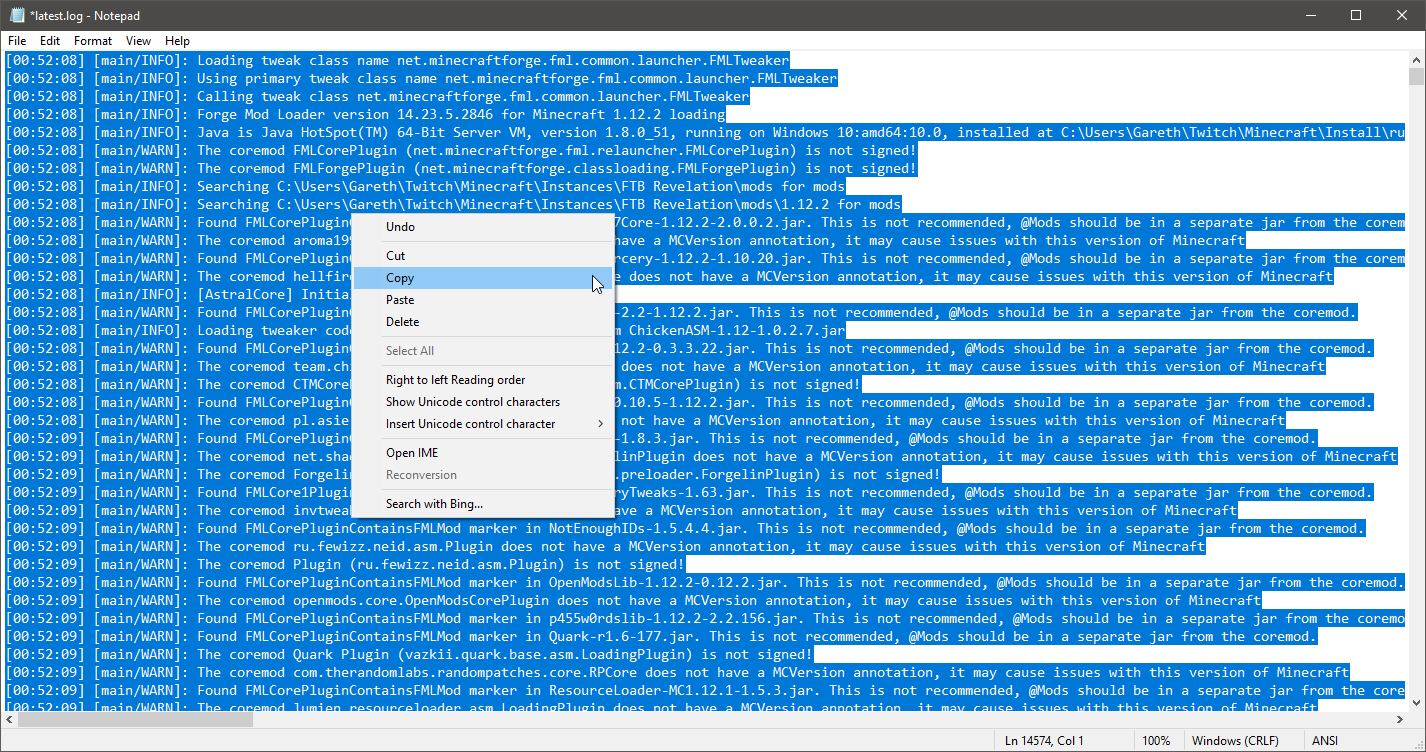](https://www.creeperhost.net/wiki/uploads/images/gallery/2020-05/2MKpB9N3hv9ufACo-notepad_2020-05-11_20-50-39.png) Go to https://pste.ch/ and paste the log by right-clicking in the empty area and click `Paste` or press `CTRL+V` then click the Save button and share the URL with our support team [](https://www.creeperhost.net/wiki/uploads/images/gallery/2020-05/pVjYkvJxkgZzvzEr-2020-05-11_20-53-16.png) # Uploading logs from the FTB App If you are asked to upload logs from the FTB App but are unsure where those log files are, you can follow this guide on finding the correct files to upload. Open the FTB App then navigate to the Library page of the app. [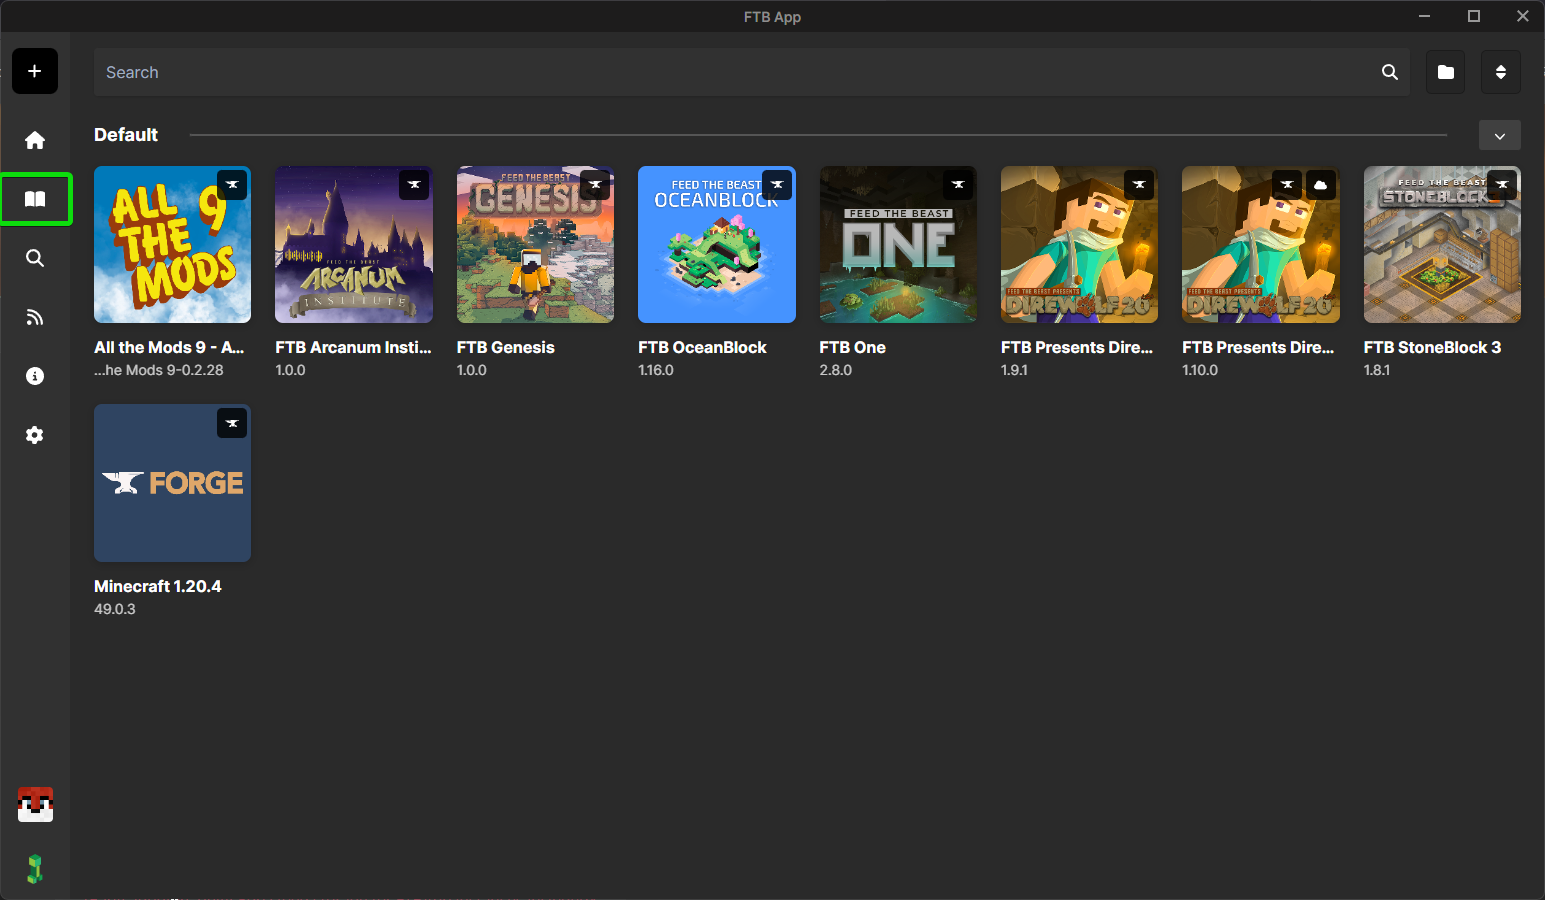](https://www.creeperhost.net/wiki/uploads/images/gallery/2023-12/neq2wQ6cxe5Y0fwT-overwolf-2023-12-12-00-35-01.png) Once on the library page click on the image of the modpack you are having issues with and you will be taken to the Description page for that modpack, should should now see a large Play button with 3 vertical dots to the right of the button. [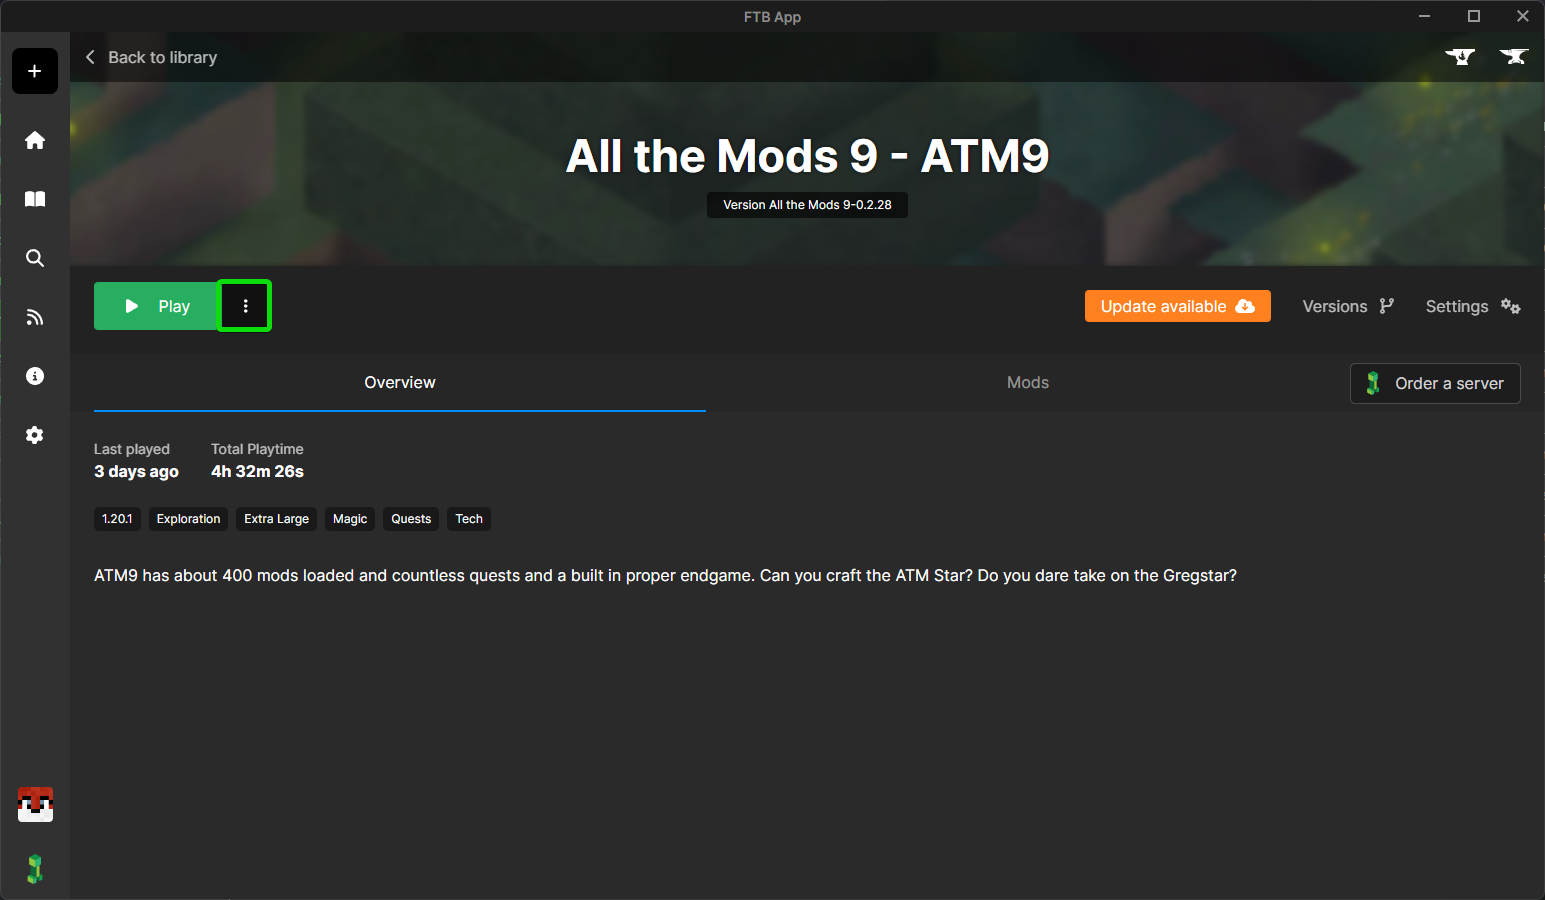](https://www.creeperhost.net/wiki/uploads/images/gallery/2023-12/IBGXQFVVxg4r46i0-overwolf-2023-12-12-00-35-27.png) Click on the 3 dots button then a menu will be displayed, hover over the Open option then in the sub menu that pops up click on the Logs Folder option. [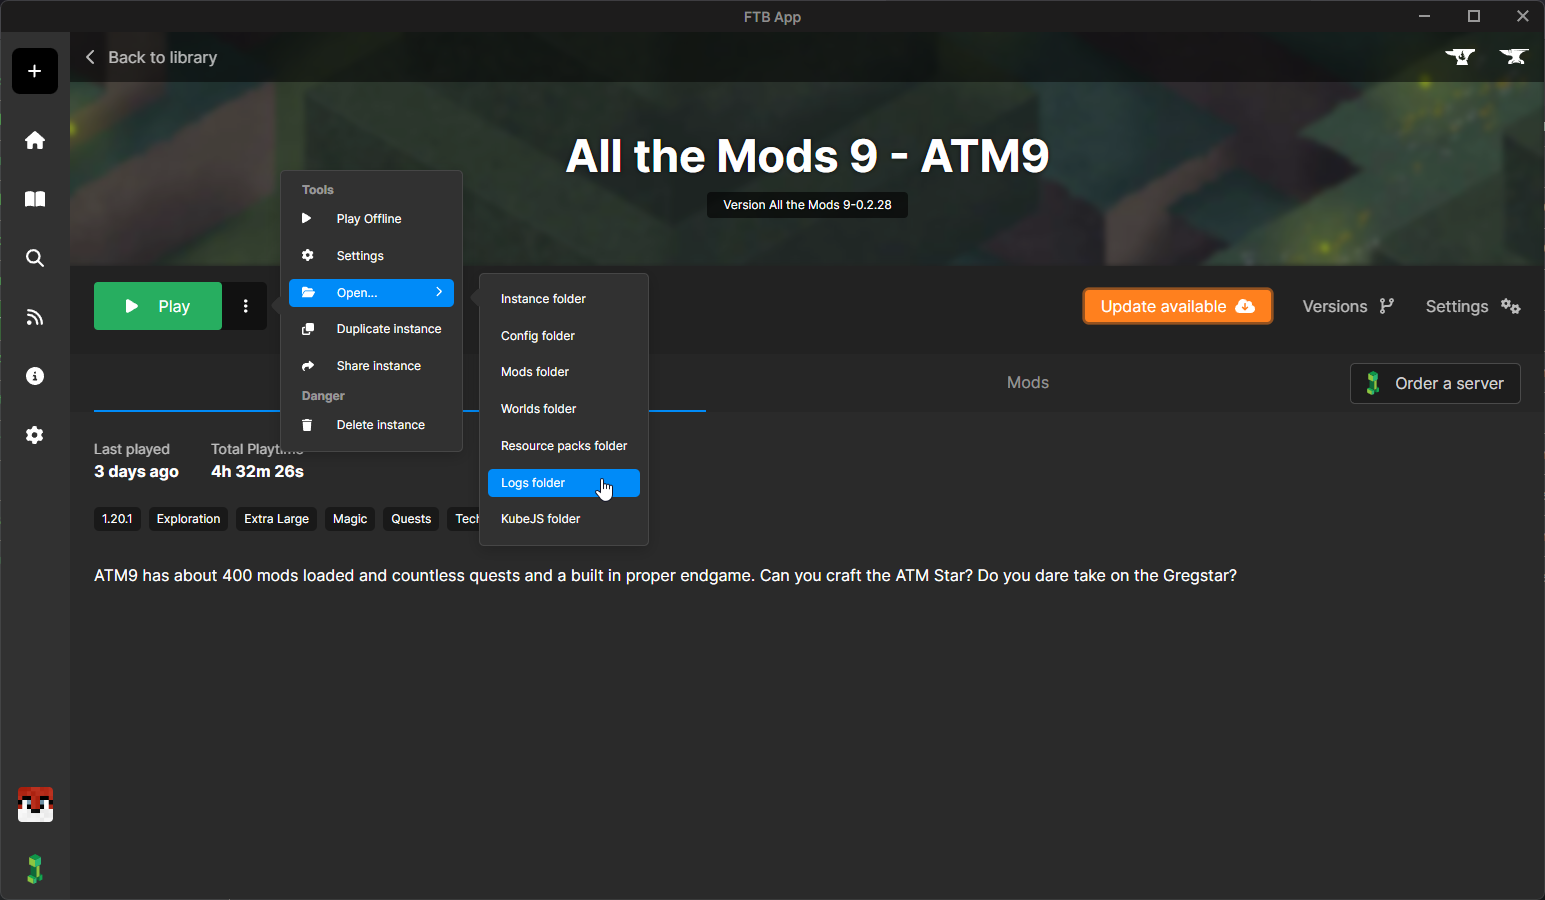](https://www.creeperhost.net/wiki/uploads/images/gallery/2023-12/gcy70rc2zkjWdKkF-overwolf-2023-12-12-00-35-50.png) This should now open your File explorer to the location of the logs folder for that instance, if you dont see the window, it can sometimes open minimized in the background. [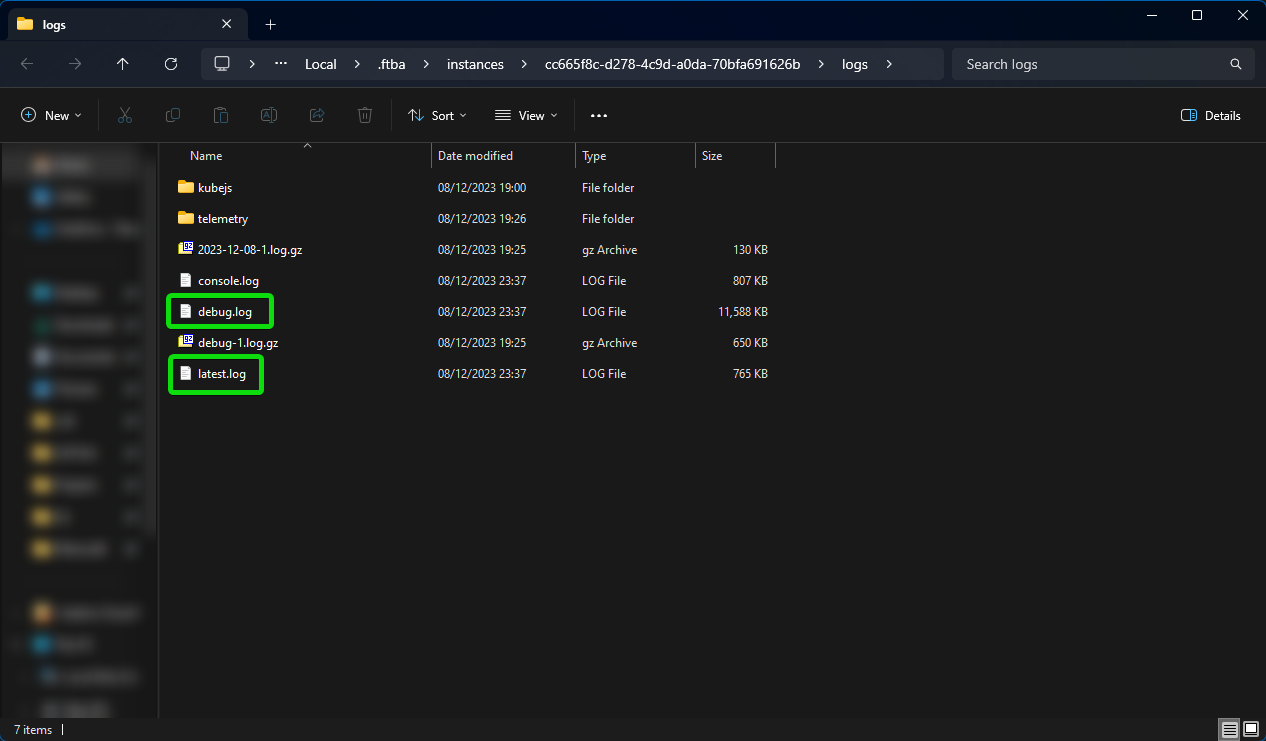](https://www.creeperhost.net/wiki/uploads/images/gallery/2023-12/YpZKqHMBO6ND4bNy-explorer-2023-12-12-00-36-47.png) In this folder you should see a few items and hopefully a latest.log and a debug.log Top open these files, right click on them and select Open With > Notepad With the file opened notepad right click anywhere on the text and then click on Select All [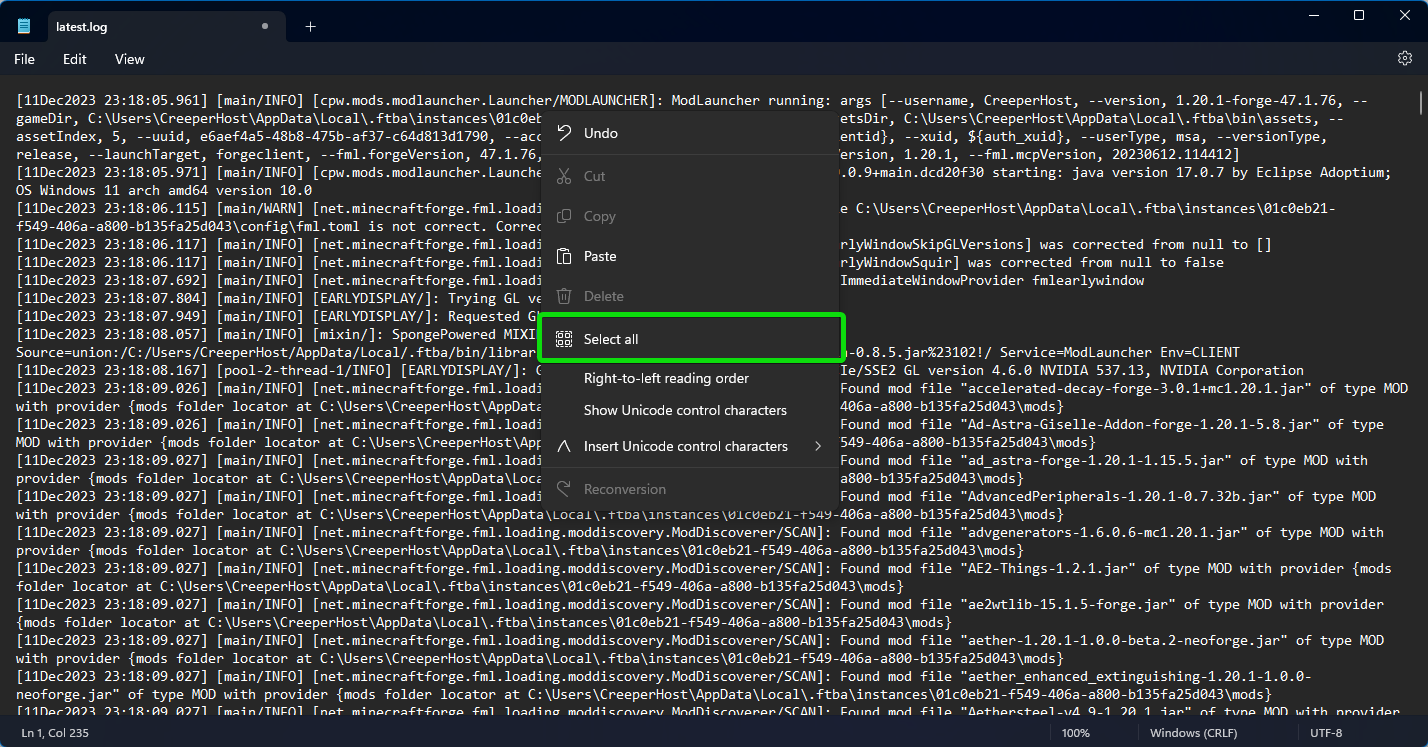](https://www.creeperhost.net/wiki/uploads/images/gallery/2023-12/2ISIFsKFRs6jrWUV-notepad-2023-12-12-00-44-05.png) The text should now turn blue, right click anywhere on the text again and click on Copy [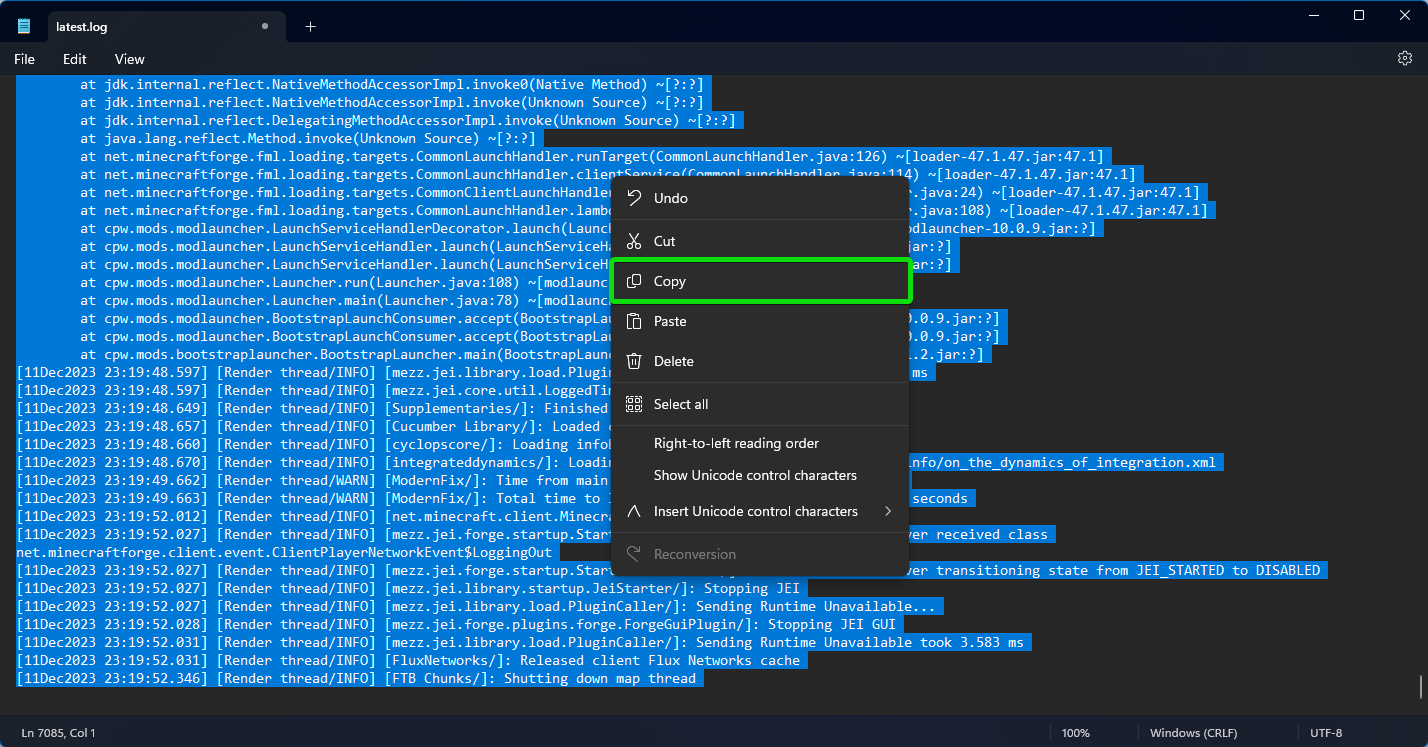](https://www.creeperhost.net/wiki/uploads/images/gallery/2023-12/qqb8xzjTnLUa8JO9-notepad-2023-12-12-00-44-27.png) This will copy the contents of the file to your clipboard, if you head over to [https://pste.ch/](https://pste.ch/) you can then right click and paste the contents there, click on the save button in the top right, then copy the URL and reply to the support ticket with the URL # Commands Minecraft commands are essential tools that allow players to modify their game experience, from simple actions like teleporting and changing the time of day to more complex operations such as spawning items, controlling mobs, and managing entire servers. In this section, we provide a comprehensive guide to Minecraft commands, covering their syntax, usage, and practical examples for both beginners and advanced players. Whether you're looking to enhance your single-player experience or streamline server management, mastering these commands will significantly elevate your gameplay. # Kill Command in Minecraft Java Edition. The Minecraft /kill command is a powerful tool that allows players to instantly eliminate entities, including themselves, mobs, and other players, with a simple input. Whether you're managing a server, troubleshooting a game issue, or simply looking to clear out unwanted creatures quickly, the /kill command is an essential feature for many Minecraft players. In this guide, we will explore how to use the /kill command effectively, covering various syntax options, practical use cases, and important considerations to ensure you maximize its potential in your Minecraft world. **Kill the player who used the command** ``` /kill ``` **Kill a player by name** ``` /kill