Instance options
List of all instance options and explaining their functions
Export/Import Instance
Exporting Instances:
A feature in the control panel allows you to export an instance to download to your computer, in which you can restore them later on.
- Visit the Control Panel > Minecraft: Java Edition > Instance sub-menus.
- Click Export Instance and wait for it to complete, this could take a few minutes, or longer (hours) depending on the size of your installation.
- You will get a pop up in the panel with a URL to download your instance file.
- If for some reason this popup does not show, you can find the URL by going to Account > Security then you should see an entry with the commandexportInstanceif you click on that it will expand the box and show you the URL you can use to download the export.
NOTE: If you do not have enough disk space to copy your server files the export process will fail and the URL generated will produce a "404" error. We would recommend using the Files sub-menu or sFTP/SSH to remove excess backups or logs that could be 'inflating' the export size.
On rare occasion, the export files may be left on the disk after the task has completed, increasing disk use, these files are located in /home/export/ and the zip is in /home/, to remove these files, either; a) Login using your root sFTP key and delete them, or, b) Send in a ticket and support will nuke them for you!
The .instance file is a ZIP, it can be opened in any ZIP management program such as 7zip, WinRAR, WinZIP etc.
It contains a complete copy of your Minecraft installation, the world, configs, mods.
Importing Instances:
Instances on the new panel can be imported via the "Create Instance" option, this menu will popup a dialog containing the clickable "I'd like to import an instance" option. The "I'd like to import an instance" option will allow you to enter the URL to your instances .instance or CurseForge .zip file.
Legacy panel importing:
Instances can be imported to your control panel later on using the Control Panel > Minecraft > Import Instance menu if you decide to re-implement that installation of Minecraft.
Advanced note: You can also upload the .instance file via sFTP/SSH, rename it to a .zip and 'wget' via sFTP/SSH, or, use the Files sub-menu for your game to 'extract/decompress' your file.
Settings
Every Minecraft instance has its own individual settings options. The settings page contains all of the following options:
Note:
(*) options are unique to our panel functionality.
(**) options relate to MineTogether configuration.
|
OPTION: |
DESCRIPTION: | DEFAULT: |
|
Display Name (*) |
This is the name displayed for this Minecraft instance. | Name you give your instance when you create it |
| MOTD | The message of the day of your server. | A Minecraft Server |
| Allow Bedrock | Allows Bedrock players to connect - must be using Vanilla 1.16.2 or newer | False |
| Discoverability (**) | If available, would you like this server to appear on the public server listing, be invite only or entirely unlisted? Part of the MineTogether mod. | Unlisted |
| Server Port | The port of your server. Best to leave as default! | 25565 |
| Info Port | The port configured in ServerInfoProvider (If installed). | 25566 |
| Jar file to start (*) |
The jar file started by the control panel. |
Auto-Detect |
| Memory (*) | Memory to allocate to the server - usually fine on adaptive if only running one instance. | Adaptive |
| Arguments (*) | Would you prefer the java arguments to try and optimize CPU usage, or, optimize RAM usage? | Low memory usage |
| PermGen/Metaspace (*) | Permgen/Metapsace to assign. Should be Dynamic unless you are using Java 7 (default is Java 8). | Dynamic |
| Maximum Players | The maximum number of players that can be connected to the server. | 20 |
| Whitelist | Whether whitelist is enabled on the server. | false |
| Online Mode | Whether your server allows people without paid accounts. Please note - This will need to be set to 'false' to allow BungeeCord to work, as BungeeCord handles authentication. | True |
| Allow Flight |
Allow flight for hacked clients. Usually should be disabled. Note: Mod packs may have additional flight settings in mod configs for certain flight-related items. |
False |
| Enable PVP | Whether Player Vs Player is enabled. | True |
| Enable Command Block | Whether command blocks are enabled. | False |
| Announce Player Achievements | Announce in chat when a player gets a achievement in game. | True |
| Op Permission Level | The permissions that ops have by default. 1: Ops can bypass spawn protection 2: ops can use /clear, difficulty, /effect, /gamemode, /gamerule, /give and /tp - and can edit command blocks. 3: Ops can use /ban, /deop, /kick, and /op 4: Ops can use /stop. | 4 |
| Player Idle Timeout | If non-zero, players are kicked from the server if they are idle for more than that many minutes. | 0 |
| Enable Query | Whether your server has the query port enabled. Used by many server listing sites. | False |
| Query Port | Port used for server queries. | 25565 |
| Enable Rcon | Whether your server has the rcon port enabled. Used to control your server remotely. | False |
| Rcon Port | Port used for remote server control. | 25575 |
| Snooper Enabled | Sets whether the server sends snoop data regularly to Mojang. | True |
| Difficulty | The difficulty level: Easy, Normal, Hard. | Easy |
| Default Gamemode | Default set gamemode for new joining players. | Survival |
| Force Gamemode | Whether to force the default gamemode when a new player joins | False |
| View Distance |
The view distance. Recommended 1~10. Note: View distance of 7 or lower can reduce mob/animal spawns dramatically. Increasing the view distance beyond 10 is not recommended. |
10 |
| Level Name | Which world folder to load. | World |
| Level Seed | The seed used to generate the world. | |
| Level Type | The level type used to generate your world, eg: Amplified, Default, Voidworld, Biomes'O'Plenty etc. | Default |
| Generate Structures | Whether world structures (such as villages) will be generated. | True |
| Hardcord Mode | Enable hardcore mode. Please note that this is set on generation of a new world, and can not be unset! | False |
| Generator Settings | Options to pass to the world generation. Useful with super-flat worlds. Usually blank. | |
| Max World Height | Maximum build height. | 256 |
| Max World Size | Maximum possible world size in blocks, expressed as a radius. | 29999984 |
| Allow Nether | Whether the Nether can be generated and travelled to. | True |
| Spawn Monsters | Allow mob spawns: true - yes, false - no. | True |
| Spawn NPC/Villagers | Allow villagers to spawn: true - yes, false - no. | True |
| Spawn Animals | Allows animals to spawn: true - yes, false - no. | True |
| Spawn Protection | Spawn protection radius. 0 is disabled! | 16 |
For a full list of settings available in the minecraft server.properties file and their descriptions, please refer to the minecraft wiki at https://minecraft.wiki/w/Server.properties#Keys
NOTE: There are some server options not available on this menu that may be helpful.
For example: max-tick-time=(default:60000).
For heavy mod packs you may want to disable max-tick-time= by setting it's value to "-1" in the server.properties via the File Manager or sFTP/SSH, to prevent the error 'A single tick took longer than 60 seconds'.
Mod/Plugin Manager
If you are running a Bukkit-based/Modded Minecraft instance, then you will be able to use the "Plugins"/"Mods" sub-menu for your Minecraft: Java Edition instance.
NOTE: You will not be able to use the Plugins/Mods menu's if the installation does not contain the appropriate folders. These folders are generated during startup with the applicable software:
Vanilla Minecraft can not load mods or plugins.
Bukkit-based Minecraft can load plugins (Not mods).
Forge-based Minecraft can load mods (Not plugins).
Hybrid software can load mods and plugins, however, depending on which software you opt for is unsupported, depreciated and unstable. We recommend 1.10.x+ mod servers can use SpongeForge to load plugins.
-
View installed plugins/mods
All detected plugins/mods will be listed on the Plugins/Mods Manager.
You can click the buttons on the right side of the plugin or mod to disable or enable them. Disabled plugins/mods are renamed to prevent them loading with the .disabled filetype.
-
Upload plugins/mods from your PC
Drag a plugin/mod jar file into the [Upload] box at the top of the Plugins/Mods Manager. Note: If the plugin/mod is too big, it may not upload via the browser, you would need to upload it via sFTP/SSH to the corresponding plugins or mods folder for your instances directory.
-
Install plugins from Bukkit or mods from Curse:
Type the plugin/mod name into the search bar at the top of the Plugins/Mods menu, then click search. This may take a few seconds/minutes depending on the speed of the search. Once your plugin or mod has been found it will appear with a drop-down box next to it and an install button.
NOTE: Make sure to type the correct plugin/mod name, especially for modded searches, as "Exnihilo" is not the same as "Ex Nihilo", if the Bukkit/Curse website cannot display the correct results on their website, our panel will likely not be able to display an install for it either.
The drop-down box dictates which 'build' you want installing, you can select older builds via this box, the newer build should always be displayed first.
Changing Java Version
To find your instance please follow this guide: https://www.creeperhost.net/wiki/books/minecraft-java-edition/page/finding-your-instances
First, you will need to make sure that the instance you are changing the version on has been stopped (you can find out how to stop your server https://www.creeperhost.net/wiki/books/minecraft-java-edition/page/startingrestartingstopping-your-server)
If you need to change the Java version that is used to run your server you can follow the step by step guide below.
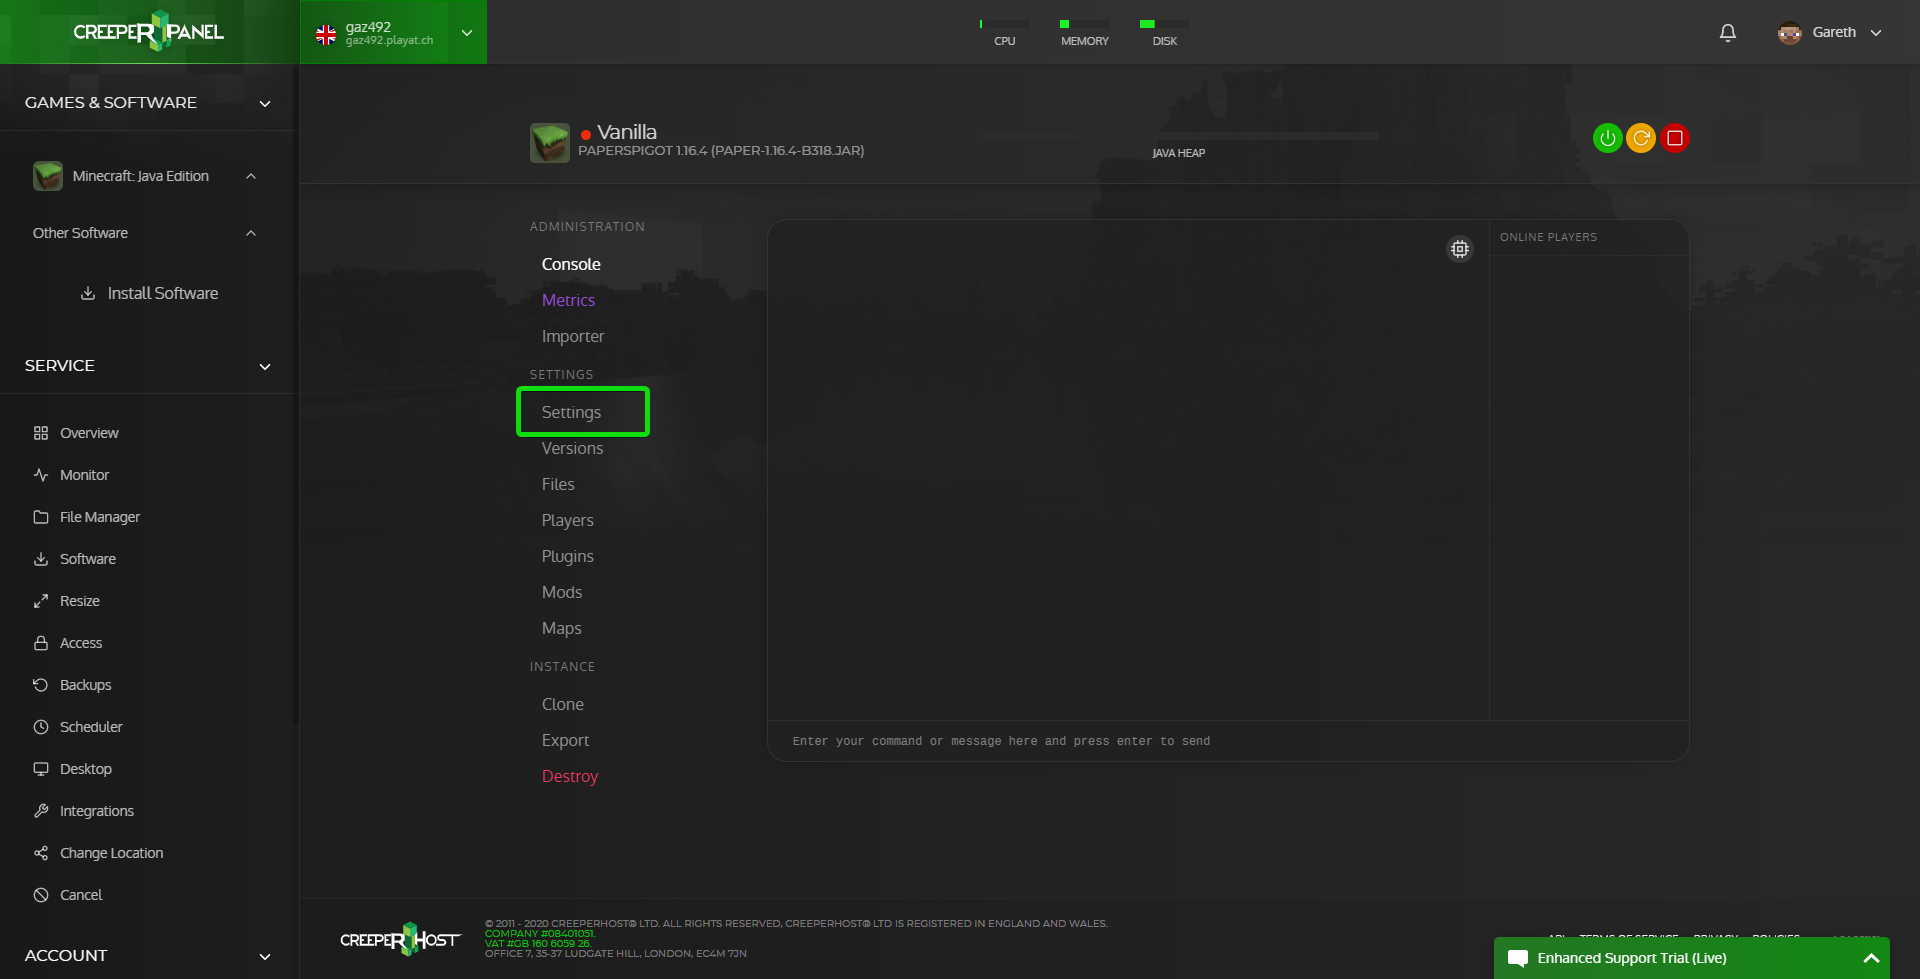
Step 1
Click on Settings as highligted in the image below
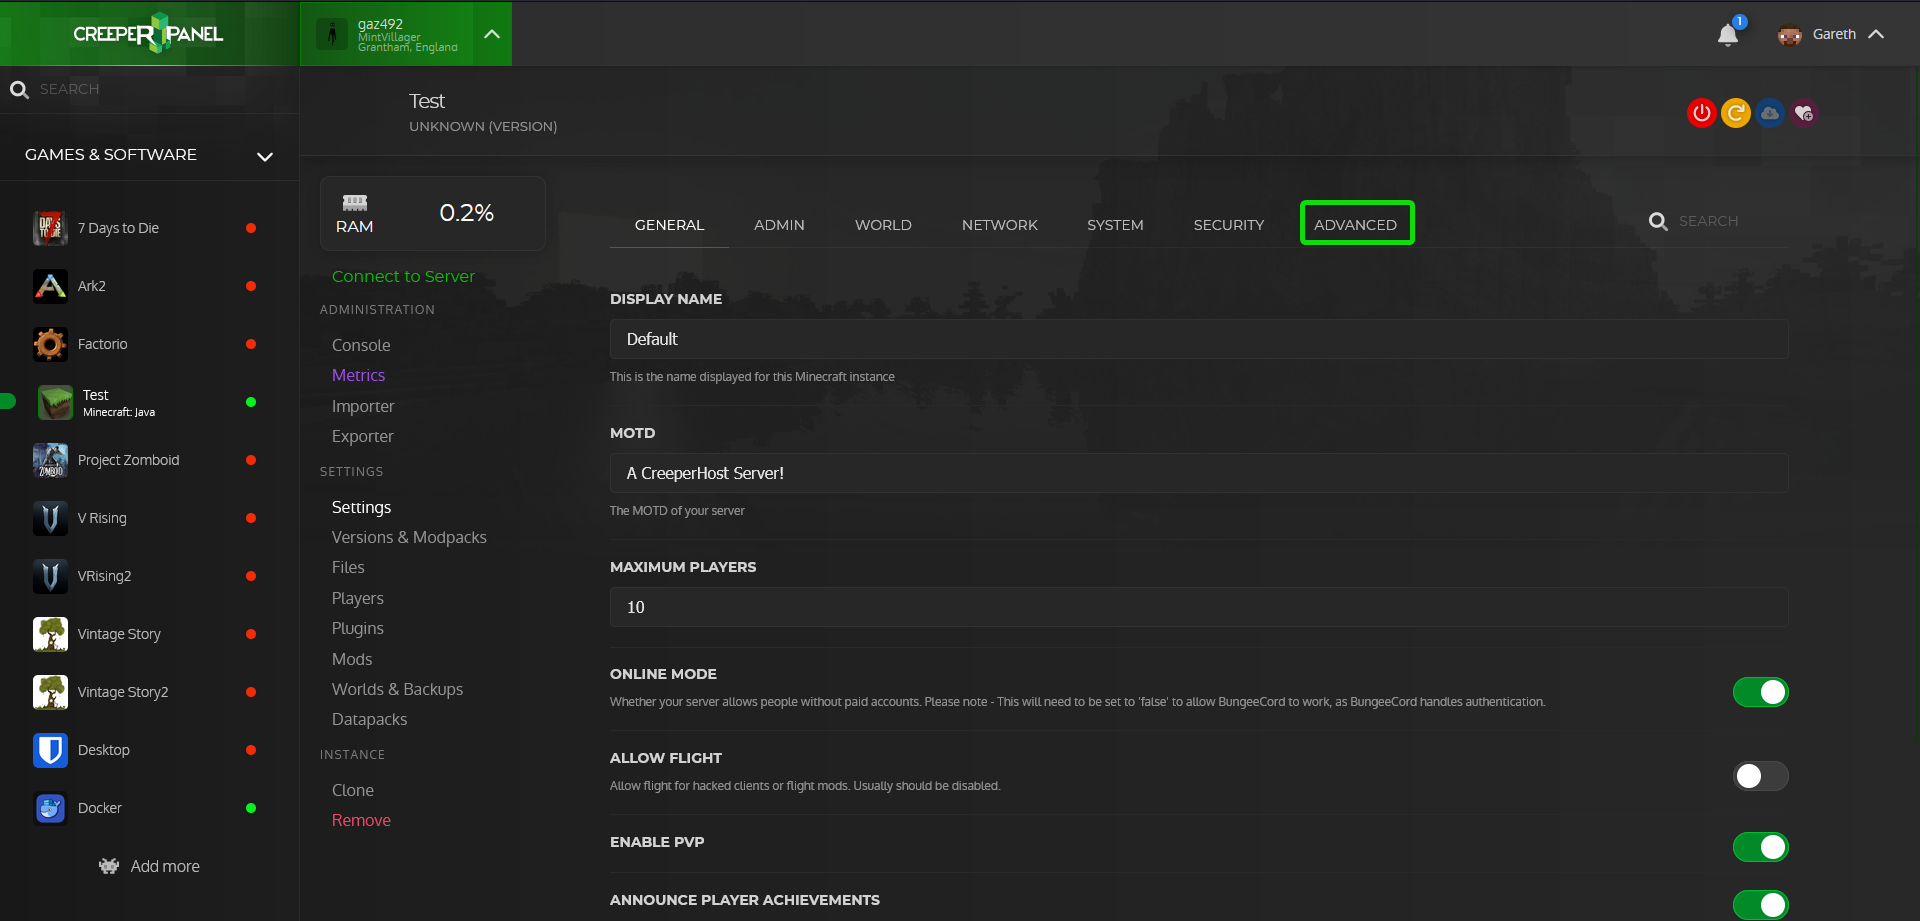
Step 2
On the settings page click on the Advanced tab
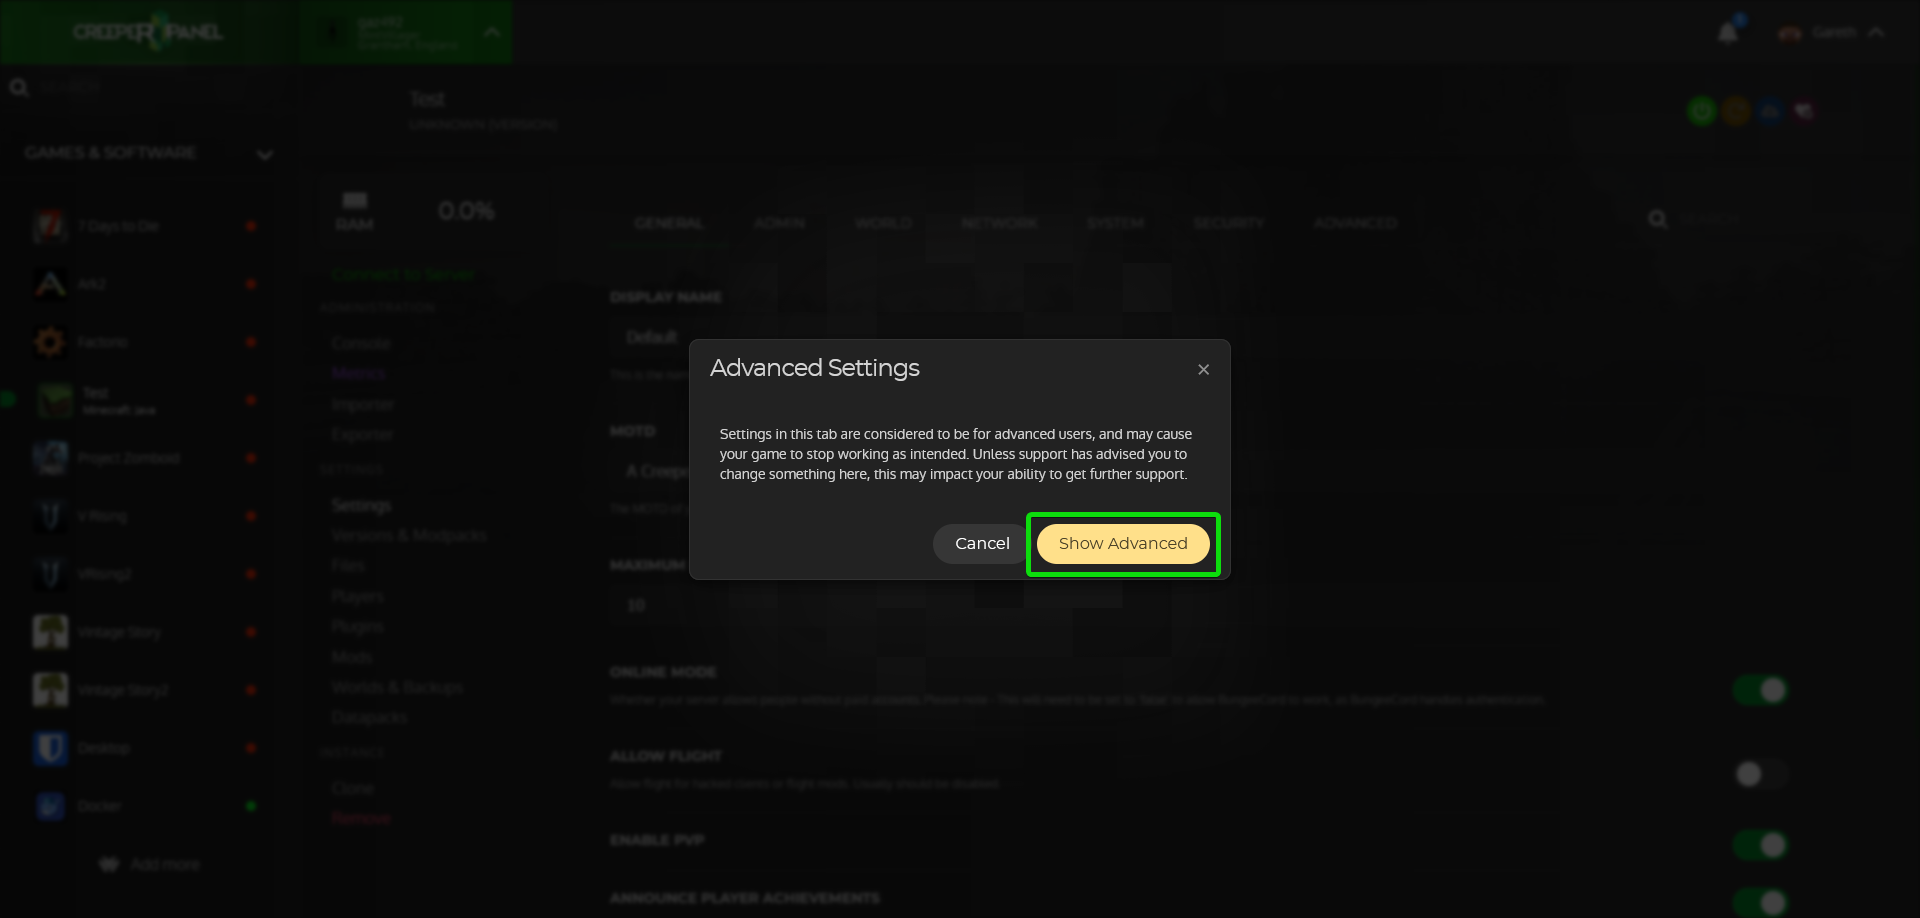
You will now be shown a warning message where you will need to click Show Advanced to continue
Step 3
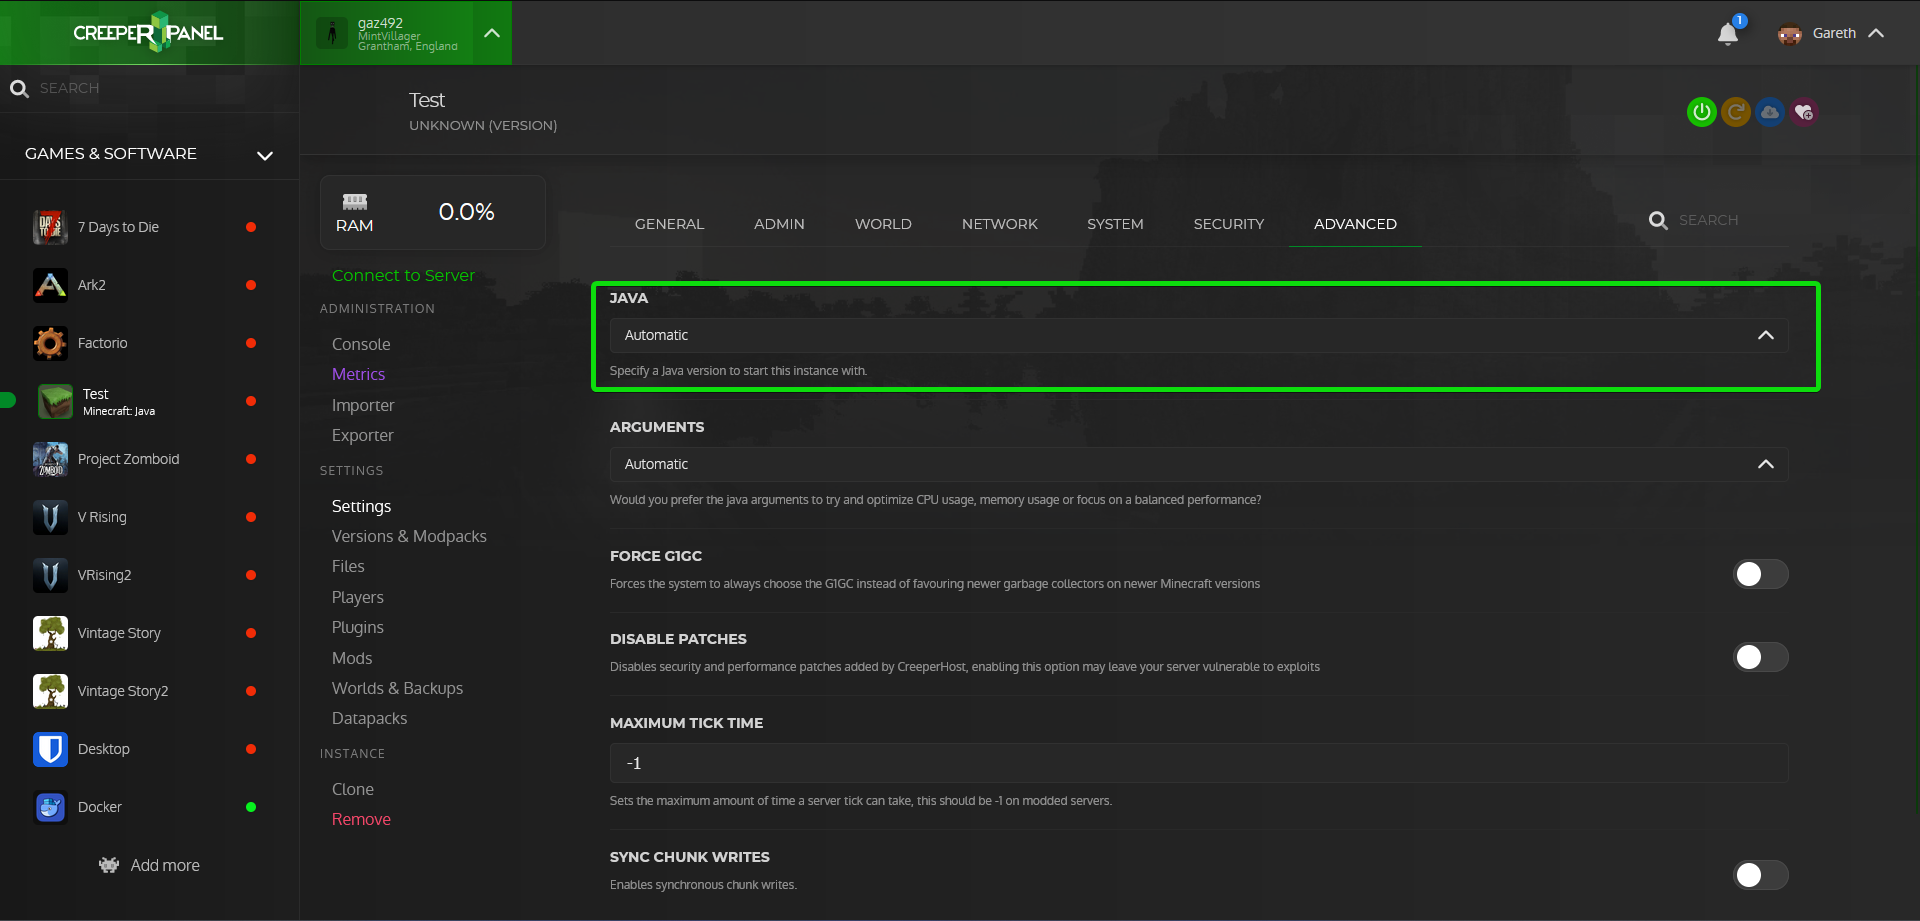
Click on the JAVA dropdown box then select the Java version you need and click save
Step 4
You can now start your server back up and it will now be using the Java version you selected in the previous step.