General Information
Information not restricted to a certain game
- File management & SSH/sFTP
- Installation Locations
- Restoring Backups
- File Manager
- Setting up SSH/sFTP
- WinSCP SFTP Guide
- CyberDuck SFTP Guide
- FileZilla sFTP Guide
- PuTTY (>=0.78) SSH Guide
- PuTTY (<=0.77) SSH Guide
- Generating your own SSH key
- Network connectivity
- Troubleshooting
- Ordering
- Cold Storage
- Fractureiser Scanner
File management & SSH/sFTP
Information about managing files and logging in via SSH/sFTP
Installation Locations
All installations are stored within the /home/minecraft/* directory within their respective folders...
Minecraft: /home/minecraft/mc-instances/* - See here for extra information on Minecraft instance identification.
CS:GO /home/minecraft/csgo/*
ARK: /home/minecraft/ark/*
...etc.
Hidden Directories
Have you ever tried to change mods list (mods-list.json) for Factorio via sFTP/File Manager, but it is not working or loading any mods? Or thought "Hey, why is my uploaded Terraria save not working?", you may be the victim of a hidden directory!
Some games will store the information in a hidden directory, on your home computer, this may be located in the %App Data%. However, most of our services run on Linux CentOS, Linux does not have a %App Data%, instead, it stores these files in hidden directories such as /home/minecraft/.local/, the full stop in the directory name makes the directory hidden by default.
Note: Never remove or edit your .ssh .pki directories, you can break your service!
Restoring Backups
If you have made a backup via the Service > Backupspage, you can restore it by:
1) Visit any Console submenu for the game software you intend to restore, ensure the server is shut down by clicking the red stop button on the right side of the page and waiting for the running indicator on the games menu to turn red.
*If the server is running, some files may not be overwritten OR may be overwritten by data in RAM when the server reboots, reverting your restoration changes.
2) Click Restore next to the backup you want to restore on the Service > Backups page.
Restoration may take a few mins depending on the size of your backup, the more data, the longer it will take.
File Manager
Navigating Around
Edit Files
If you want to edit a file(s) first find the file you want to edit then double click on it, it will then open the file in a built-in text editor if it is a supported file type, if the panel does not recognise the file type of the file you are trying to edit it will ask if you want to download the file.
Uploading Files
To upload files to your server you can drag the file from your desktop then drop it on the file manager and it should upload the file for you.
Extracting/Compressing Files
If you have uploaded a compressed file or there is a compressed file you would like to extract on your server you can right-click the file then select Extract from the menu to extract the file.
You can also compress files by right-clicking on the file/folder and selecting compress from the menu. This will then generate a compressed zip of the files/folders you selected.
Setting up SSH/sFTP
If you are looking to manage your server using SSH or want to transfer files using sFTP you will need to download the SSH/sFTP key from the access page of the panel as we do not provide a password for logging in via these methods.
Using an SSH/sFTP key increases the security of your service as it requires the user connecting to the service to have a physical file on their system rather than just entering a password.
Generating/Uploading an SSH/sFTP key
-
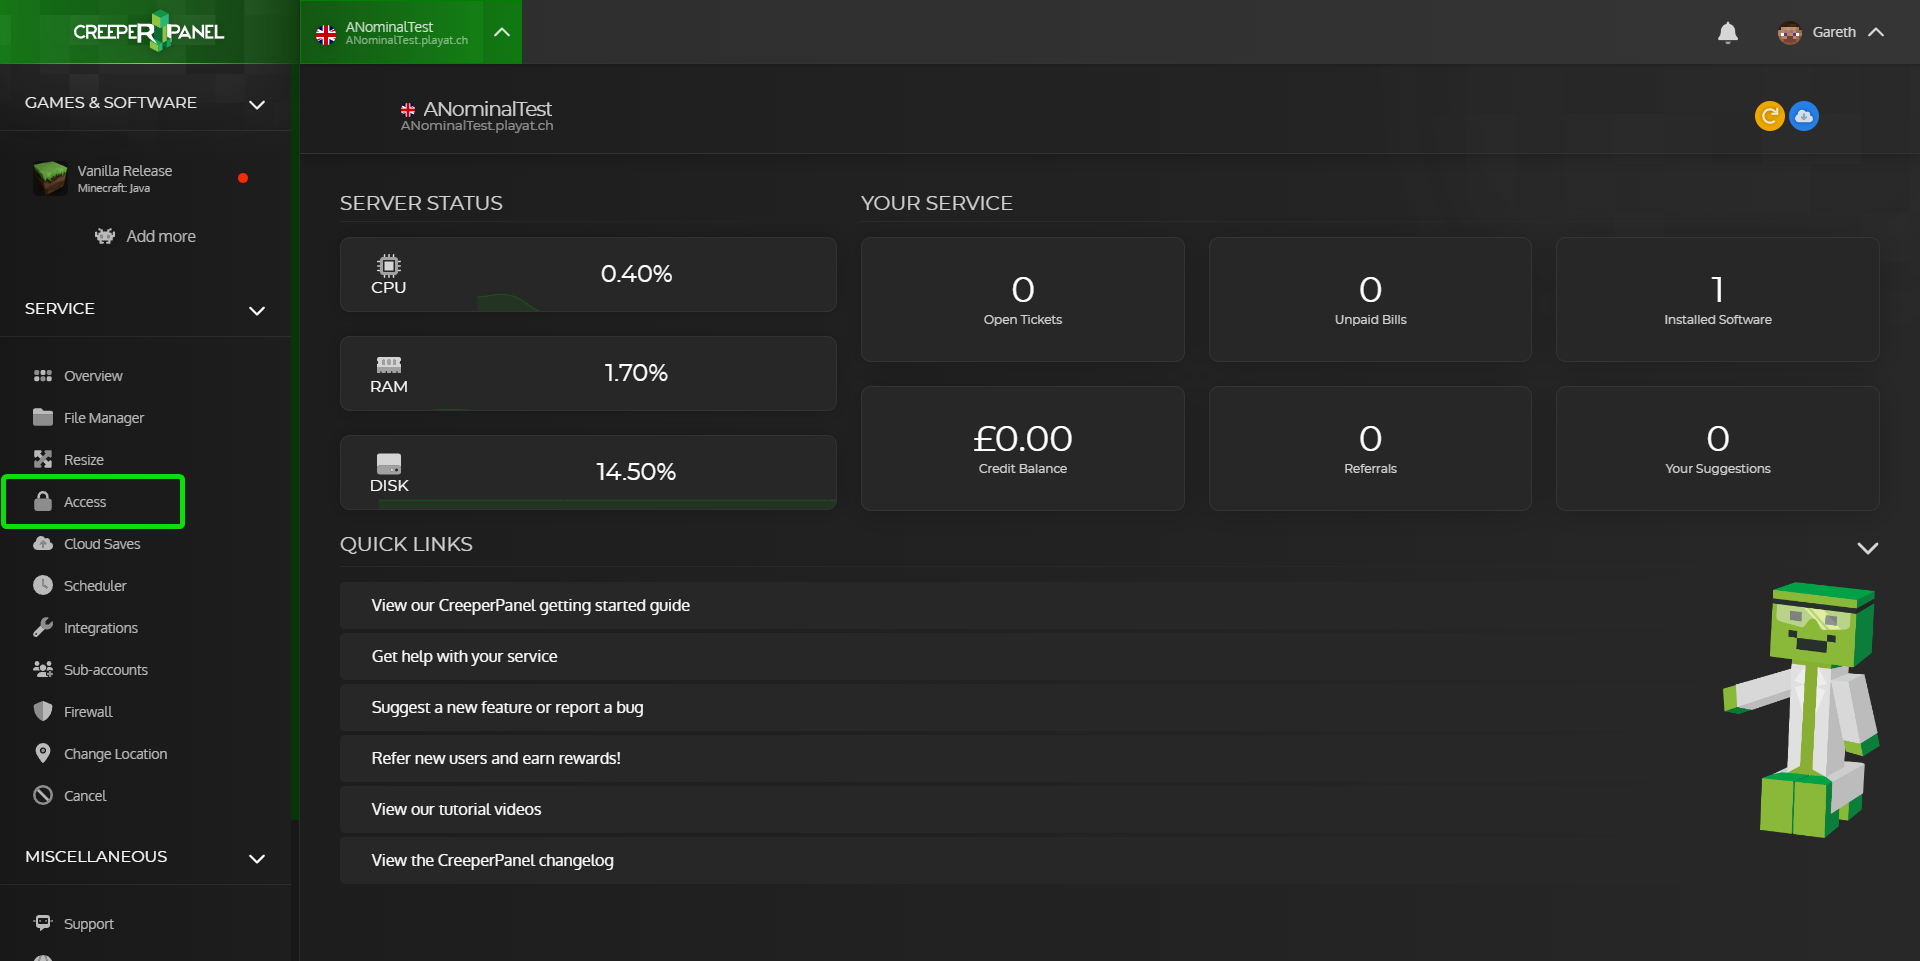
Login to the CreeperPanel then click on the Access link in the sidebar, This will take you to the Access page where you can upload your own SSH key or generate one.

-
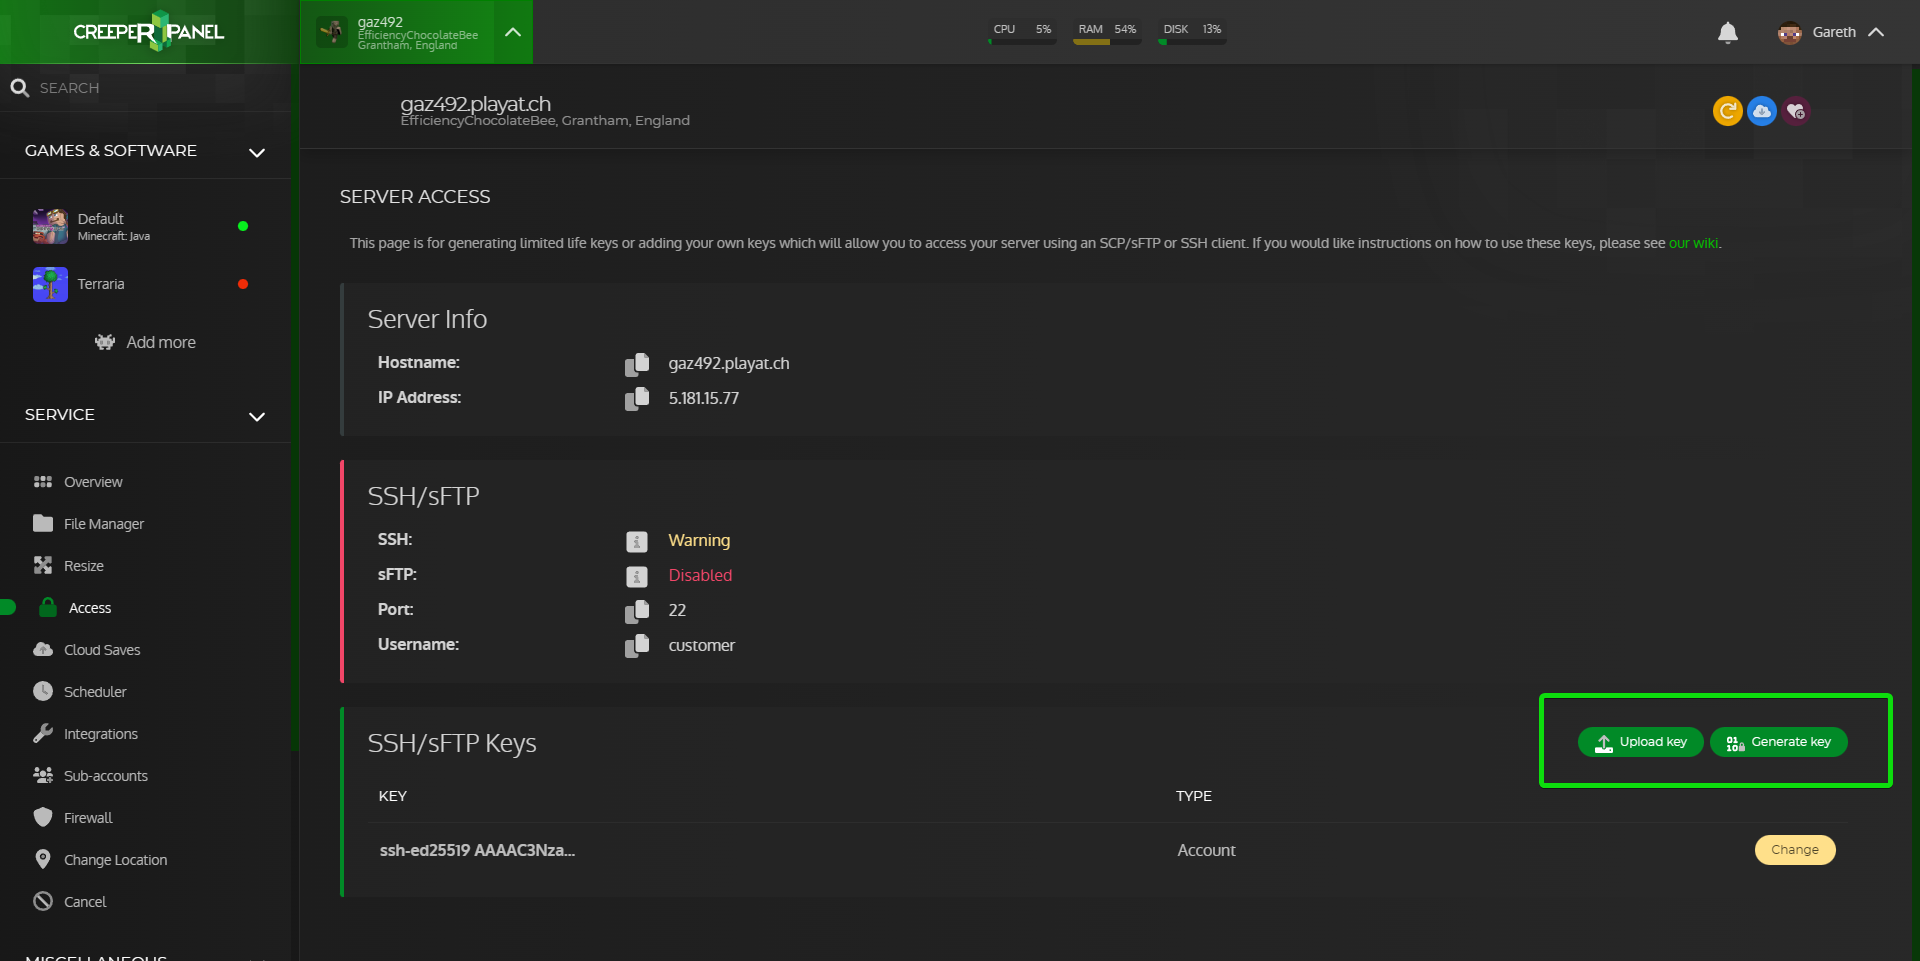
We can either click on Upload key to upload a key from your computer, or Generate key to generate a key from the panel. If you generate a key through the panel you will need to convert the key before being able to use it with Putty
This guide will go through generating our own key and uploading it to the panel.
- Please follow this guide on generating an SSH key https://www.creeperhost.net/wiki/books/general-information/page/generating-your-own-ssh-key
- Now that you have saved your keys, copy the public key that's in the box highlighted below, then go to the CreeperPanel

-
Click on the Upload key button, then paste the public key you copied into the pop-up that opens and click Upload.
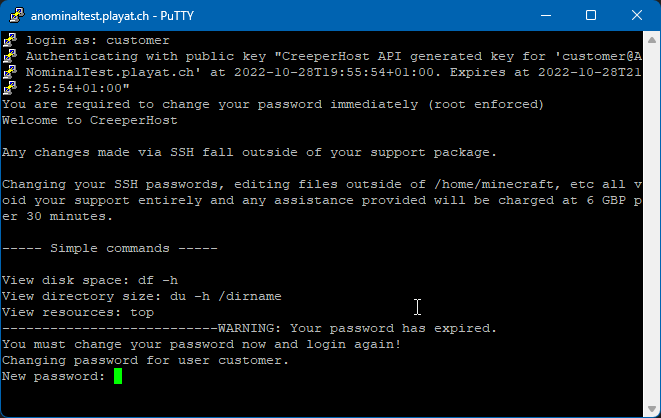
- If this is the first time connecting via SSH/sFTP you will now need to log in to your server with PuTTY to set a sudo password, if you have previously set a password you can skip to the next step.
A sudo password allows you to run commands with elevated privileges, and it's important to remember this password.
You can use the following guide to set up PuTTY then once you are connected through PuTTY you will be prompted to set the password https://www.creeperhost.net/wiki/books/general-information/page/putty-078-ssh-guide
Your password will not show up while typing it

-
You can now follow one of our guides at the following link to set up your tool of choice :
-
WinSCP: https://www.creeperhost.net/wiki/books/general-information/page/winscp-sftp-guide
-
CyberDuck: https://www.creeperhost.net/wiki/books/general-information/page/cyberduck-sftp-guide
-
FileZilla: https://www.creeperhost.net/wiki/books/general-information/page/filezilla-sftp-guide
-
PuTTY: https://www.creeperhost.net/wiki/books/general-information/page/putty-078-ssh-guide
-
WinSCP SFTP Guide
Download and install WinSCP. This is Windows only. You can do this by either going directly to the website, or downloading the archive linked below which can be run without installation.
WinSCP website: http://winscp.net/
WinSCP download (portable, non-install version): https://winscp.net/download/WinSCP-5.21.5-Portable.zip
IMPORTANT!
You will now need to download the SSH/sFTP key from the panel, a guide on finding and downloading the key can be found at https://www.creeperhost.net/wiki/books/general-information/page/how-to-sshsftp-into-your-server
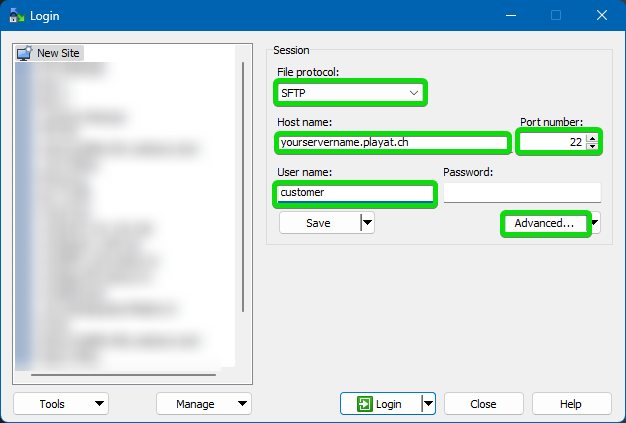
Next, open WinSCP.
Ensure the following:
- Protocol is set to "SFTP".
- The port is "22".
- Enter your server's Hostname (yourservicename.playat.ch).
- Enter in the user "customer".
Click "Advanced" under the password (leave the password blank):
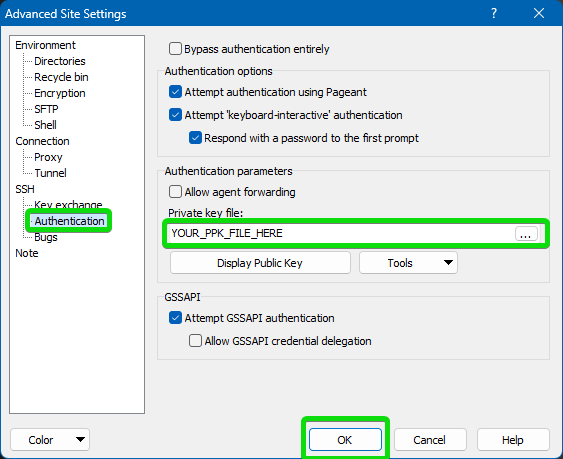
Select "Authentication" in the left menu of WinSCP., then click "..." next to "Private key file:" and select the .PPK file you downloaded from the control panel.
Click "OK" to close the settings.
Click on "Save" then click "Login".
WinSCP will now login to your server's sFTP and display your /home/customer/* directory, ready for you to drag, drop, double-click open configuration files for editing (Control+S to save edits using the in-built editor)... etc.
Note: PPK files have a limited lifespan, after approx. 90mins you will need to obtain a new one in order to login again. This lifespan can vary.
CyberDuck SFTP Guide
Firstly, download and install CyberDuck. This can be used on either Mac or Windows. You can do this by going to the CyberDuck website http://cyberduck.io
IMPORTANT!
You will now need to download the SSH/sFTP key from the panel, a guide on finding and downloading the key can be found at https://www.creeperhost.net/wiki/books/general-information/page/how-to-sshsftp-into-your-server
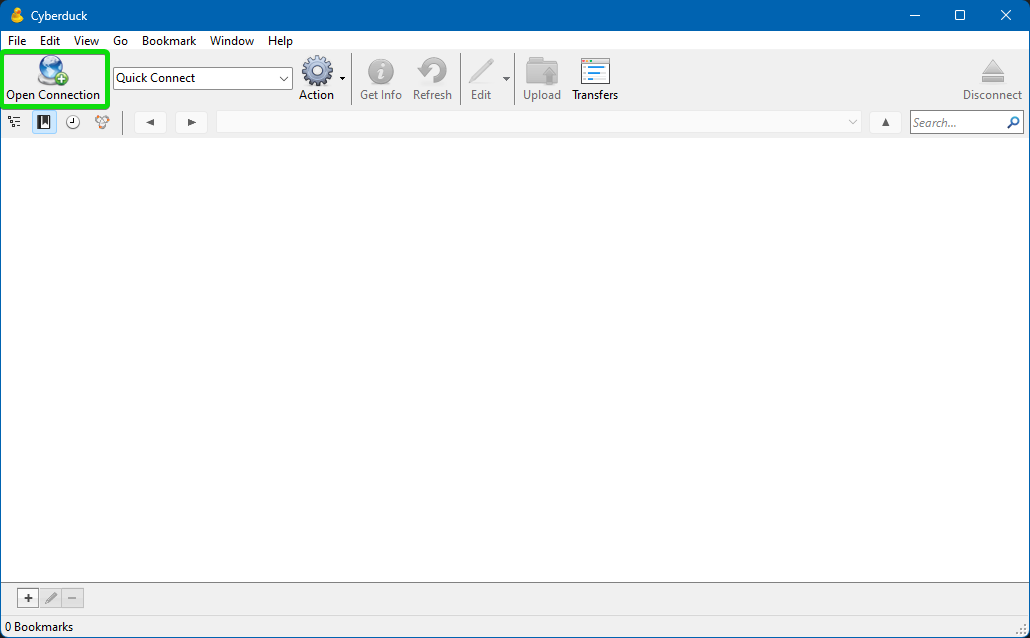
Open CyberDuck, then click "Open Connection".
Ensure the following:
- Protocol is set to "SFTP".
- The port is "22".
- Enter your server's Hostname (yourservicename.playat.ch).
- Enter the user "customer".
- Click on "Choose"
- Click on the dropdown above the open button and select "All Files (*.*)
- Navigate to where you saved the .ppk file and click on it, then click on open
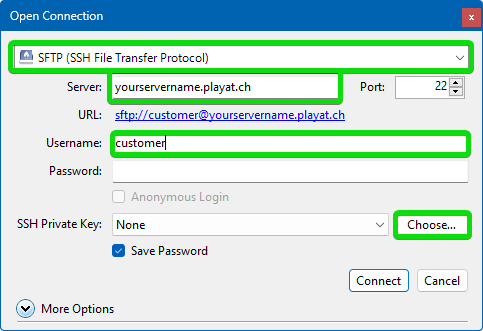
Finally, click connect - and you will be able to access the server's filesystem
Note: PPK files have a limited lifespan, after approx. 90mins you will need to obtain a new one in order to login again.
FileZilla sFTP Guide
IMPORTANT!
Before proceeding with following the guide, you will fist need to follow this guide to download or set your SSH/sFTP key.
https://www.creeperhost.net/wiki/books/general-information/page/how-to-sshsftp-into-your-server
1. Click on File > Site Manager
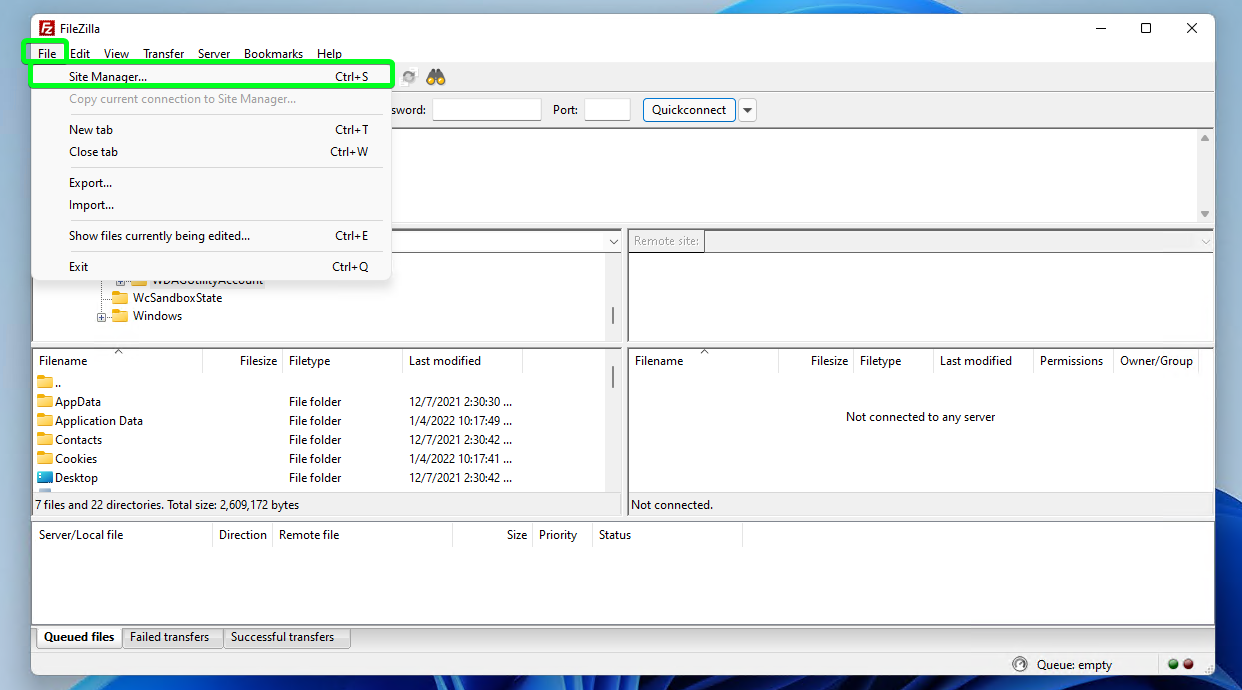
2. Click on New Site
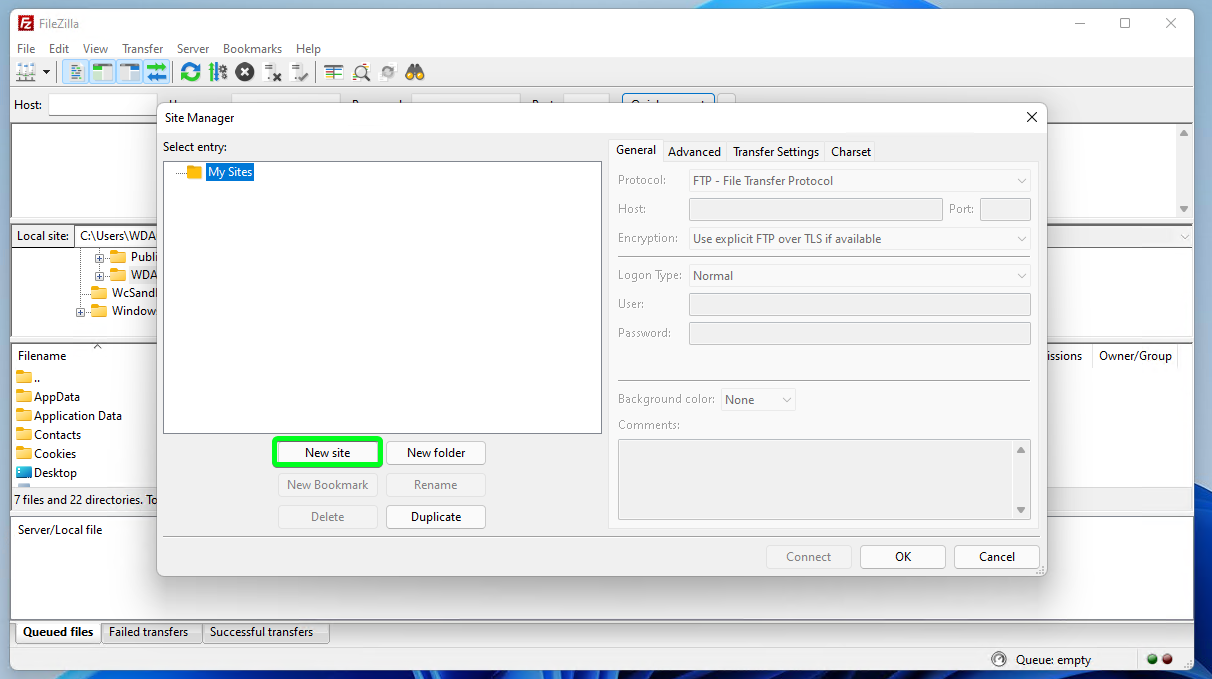
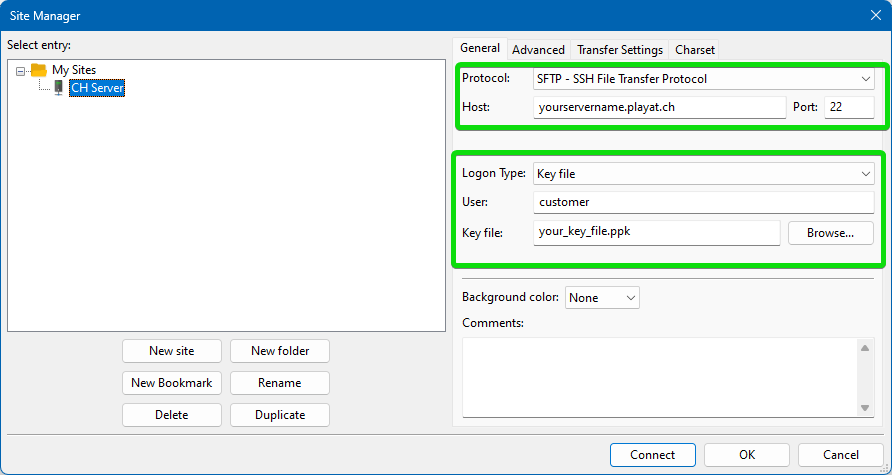
3. Give it a name then change the following options:
- Set Protocol to SFTP
- Set the host to the hostname found on the access page of the panel.
- Set Port to 22
- Change the Logon Type to Key File
- Set the User to customer
- Click on browse and select the ssh/sFTP key downloaded from the access page on the panel
4. You should now be able to click on Connect and if all goes well it will connect you to your server
PuTTY (>=0.78) SSH Guide
Putty is a piece of software that can be used to connect to your server using SSH and can be downloaded at the following link https://www.chiark.greenend.org.uk/~sgtatham/putty/latest.html
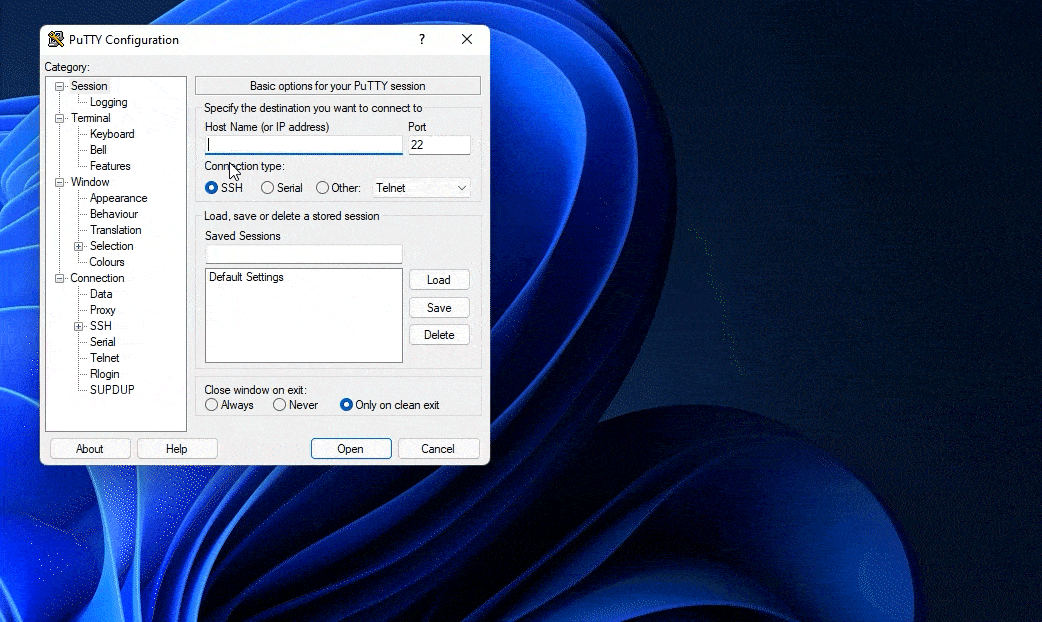
Once you have putty downloaded, open it and you will be greeted with the following screen.
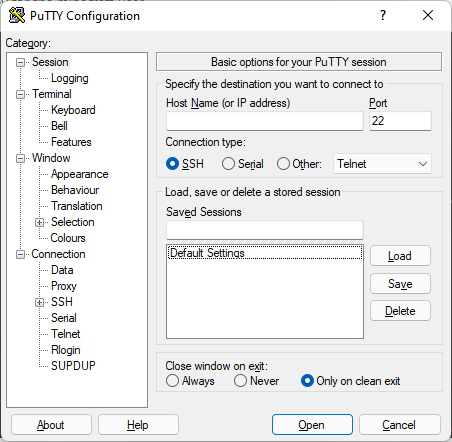
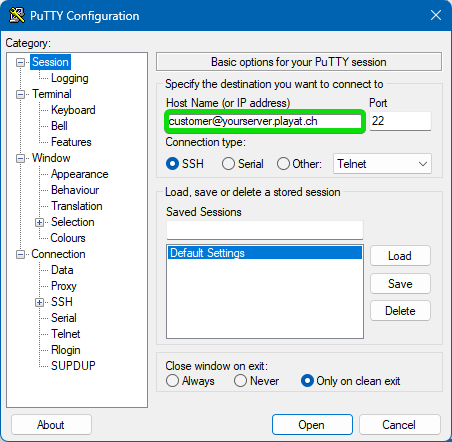
Now enter customer@YOURSERVERNAME.plyat.ch into the Host Name box
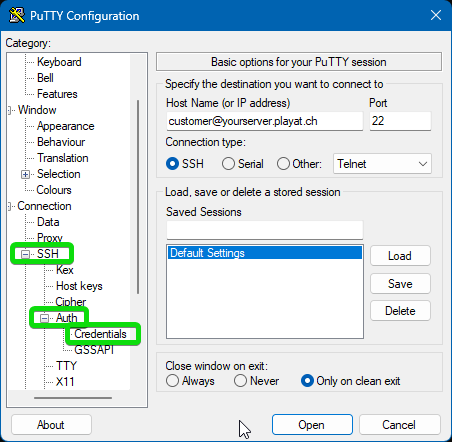
Next you will need to click on the + next to SSH and then Auth then click on Credentials
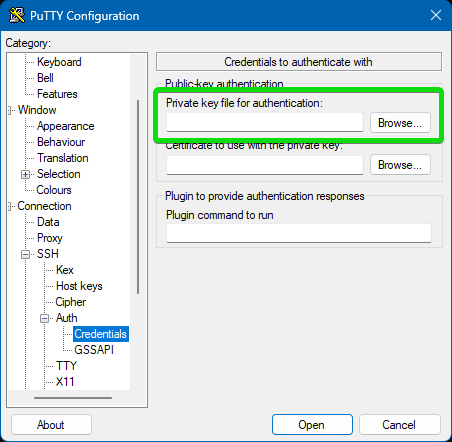
You will now be on a screen where you can select a Private key file, this is the PPK file that you generated or uploaded to the CreeperPanel, to select the file click on the Browse button then navigate and select the ppk file.
After selecting the key file, click on the Open button to connect via SSH
PuTTY (<=0.77) SSH Guide
Putty is a piece of software that can be used to connect to your server using SSH and can be downloaded at the following link https://www.chiark.greenend.org.uk/~sgtatham/putty/latest.html
Once you have putty downloaded, open it and you will be greeted with the following screen.
You will now want to enter customer@yourServerName.playat.ch in the Host Name box then click the Plus button next to SSH then click on the text Auth, you should now see a text box with a browse button next to it, click on browse then navigate to where you save the SSH/sFTP key to, select the key then click Open. Now click on Session and (optionally) Enter a name in the text box below Saved Sessions and click the save button to save the Configuration. Finally, click on open to connect to your server.
Generating your own SSH key
Windows
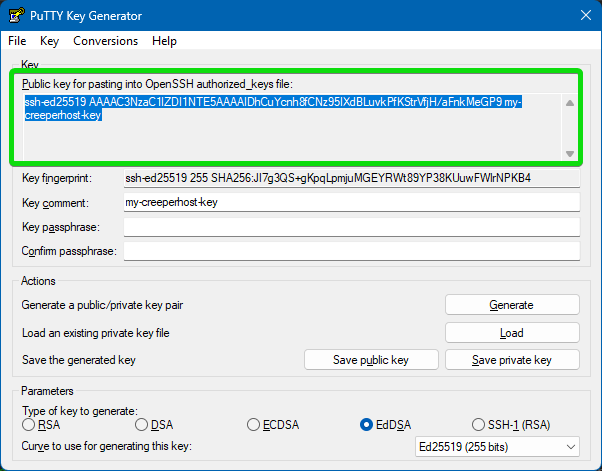
To generate an SSH key on Windows you will need to download PuttyGen from https://www.chiark.greenend.org.uk/~sgtatham/putty/latest.html
Once you have PuttyGen downloaded, open it and you should see a screen such as the one below.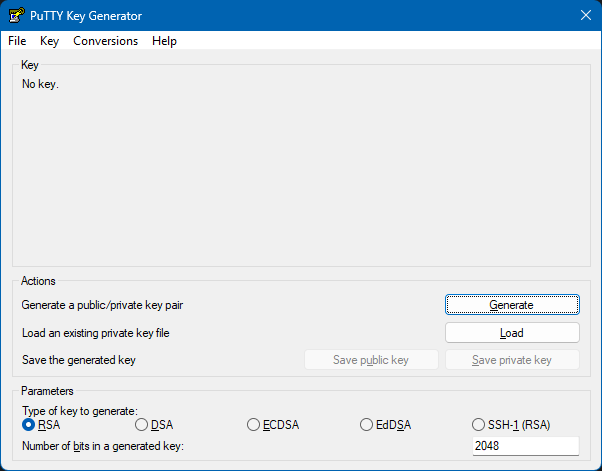
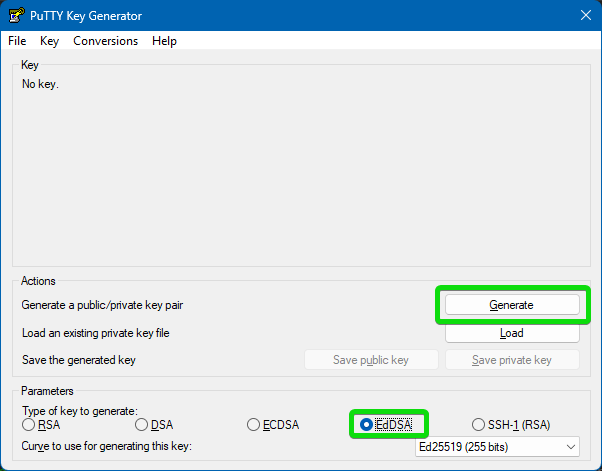
We would recommend changing the Parameters at the bottom so that EdDSA is selected, this will allow you to generate a key quickly and provide a shorter yet very secure key.
Once you have selected EdDSA click on the generate button.
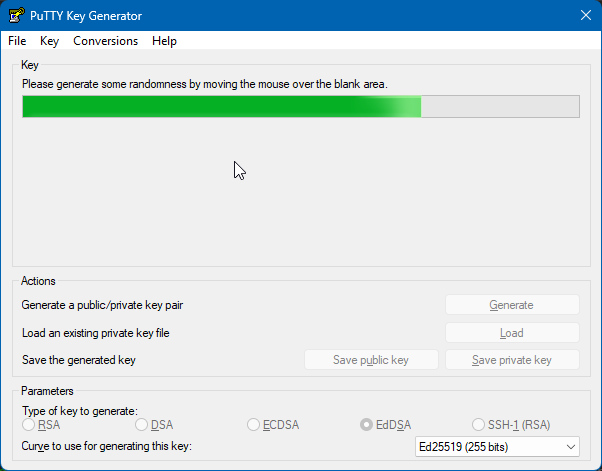
You will now need to move your mouse around in the box below the progress bar to generate your key.
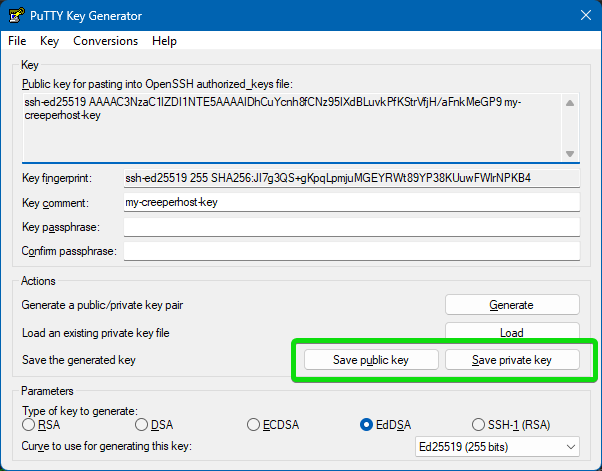
Once the key has been generated and the progress bar disappears, click on the Save public key and the Save private key and save them to a safe location on your computer, you can also set a passphrase/password on the keys if you desire.
macOS/Linux
- Open the terminal app on your operating system
- macOS
- Open Launchpad and type Terminal in the search bar at the top
- Linux
- How you open the terminal varies depending on your flavour of Linux, it also may be named console or Konsole
- Once the terminal is open, type
ssh-keygen -t ed25519 -f myCreeperHostSSHKeyand press enter.- You may be asked about entering a passphrase/password, you don't need to set a passphrase but it does increase the security of your key
- You will now have generated a key in your user directory and will need to upload the public key to your server
- To get your public key, type the following in the terminal
cat myCreeperHostSSHKey.pub - You should now see the public key be printed in the terminal, copy this, then paste it into the box on the panel.
- NEVER share your private key with anyone, as this will allow them to access your server.
Network connectivity
General information about network connectivity and how to test it
Testing connectivity (MTR)
In order to see what might be affecting your connection to the server, we need to run something named "my trace route" in order to find out exactly where the connection has dropped. This will test the connection all the way from your computer to the server.
Windows - WinMTR
- Download WinMTR from sourceforge.net/projects/winmtr/
- Right click WinMTR and 'Run as Administrator' - Ensure you allow this program through any firewalls/anti-virus programs to access the internet.
Note - you may need to disable Windows Firewall entirely
- Enter your server's IP address or hostname into the 'Host' box and click 'Start'.
- Allow this to send approx. 1000 packets for a thorough testing, then click 'Stop'.
- Press the 'Export as TXT' button, save this to desktop or somewhere you can find it on your computer.
- Open the TXT file you have created and copy the results to https://pste.ch and create a URL to the log.
- Provide the paste.creeperhost.net URL to support.
Mac
- Install Homebrew, you can find instructions here: https://brew.sh
- Open a terminal (Using the search function found in the top right hand corner)
- Run
brew install mtr- this will install the mtr software. - Enter the following command
sudo mtr -rwc 100 PlaceYourIPHere(You may be asked to enter your password for your Mac. This is normal.) This will complete in approximately 100 seconds. - You will then want to copy and paste the results onto https://pste.ch or screenshot it and provide it to support.
*nix
- Run this command (preferably as root) from a terminal:
mtr -rwc 100 PlaceYourIPHereIf this is not found, use your distributions package manager, such as yum, apt-get or dnf, in order to install it.
- You will then want to copy and paste the results onto https://pste.ch or screenshot it and provide it to support.
Connection failures
If you are unable to connect to your server:
First, check your server logs! If the game software is noting your connection attempt it is likely your game software itself is rejecting the connection. The server logs should go into detail on why you cannot connect (Mods mismatching, version mismatching, failures to load maps etc).
NOTE: Across most games you must be running the same version+build client-side as you do on the server. Steam games are known not to print any 'useful' errors when version mismatching occurs. You can contact support for further assistance if you do not understand the errors etc.
Try using the numerical IP from the Server > Overview > Access menu (Old Panel: Virtual Server > sFTP/SSH Access). Note: If you are able to connect with the numerical IP, but not your hostname... Make sure your DNS is flushed, or, change your DNS server (1.1.1.1, openDNS, GoogleDNS etc, there are many available online) to ensure your computer is retrieving up to date DNS records.
Visit the Virtual Server > Power Controls page and run a system update (this will check all the firewalls are working as intended and if not, should kick them into proper order!). Note: Public port checkers will fail if the software on the server is not designed to respond properly.
Make sure your game software is started to competition and awaiting player connections.
Troubleshooting
Panel not responding
Just purchased a server or logged in and noticed there are 'tons' of new menus on the left that you did not expect to see? Who installed all this software, where did it come from!?
Does it look a bit like this?
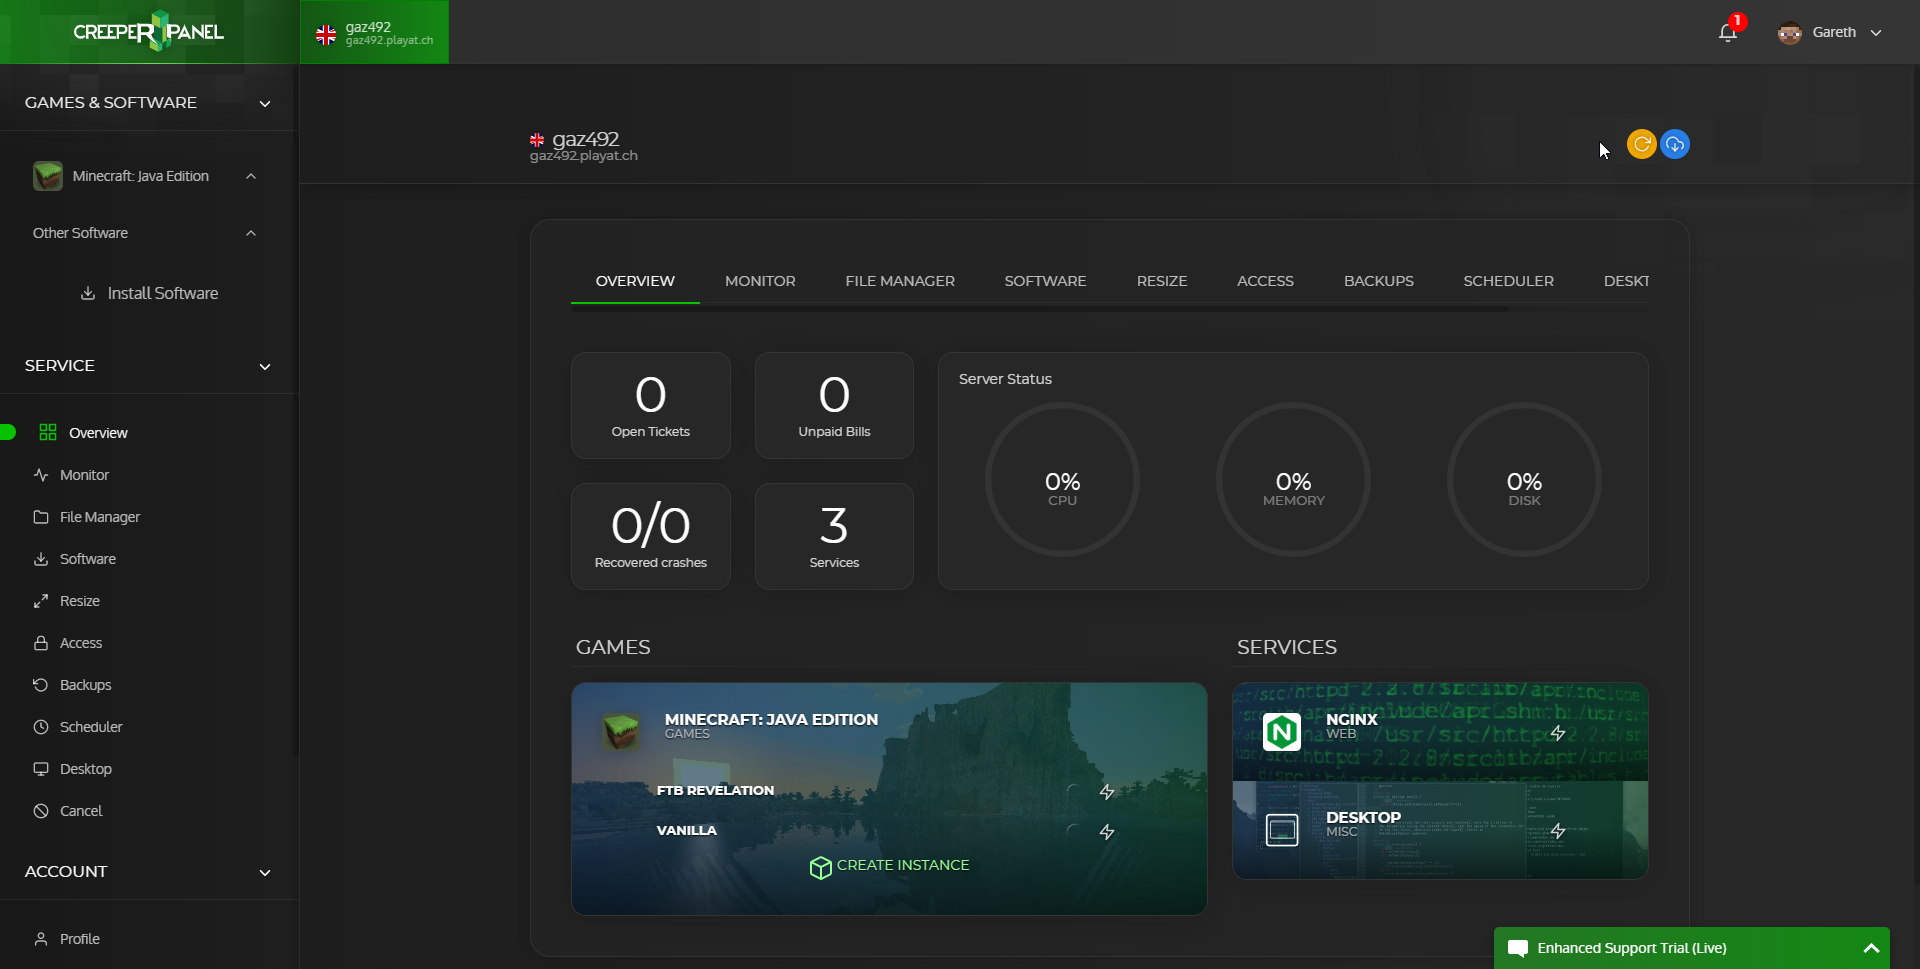
Or the CPU/RAM/DISK bars are blank?
Don't panic!
Your service may be down, or, the panel is unable to contact your service.
When this happens the the CPU/RAM/DISK bars will be blank, and, as the panel is unable to determine what software is installed, it will display every game menu possible; None of these menu's will work. What you are seeing is the panel in a 'Hey, I can't talk to your service' state.
If you are a new customer check your email inbox for an email called "Problem Creating Your Server", we send these out automatically if your service cannot be installed due to location issues. It contains a URL to change the install location and get you online faster.
You can also use the support menu on our main website for further inquiries into the state of your service.
If your service has only recently started this behavior, contact us via the support menu on our main website.
Settings Errors
Error Unable to find existing config
This error is not critical. This is a warning; When you've first installed the game you may not have a main configuration file for the game, some games only generate this file when started for the first time. Once you press save at the bottom of your "Settings" submenu for your game instance, you will see a 'Success, saved config file.' and the warning will go away.
Save Failed:
This error appears when there is an issue on the config file, an invalid name, file permissions issue etc. If you are unable to resolve this error, do not hesitate to contact support via your "Support" menu.
Generating a HAR file for troubleshooting
To troubleshoot issues such as logging into the panel or issues with the panel not responding correctly, a customer service team member may request that you record a HAR file, or a log of network requests, while that issue is occurring and then provide that to them for further analysis.
HAR files contain sensitive data, including content of the pages you downloaded while recording and your cookies. This allows anyone with the HAR file to impersonate your account and all the information that you submitted while recording (personal details, passwords, etc.).
Please make sure to clear any previous request by clicking on a button that looks like ![]() or
or ![]() before recording your network requests for us.
before recording your network requests for us.
Chrome
- Open Google Chrome and go to the page where the issue is occurring.
- Look for the Vertical ellipsis button (
 ) and select More Tools > Developer Tools.
- From the panel opened, select the Network tab.
- Look for a round Record button (
 ) in the upper left corner of the tab, and make sure it is red. If it is grey, click it once to start recording.
 - Check the box Preserve log.
- Click the Clear button (
 ) to clear out any existing logs from the Network tab.
 - Reproduce the issue that you were experiencing before, while the network requests are being recorded.
- Once you have reproduced the issue, in Chrome, click Download. Then save the file to your computer: Save as HAR with Content
- Upload your HAR file to your ticket or attach it to your email so that our Support team can analyze it.
Firefox
- Open Firefox and go to the page where you are experiencing trouble.
- Select the Firefox menu (three horizontal parallel lines) at the top-right of your browser window, then select Web Developer > Network.
- The Developer Network Tools opens as a docked panel at the side or bottom of Firefox. Click the Network tab.
- The recording autostarts when you start performing actions in the browser.
- Once you have reproduced the issue and you see that all of the actions have been generated in the Developer Network Panel (should just take a few seconds), right-click anywhere under the File column, and click on Save all as Har.
- Save the HAR file somewhere convenient.
- Upload your HAR file to your ticket or attach it to your email so that we may analyze it.
Ordering
Information needed when wanting to order a service
Service Name
One of the most important choice you will make when ordering a service is your service name. The name you pick will be final as once a service has been created with that name, to change it, your service will need to be re-created from scratch. Sadly not all names are available. We do have a lot of services running at any given time, so there can often be a service already running with your name sadly.
Another important reason why chosing your service name is so important is it will determine your server hostname.
You can connect using your numerical IP (Note: Your numerical IP can be found on the "Service" > "Access" menu), eg: 111.111.111.111, OR, you can connect with your service_name.playat.ch hostname.
For example, if you chose yourname as your service name, then your service IP will be yourname.playat.ch.
Your hostname can be found on the lower left side of the control panel, you can click the hostname to copy it into your computers clipboard for pasting (CTRL+V) into the game clients 'hostname/ip' box.
To connect with a purchased domain, add "play." to the start of your domain name, eg: play.myserver.com.
For more information about configuring custom domains, please visit: Third Party Nameservers
Service Location
When ordering a service, it is important to get the best connection to your service as possible. This means having as lower latency as possible.
If the service is just for yourself or for a small group of friends who all live in the same area/region, then it is best to select the location closest to you for the lowest latency.
However, if you are looking to host or manage a larger community of people spread out across a much larger area or multiple regions, then it is best to select a location more centralized for everyone.
EG: You have a large community based in the US and a small community based in the EU, then it is recommended to select a location on the east cost of the US, such as our Buffalo data centre.
Latency test:
Before you order, if you are unsure which location is best and wish to test the latency from you to one of our locations, we offer these test IP addresses which can be pinged using the ping command in the console/terminal of your computer or run using an MTR test to check the latency.
| Grantham (UK) | 217.145.238.133 |
| Bucharest (Romania) | 169.150.244.242 |
|
Dallas (US) |
149.50.223.129 |
|
Los Angeles (US) |
79.127.205.33 |
|
Buffalo (US) |
79.127.219.227 |
| Chicago (US) | 205.234.203.34 |
| Atlanta (US) | 149.88.29.129 |
| Seattle (US) | 107.174.246.66 |
| São Paulo (Brazil) | 149.102.251.225 |
| Hong Kong (Asia) | 217.145.236.2 |
| Tokyo (Asia) |
149.50.210.105 |
| Sydney (Australia) | 121.127.47.51 |
Changing payment method
1. To change the payment method used to pay for your service, open the invoice for your service from either the panel or the link sent in the payment reminder email.
2. Once on the invoice page you should see something such as the image below, if you click on the dropdown that's in the payment method section, you can then select a different payment method such as PayPal or Credit & Debit card
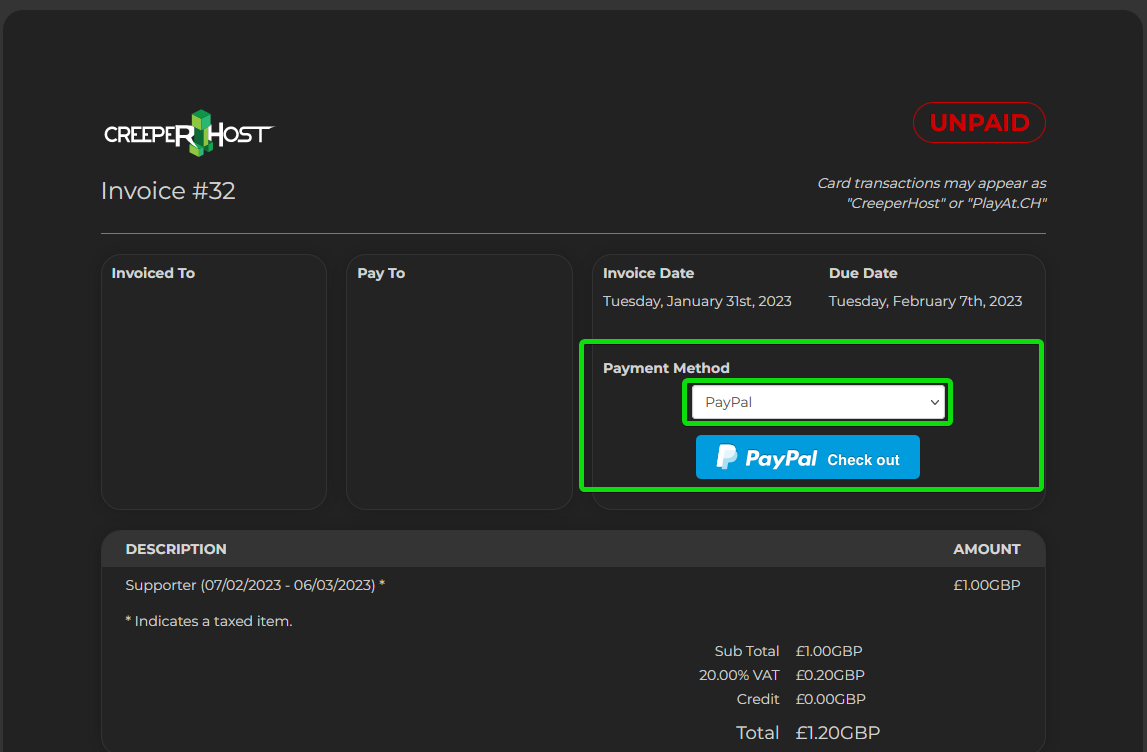
3. After selecting a different payment method, click on the pay button and this should then set the payment method as your default for any future invoices.
Cold Storage
What is Cold Storage?
Cold Storage is an option that will allow you to cancel your service and keep the data that was on your service. This will allow you to take a break from running your service and restore it at a future date.
How to enable Cold Storage?
If you want to take advantage of our cold storage feature you can do so when cancelling your service if you select the "Taking a break" option.
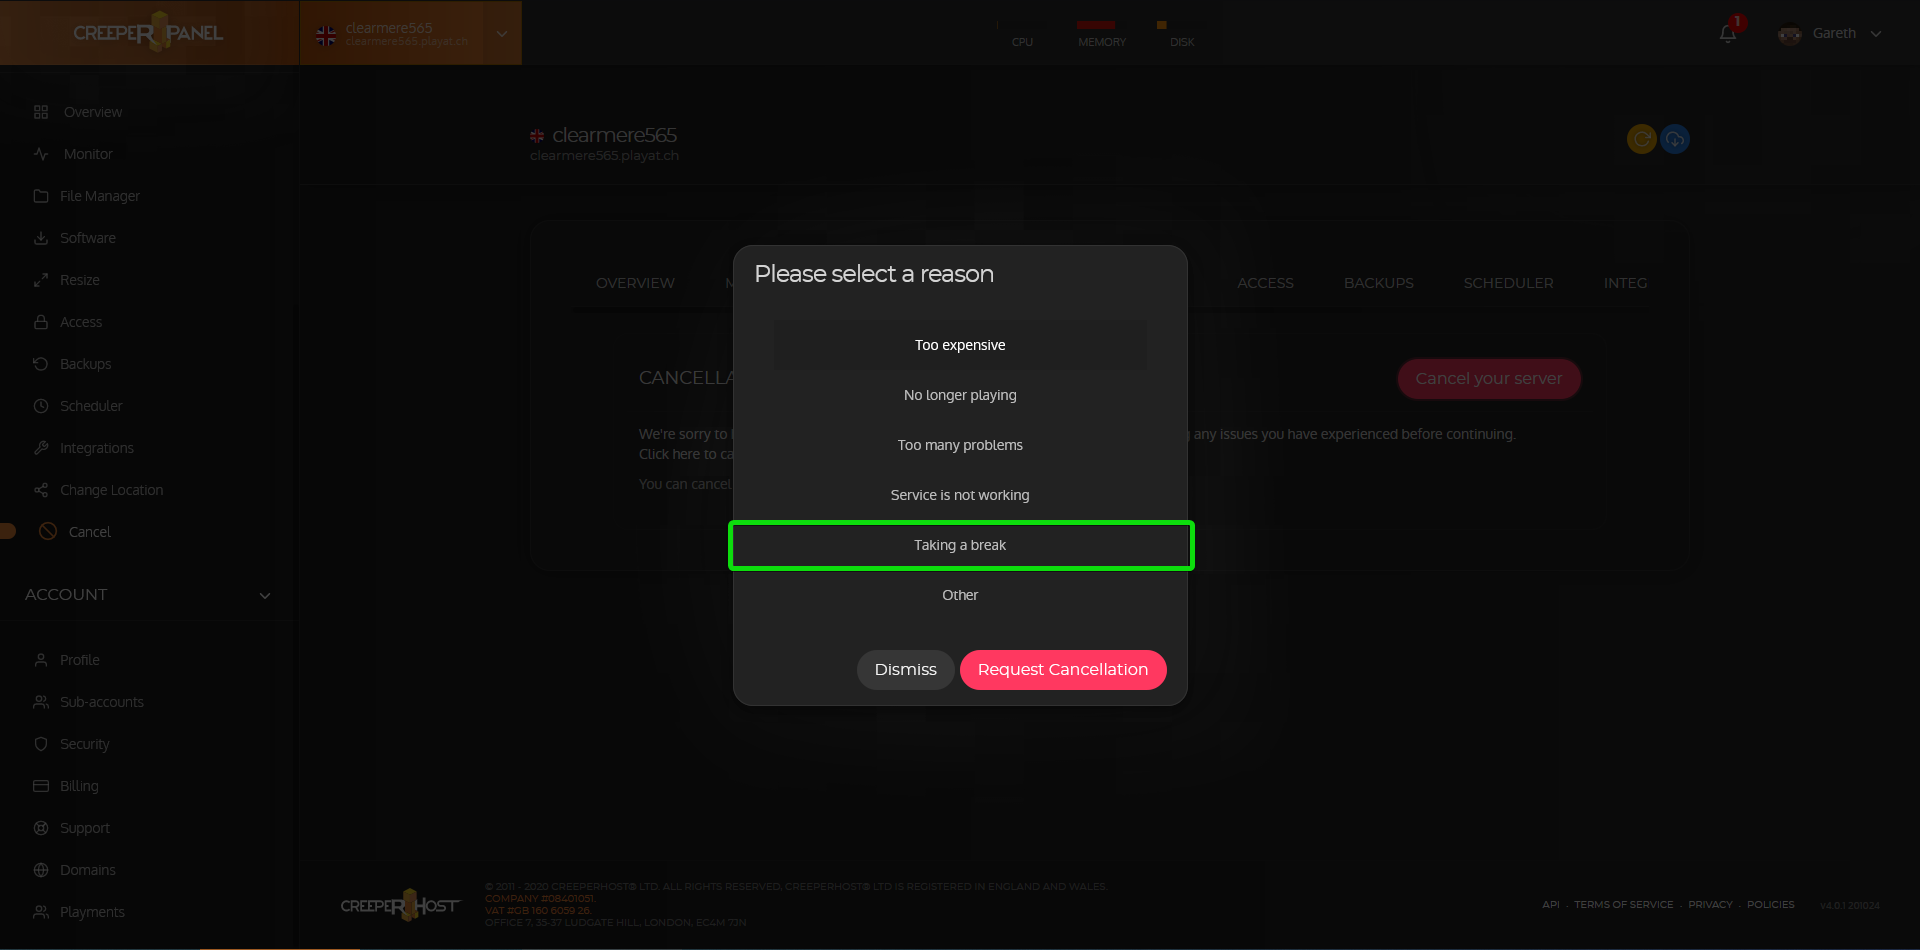
NOTE
You can get 90 days free of cold storage for your service.
You will then be charged £1.50 ex VAT per month to store your service unless cancelled.
After selecting the taking a break option you will be given an option to enable our cloud storage feature. To enable the feature simply click on the toggle button.
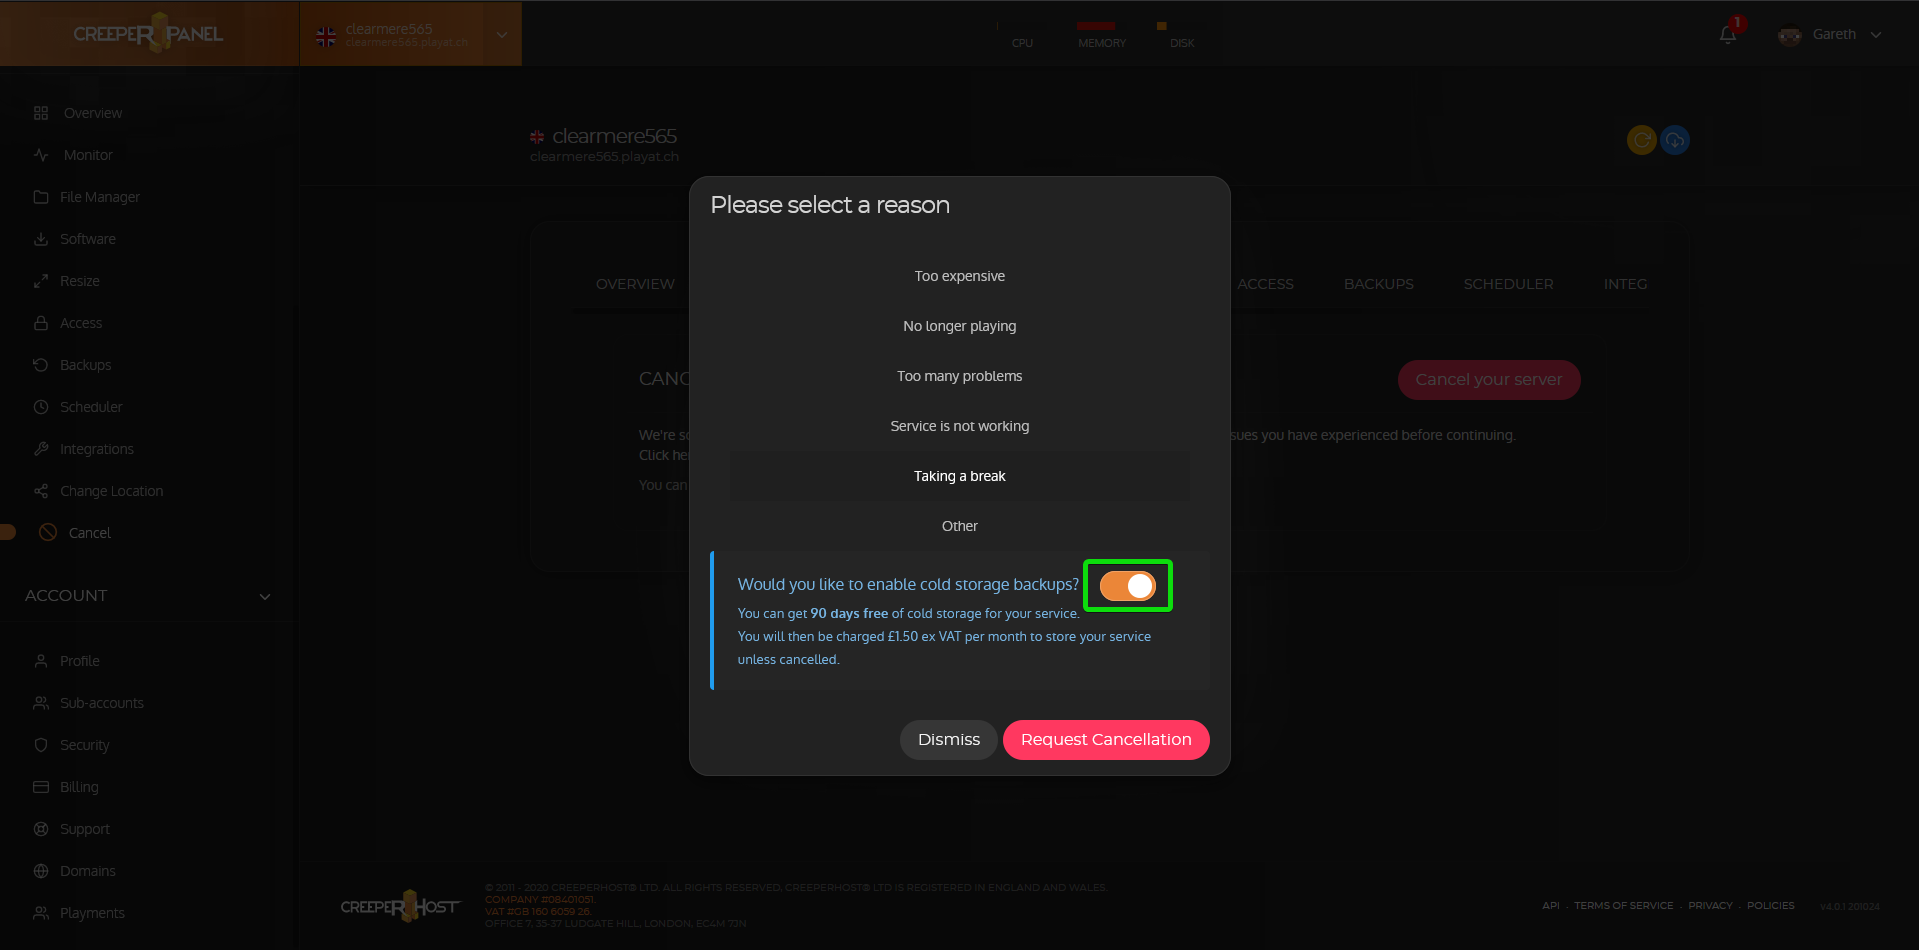
Once enabled it will create a backup of your service that will be stored, which can be used at a future time to restore your server to how you leaft it.
How to retrieve the backup
If you enabled the cloud storage option when cancelling your server you can follow the steps below to retrieve the server backup that was created.
Go to https://creeperpanel.com and login to your account.
Once logged in, click on the dropdown to the right of the CreeperPanel logo and then select restore
You should now see a list of the cold storage backups available to you and select the one you want to restore.
Fractureiser Scanner
What is Fractureiser?
Fractureiser is a piece of malware that was recently found in some popular mods/bukkit plugins that had their authors accounts compromised, the malicious versions of the mods have since been removed.
How can I check if I have been affected?
We have created a tool that works for all major operating systems to help you scan both your minecraft instances and your computer for the known traces of the malware.
You can download our tool from https://dist.creeper.host/ScanTool/
How can I run this tool?
Windows
Download the version that matches your operating system (x64 or arm64)
Windows x64: https://dist.creeper.host/ScanTool/BadShitScanner_win-x64.exe
Windows Arm64: https://dist.creeper.host/ScanTool/BadShitScanner_win-arm64.exe
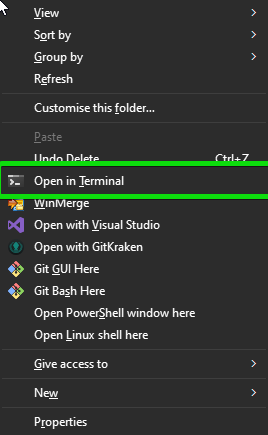
Then in the folder you downloaded it to, then hold SHIFT + Right Click in an empty part of the window and you should see a menu with several options (Windows 10 may say Open command window here).
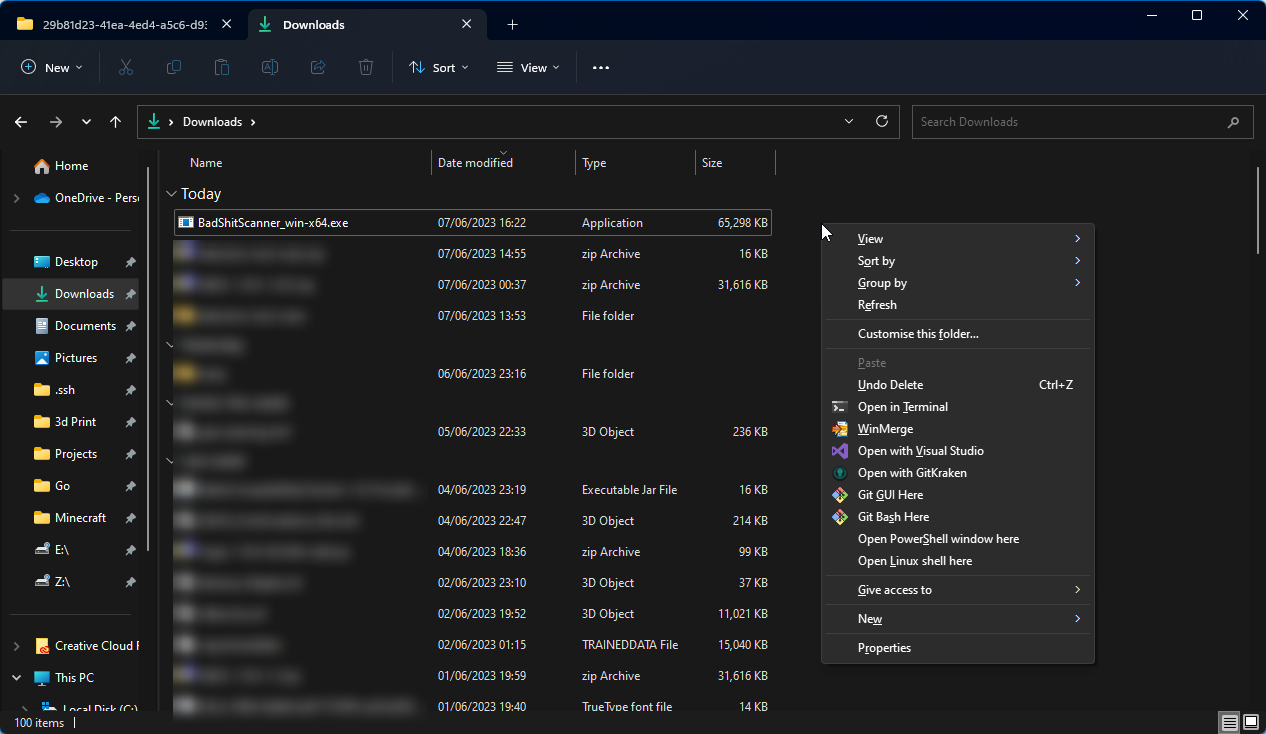
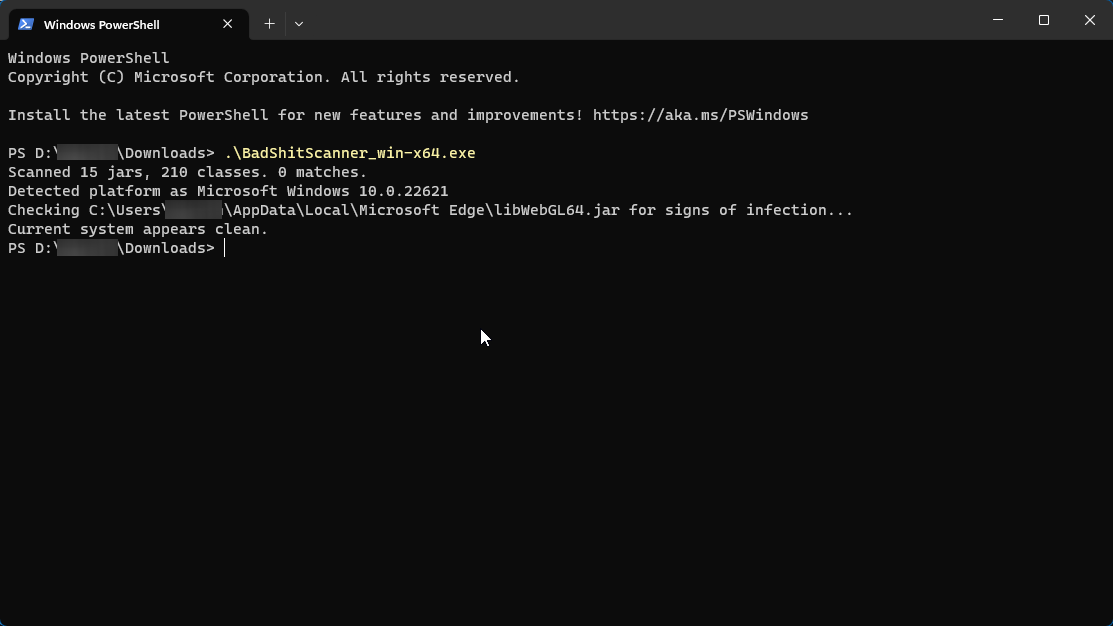
Click on Open in terminal then in the window that opens type .\BadShitScanner_win-x64.exe and press enter.
This will now scan the known locations for the malware and let you know if it found anything.
You can also type .\BadShitScanner_win-x64.exe <path to minecraft instance> (e.g .\BadShitScanner_win-x64.exe C:\Users\Admin\AppData\Local\.ftba\instances\29b81d23-41ea-4ed4-a5c6-d939613be3be) to also scan your Minecraft instance for known bad files
Linux/macOS
Download the version of the tool that is compatible with your operating system then rename the file to ./BadShitScanner
macOS (intel): https://dist.creeper.host/ScanTool/BadShitScanner_mac-x64
macOS (m1/m2/Arm): https://dist.creeper.host/ScanTool/BadShitScanner_mac-arm64
Linux (x64): https://dist.creeper.host/ScanTool/BadShitScanner_linux-x64
Linux (Arm64): https://dist.creeper.host/ScanTool/BadShitScanner_linux-arm64
Linux MUSL (x64): https://dist.creeper.host/ScanTool/BadShitScanner_linux-musl-x64
Linux MUSL (Arm64): https://dist.creeper.host/ScanTool/BadShitScanner_linux-musl-arm64
Open console/terminal then navigate to where the tool was downloaded to using cd <path to downlaoded file>
Once at the location of the tool type ./BadShitScanner
This will now scan the known locations for the malware and let you know if it found anything.
You can also type ./BadShitScanner <path to minecraft instance> (e.g ./BadShitScanner /home/minecraft/mc-instances/example) to also scan your Minecraft instance for known bad files